

Naturally I decided to build my own bar stand for the fridge and our little popcorn maker, plus add some storage space for paper plates, plastic cups, napkins, and all the things that are nice to have for these imagined “parties” we’re going to have.
Drawing inspiration from my electric fireplace (which only functions as a light anymore and hangs on the wall over the space), I wanted to make a copper-y countertop for the bar stand. I’m quite familiar with epoxy after doing 100+ square feet of it in our kitchen and powder room, so that was my idea for the artsy part of the project. But what was I going to use for the frame and base?
Enter scraps. I used the peninsula countertop I’d saved from our kitchen, a bunch of spare 2x4s salvaged from my dad’s junk pile, an old door that was randomly stored in our basement when we moved in, and spare plywood and 1x2s from other projects.

If you don’t have these random things lying around (and why would you have a spare countertop? 🤣) you could use new 2x4s, 1x2s, and 1-inch plywood sheets (or whatever thickness you need to hold the weight of whatever you’re going to set on it).
Supplies:
(As an advertising affiliate and Amazon Associate, I earn a small commission from qualifying purchases. But it doesn’t cost you anything extra and helps me keep up my site!)
- Base wood (I used my old countertop)
- 2x4s (I used five 8-footers)
- Countertop wood (I used my old door)
- 1/2 inch plywood sheet
- Wood piece for side panel (optional)
- Primed 1x2s (I used 7)
- Primer/Bonder
- Paint (I used Tricorn Black)
- Polyurethane (I used SCC Ultimate Top Coat)
- Drill and wood screws
- Brad gun and nails
- Wood putty
- Wood glue
- Epoxy and Ultimate Top Coat
- Colorants and additives (I used mica powders in turquoise, copper, bronze, and gold. I used nutmeg spray paint for the base edges, plus 91% isopropyl alcohol and gold metallic spray paint for a top layer)
- Epoxy mixing containers, stir sticks and brushes, gloves, painter’s tape, plastic sheets, kitchen torch, etc. (or whatever tools your epoxy requires)
That looks like a lot, but you use the same primer, paint, and poly for several parts. Also, you can use the epoxy and colorants for many other projects, so you get plenty of use out of everything!
Step 1: Measure and cut. Our corner space was about 2 feet deep, so all my “wide” measurements were made to fit no more than 2 ft. I decided to extend along the wall for 42 inches. Figuring out my base piece was therefore easy – 24×42 inches. I used a circular saw and jig saw and cut my old counter to that size.

For the rest of the frame, I made sure to measure how high the fridge was, how wide, and then leave plenty of space around it. I also measured that popcorn maker to be sure my shelf would be high enough to fit the popcorn maker under it on the bottom “shelf” base. If you’re going to store something specific, be sure to measure for it!
I ended up designing my frame this way: I needed 2 frames for each end and 1 frame for the middle as a support plus a way to attach my shelf. So, I needed six 2×4 pieces cut to the same length (35 inches) to work as the “legs” of the frames – 2 legs for each frame. Then I needed six 2×4 pieces (22 inches) to be the crosspieces that would connect the legs at top and middle – 2 crosspieces for each frame. Then I needed 2 longer (42 inches) 2x4s to run along the back to connect all 3 frames together. These back 2x4s would also give my 22-inch crosspieces the extra 2 inches to complete the 24 inches of my whole stand’s width.
Cutting the 2x4s was very easy…because my dad did it before bringing me the wood. 🤣 But you can easily use a miter saw or circular saw and cut yours to length.
For the countertop, I wanted it to have a little overhang in the front and on the side that wasn’t against the corner. I added 1 inch to my width and length (so 25×43 inches) and cut my door with a circular saw. REMEMBER if you use a hollow-core door like I did – only the existing edges of the door will have solid sides. The parts you cut will expose the interior braces. This is fine for a corner like mine because I put the exposed sides against the walls. I was worried that it might be too weak along those sides, but everything turned out fine.

For the shelf, I knew it needed to be at least 16 inches wide because of the popcorn maker I wanted to put under it. I gave myself an extra few inches and cut a piece of 1/2 inch plywood to be 19×24 inches – making the shelf the full depth of my stand at 24 inches.
I also cut some 1/2 inch plywood filler pieces to attach along the 2×4 crosspieces on my exposed end of the stand. These were needed so that my attached decorative pieces would have something to connect to along that space, since the crosspieces would be on the inside and not the outside of the frame. I cut these filler pieces a little shy of 4 inches wide to fit along the 2x4s, and I cut them at 14 inches long to fill the length of the space between the frame’s legs. (This will all make sense later, I promise.)

The decorative wood pieces could have been cut later, but I wanted to remember all my measurements and so cut everything at once. I used decorative 1x2s to help hold the stand together (ever so slightly), so I cut them the 35 inches of my frame’s height plus the thickness of my bottom base so that they would cover the whole height of the stand – from floor to right under the counter. To give them a cool little touch, I cut the top and bottoms at 30 degrees so they’d “indent” a bit. I used my miter saw for this to make quick and easy cuts.
I also found a leftover piece of wood that I decided to epoxy as a decorative side panel on the side of the bar. You could completely skip this and just do more 1x2s along the side. But, I LOVE the look of it and am glad I did it. This wood can be whatever width you want, then cut it to fit from the floor to the underside of your counter like the 1x2s above – 35 inches plus the bottom base’s thickness.
Sound like a lot? Fortunately, if you do all that work first, the rest goes pretty smoothly.
Your plan and dimensions obviously might be different from mine, depending on your space, height preferences, etc. You also could do another crosspiece at the very bottom if you need more structural integrity, or make your frame bigger than your base piece so the legs touch the floor rather than rest on top of the base. For me, since my bar was going in a corner, I knew it wouldn’t be bumped or moved that much.
Step 2: Paint the base. Once I had everything cut and ready, I started from the ground up. After cleaning my base piece, I used a bonding primer to give it a nice coat for the paint to stick to.

Once that was dry, I used leftover Tricor Black paint and gave it 2 coats. Once that was dry (I gave the paint overnight), I used StoneCoat Countertops Ultimate Top Coat to work like a protective polyurethane. This stuff is AMAZING and scratch-resistant despite being applied super thin, and it’s something I’ve used on my countertops all over our house. Since I knew the stand’s base was likely to have stuff shoved back and forth on it all the time, it seemed like a good option. All I did was follow the instructions on the bottle – mix at a 2:1 ratio, add a capful of water, roll on quickly in one direction, and use a dry roller to get off the excess and avoid lap lines. Bam! Done in 15 minutes.
You could use a normal poly applied in a few coats to give yourself some scratch protection. But, I like that the base has the same matte finish as the countertop, since I put the Ultimate Top Coat on the countertop too.

With the base finished, I wanted to give it as much time to fully dry as possible, so I let it sit for a day and moved on to building the frame.
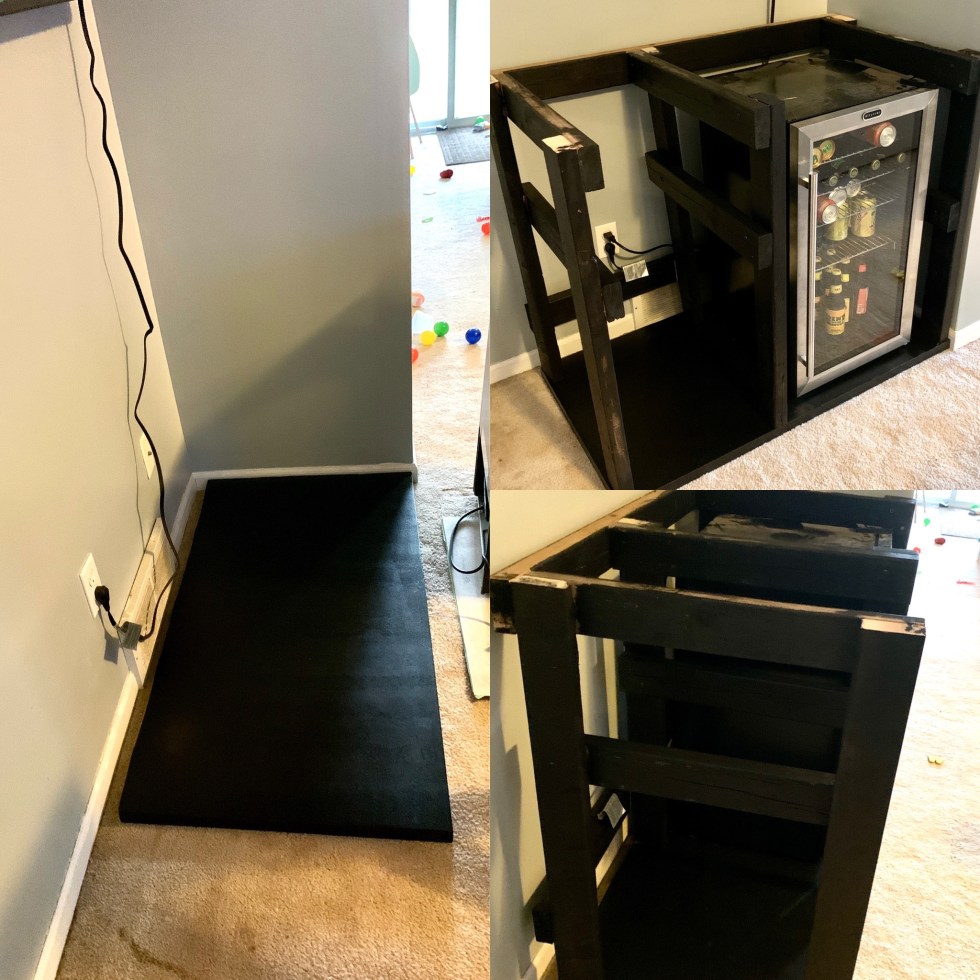
Step 3: Build the frame. Following my design plan, I set out my boards with 2 long 2x4s (35 inches) and 2 short 2x4s (22 inches) for each of the 3 main frames. With the long leg pieces flat on the floor, I put the crosspieces on top and made sure everything was even and squared up. The top crosspiece was exactly even with the tops of the leg pieces. The second crosspiece I put at a little over 19 inches from the bottom, since the popcorn maker I wanted to slide under my shelf was 19 inches.

I then pre-drilled holes and screwed the crosspieces onto the legs.

And, once assembled, I double-checked that everything was square and level.

I did this for each of the 3 frames, then stood them all on their sides and spaced them how I thought I’d want them. IMPORTANT: Make sure your crosspieces are on the inside of the stand. And for your middle frame, the crosspieces need to face whichever direction you’re placing your shelf. Also keep in mind that the side that’s up will be the back of your stand; the side on the floor will be the front.

My outside frames had to be 42 inches apart since that was the total length I wanted for the stand. For the middle frame, I measured from its lower crosspiece to the outer frame’s lower crosspiece, making sure they were a little over 19 inches apart so that the 19×22 inch shelf would fit to rest on those crosspieces. Again, make sure you remember you’re looking at the stand from the back when positioning the middle frame.
Once I was happy with the placement, I took the longest, 42-inch 2x4s and screwed them down onto the frames to act as the back braces that held it all together.

I was dumb and forgot about the air vent in the wall down behind where the stand would go. As a result, I had to move my bottom 42-inch piece up to leave room for the vent. 🤦♀️ But when the frame was finally right, I checked all over to be sure it was level and gave it a 👍

Step 4: Paint the frame, shelf, and decorative pieces. Once the frame was assembled, I painted it with the same black as the base. I only did 1 coat on the frame since it would be mostly covered up, plus I wanted it to dry faster.
While it was drying, I painted the shelf, filler pieces, and decorative 1x2s. I did 2 coats on these parts, plus I added the same Ultimate Top Coat to the shelf for added scratch resistance. (Again, you could just use a normal poly.)

Step 5: Place frame in place. The frame dried pretty quickly, but while I waited I put the base in place. Then I lifted the fridge onto the base and put it in place. When the frame was dry, I lifted it over the fridge and set it in place. (Yes, it would have been easier and smarter to put the frame in place and then the fridge, but here we are.)
I was very glad to see that everything fit! The whole frame assembled was 42×24 inches and fit great in our corner space. The 4 legs of my frames that made up the stand’s corners rested nicely on the 4 corners of the base. Everything was pretty level, but I did shim the front middle frame leg because that leg was a little short. All in all, another sigh of relief and a 👍
Step 6: Attach shelf, filler pieces, and front decorative pieces. First, I simply placed the shelf on top of the ready-and-waiting crosspieces. Then I used my brad gun and nailed a few 1 1/2 inch nails to hold the shelf in place.
Next I put my filler pieces of wood onto the exposed sides of the crosspieces so that there was now some wood flush with the outer legs. (See the exposed crosspieces on the end of the stand in the picture below.) This would let me attach the 1x2s and the side panel once that was done, making it all even. Think it looks a little funky? No worries. Because the panel and 1x2s will all be pretty close together, you won’t see these filler boards, especially with them painted the same black as the frame.
For the front 1×2 decorative pieces, I used a level and started on the outside, using my brad gun to nail on the 1x2s to hide the 2x4s of the frame. Each frame got 2 of these, and I left a little space between them for a cool look.

With those on, I quickly used wood putty in the nail holes and touched up the paint.
Note: If you aren’t going to do an epoxied side panel, you can attach the rest of your 1x2s to the side now too. If you are doing a panel, it worked best to wait for that before attaching the rest of my 1x2s so I could be sure about spacing.
Step 7: Epoxy time! This is the fun part. First, I prepped the old door and my wood side panel the same as I’d done the base – bonding primer and 2 coats of black paint. I also used wood putty to fill the hinge holes on the side of my door, but that dried quickly and I could move on.
Next, I took the door and wood piece outside and spray painted the edges lightly with nutmeg paint. This was to give the edges some color to lay under the epoxy, since epoxy thins on edges and sometimes you see the base coat of paint underneath. (Also, I didn’t sand the edges down from a 90-degree angle like I usually do on countertops. This was an experiment that worked out – I wanted to hold my design without letting the epoxy run over the edges too much, and not rounding the edges seemed to help with this.)

With my pieces dry and back inside, I used painter’s tape and wrapped the sides of my pieces to create dams that would further stop the epoxy from flowing more than I wanted.
Then I mixed my epoxy and added my colorants. (For more details on how I use epoxy, see this post that has my full rundown of my prepping process and tips. Don’t be intimidated by epoxy – it’s got a learning curve, but it’s so fun!)
To get a hammered copper with some patina look, I used mica powders in copper, bronze, gold, and turquoise. Each of these was in its own cup, mixed into my epoxy. Then I poured my colors in random swirls all over each piece.
If at first your design looks like a 2-year-old did it, never fear! It’s not until you start blending your colors and the epoxy moves itself that it starts to look cool. See these pictures? I’ve learned not to panic. 😜

With all my colors on the board, I used a kitchen torch to quickly go over the epoxy and warm it up so that it moved easier. This also gets out the bubbles! Then I used gloved fingers to tap all over the place, blending the colors and starting my “hammered copper” look. I did this over and over, creating depth and layers of color with every pass. It started to look really cool.

Over the next hour (because of the temperature in my workshop – your working time may vary), I kept going back and tapping to keep the epoxy from flattening out my patterns too much. I also torched out some bubbles that appeared, but I tried not to heat up the epoxy too much so that it didn’t flow/melt all over again. I could feel when it started setting up and getting more solid, so then I pulled off my tape dams and let the epoxy ease over the sides while also tapping the color to create my hammered effect.
Once I could tell it wasn’t going to flow anymore because it was thickening up, I used gold metallic spray paint and lightly sprayed at random over both pieces. Then I spritzed these areas with 91% isopropyl alcohol to create a really cool effect. I could have left it, but I tapped it to blend with my other colors and it created a REALLY cool, layering look that added even more depth.

Because I could feel the epoxy starting to solidify, that meant it was time to stop playing with it. I left it overnight, and the next day it was beautiful and ready for a clear coat of epoxy.
You can skip the clear coat and go right to applying the Ultimate Top Coat, but the clear coat does add a nice layer that smooths everything out and also adds a layer of protection. I should also note that usually before applying a clear coat, you’d lightly sand your color coat to help the clear coat bond to what’s already there. HOWEVER, I’d learned the hard way that, if you’ve got spray paint on the surface of your color coat, sanding creates scratches and it’s not worth it. So, I skipped sanding my pieces this time because of the gold spray that I didn’t want to screw up.
Anyway, the clear coat is easier than the color coat. I simply mixed another batch of epoxy per the instructions, poured it all on my pieces, spread it around with my glove, patted it all over with my silicone brush to even it out, and torched out the bubbles. No need to tape dam this time, so I helped the epoxy cover the edges and sides by wiping a little along the sides.

Over the next hour I kept checking and torching out bubbles, but other than that, I let it sit, again overnight.
With the clear coat dry, I used a multi tool and sanded off the dried drips on the underside of my new countertop and side panel. Then, after a quick dusting, I applied the final layer – the Ultimate Top Coat. I used the same method as I did with the base, and 15 minutes later I was done!

Step 8: Attach epoxied side panel and countertop. For the side panel, I ended up quickly cutting 2 scrap 1x2s the same length as my filler pieces from before, then I painted them. Once dry, I centered the side panel over the 1x2s and used my brad gun to attach them to the back of the side panel. (See below picture) This helped because I was nervous about screwing through the frame into the side panel from behind. It was way easier to attach the panel by nailing these connected 1x2s into the filler pieces already on the waiting crosspieces. Plus, the side panel would now be completely flush with the 1×2 front pieces that I had left to attach.

The countertop was super easy to “install.” I needed one little shim under one corner to get it level, and then I simply used wood glue along the top 2x4s of the frame to stick the counter in place.
Step 9: Add last decorative pieces. With the counter on, all that was left was to attach the final decorative 1x2s on either side of my side panel. I simply spaced them out evenly and nailed them on, used wood putty to fill in the holes, and finally touched up the paint.

Voilà! Bar stand complete! Even I am surprised by how much we use this daily. It’s a great spot to set kid snacks when they’re playing in the basement. Storing paper plates/napkins/plastic silverware right there where it’s handy has been nice too.

So now for the real question: Have we had a bonfire night with friends yet so we can use this? …No. But we’ve had out-of-town house guests twice, and it’s been nice for that!
DIY Must-Have Lists


