A few of my plants outside in my deck planters still had some life in them as the weather turned cold, so I scrambled to find a pot and a way not to kill them inside. (If you know me and my history with live plants, you know this is a challenge!) Two weeks in, and these plans are still alive, so I think I can safely say this works!
Supplies:
(As an advertising affiliate and Amazon Associate, I earn a small commission from qualifying purchases. But it doesn’t cost you anything extra and helps me keep up my site!)
Pot for plants
Christmas light spool
Dirt
Plants
Tools:
Scissors
Drill and bit (or just a knife or even the scissors will work)
Step 1: Gather supplies…all 2 of them. I had a deep pot that I liked a lot, but I didn’t want to put drainage holes in the bottom of it because I was afraid I’d break the whole thing. I also didn’t want a tray under the pot to catch water because I didn’t have one that matched and the stand that this pot would sit on is really pretty. Also, I didn’t need the pot to be as deep as it was, so I needed to come up with a way to make a hidden drainage reservoir in the bottom that would take up some space. If YOU pick a pot that has holes in the bottom, you’ll have to cover them to make this hidden reservoir because the water will still flow out the bottom unless the holes are covered well.
Chosen pot.
After looking through all the junk I keep for “some project someday,” I found this plastic Christmas light spool that gave me the perfect idea! We tend to have a few of these things lying around after Christmas when a strand of lights goes dead…or we just don’t feel like wrapping the lights back around them and end up throwing the lights in boxes. Anyway, since this one was free, I claimed it for my project. I was the perfect height to take up some room at the bottom of the pot, plus that space between would give excess water a place to go.
Christmas light spool.
Step 2: Cut to size. The top of my pot was wider then the bottom, and I set the spool inside to see that I needed to cut off an inch or so in order for it to fit down in the bottom of the pot. By using just ordinary scissors, I cut the plastic bottom side of the spool slightly smaller than the top side of the spool to sit in the pot correctly.
Cut to size.
After testing the size a few times, I got it to the size it needed to be. Did I cut it perfectly even all the way around? No. Didn’t matter, so don’t worry about that.
Step 3: Make drainage holes. In the top side of the spool, I used a drill to create a bunch of holes that would help water drain down into the “reservoir.” It doesn’t matter if you accidentally poke through into the bottom side too, but you only have to do the top side that will touch the dirt.
Holes added.
Step 4: Fill pot with dirt and plants. Setting the spool inside the bottom of the pot, I made sure the side with the holes was facing up.
Reservoir in and ready!
With that ready, I dumped in some dirt. Some of this dirt slipped down between the sides of the pot and the cut sides of the spool, but it wasn’t so much that it filled the big “reservoir” space, and a little along the sides helped to hold the rest on top.
With the dirt in, I took my plants out of their other planter and put them in my new pot. After a little watering, they were happy and ready to be indoor plants.
This worked ridiculously well, really, and I know there’s plenty of room for water to drain out of the dirt.
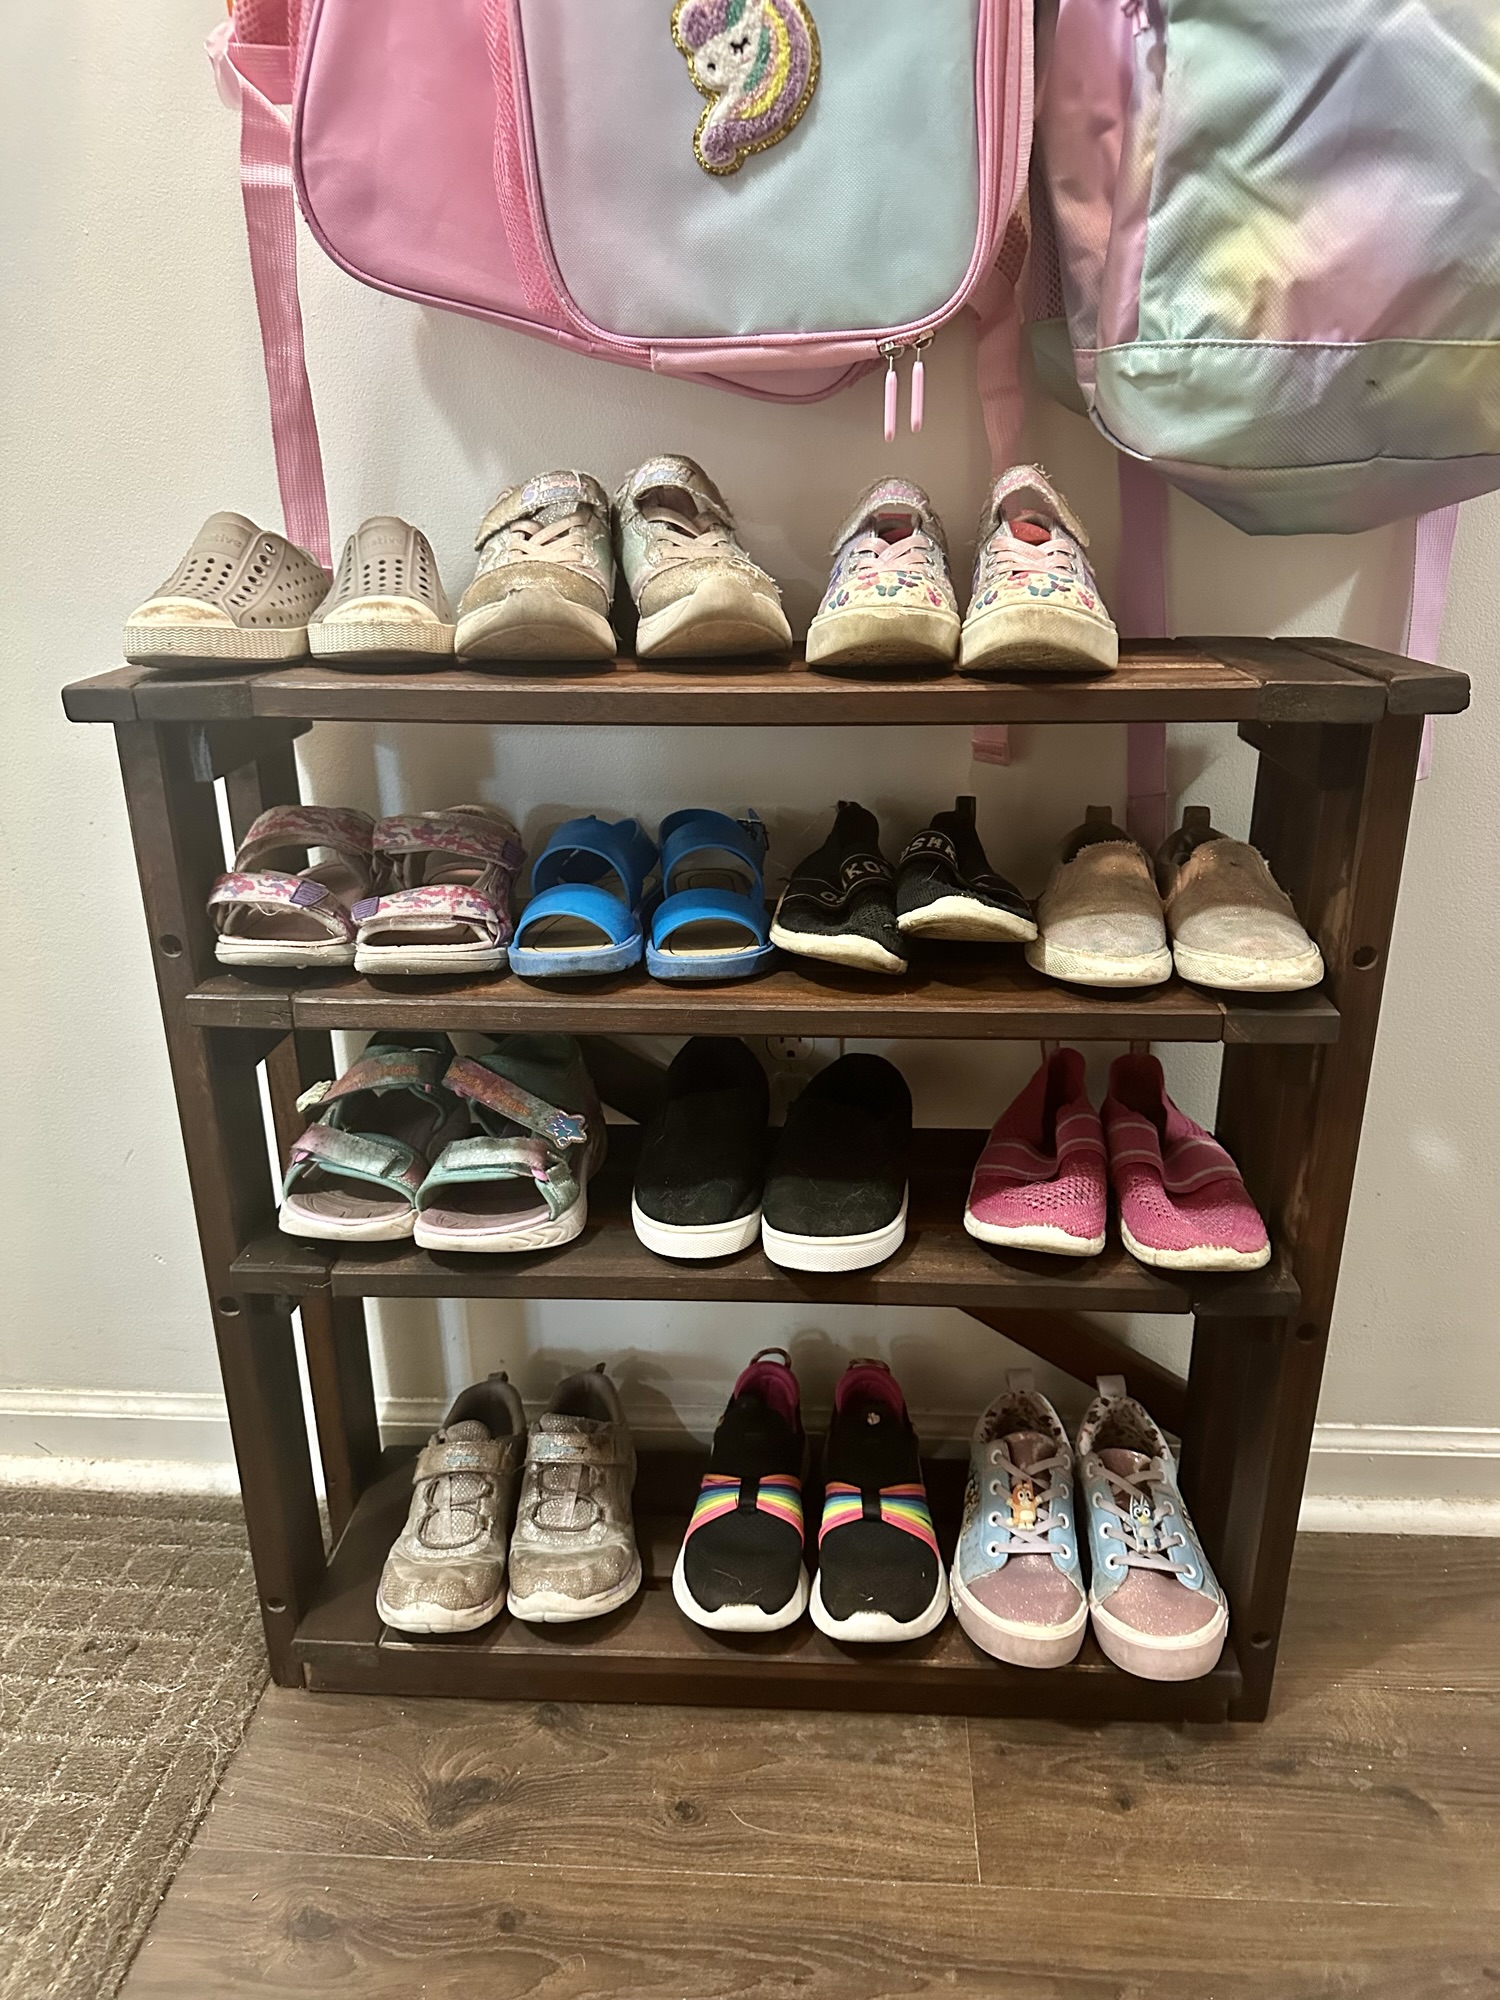
How do we still need more shoe storage?! I couldn’t take it anymore, and the constant pile of shoes by our garage door had to go. But this is obviously the best spot to have shoes, so we needed another shoe rack right by the door for all my girls’ shoes.
Cue the old, falling apart, outdoor table that I’ve ignored all summer.
BEFORE: Old table. She looks so sad.
Supplies:
(As an advertising affiliate and Amazon Associate, I earn a small commission from qualifying purchases. But it doesn’t cost you anything extra and helps me keep up my site!)
1x3s (for shelf slats, so amount depends on length you want)
1x2s (for shelf supports and front piece)
2x3s (for legs, so amount depends on the height you want)
Step 1: Take apart the table. I’m going to assume not everyone has an old IKEA table lying around for this project, but if you do, 👍. If not, the wood is basically a bunch of 1x3s, 2x3s, and 1x2s, so that’s how I’ll give instructions for assembly. But if you’ve got an old table made of slats like this, take that puppy apart and use the wood if it’s salvageable!
First, I removed all the hardware connecting the table legs, sides, etc. All of the top and hinged side sections were in good shape, so I did not take apart the slat sections – that’s what I was hoping for! The rest of the table parts like the legs and surrounding pieces came off pretty easily, and gravity helped.
Once apart, I carried all the pieces up to my garage.
Wood pieces to work with.
Step 2: Cut pieces. I decided 8 inches wide was perfect for storing my girls’ shoes without sticking out too far into the narrow hall area. It just so happened that 3 slats equaled 8 inches, so I used a jigsaw and cut the ends to free up the first 3 slats and the ends connecting them. I did this for 4 sections that would become my 4 shelves.
Cutting free the first 3 slats as a section.
If you’re using wood pieces and not a table, you can use 3 long 1x3s for slats and shorter, 8-inch pieces of 1x3s for each end. These could be attached by screwing holes on each piece where they connect, then using pegs and glue. That would give you the same thing as what I cut free – slats connected by end pieces.
Along with these sections for the shelves, you want 2x3s for each leg of the shoe rack. I used the front and back surround pieces that I’d taken off the table, so mine had character-adding screw holes to display. 😆 I wanted my legs to be 25.25 inches tall, as this would allow me to get 4 legs out of the 2 pieces of wood I was using. (This was also the perfect height to allow my girls’ backpacks to hang over the shoe rack.)
Cut leg pieces.
Next, I needed little support pieces to attach to the legs where the shelves would rest and attach. The table had had 1×2 pieces of wood running under the tabletop for support, and these were perfect, so you can use 1x2s for sure. Since my shelves were 8 inches wide, I went with 6-inch little pieces so the shelves would hang over them to hide these supports. I needed 2 of these for each shelf – one for each end of each shelf – so 8 total for my 4 shelves.
Also, I needed 2 more 1×2 pieces for each end of my top shelf to add length and cover the tops of the legs. These needed to be 8 inches, just like the ends of my 8-inch wide shelf.
With all these pieces cut, I sanded everything lightly and wiped them clean.
Wood pieces ready!
You might notice from the picture that I had 2 little scrap pieces. I used these to help me figure out exactly how high the shelves would sit on top of my support pieces before deciding on the supports’ placement.
(FYI: There will be 2 more wood pieces to cut, but I’d wait until later to be sure of your measurements.)
Step 3: Attach supports to legs. I wanted the lowest shelf to be right at the bottom so things won’t get lost on the floor under it. This also made things easy as far as positioning.
Lining up 2 of my 2×3 legs, I made sure they were less than 8 inches apart, since this would let the shelves stick out a bit farther to cover some edges. I went with 7.25 inches apart.
With the legs lying square and 7.25 inches apart, I lined up one of my 1×2 support pieces at the very bottom of what would become the inside side of the table legs. You could use little nails or screws, but I used my nail gun and shot in 2 nails at each end of the little support 1×2.
Once that bottom support was attached, I did the same at the very top.
Top and bottom supports in place.
Then, because I wanted the bottom shelf to fit rain boots, I literally held a rain boot in the space over that bottom support – with my little scrap piece mimicking where the shelf would sit – to find where I should position the next shelf up. With that figured out, I attached a 1×2 support piece in that spot. That left one more support for a shelf, so I positioned it where it looked right and nailed on that one too.
With that one side/set of legs done, I took the other 2 table legs and positioned everything exactly the same so everything would be level and equal on either side of the shoe rack.
Step 4: Attach the shelves. Starting at the bottom for stability, I held up one side (2 legs with supports) and set one of my 8-inch wide shelves on that bottom support. I lined it up so that the back of the shelf was exactly lined up with the back of the back leg, and the front of the shelf hung over the support and past the front of the front leg a little bit. Then I nailed down through the shelf into the support it rested on.
Shelf sitting on legs’ support.
After repeating this on the other side, I had my bottom shelf connected to both sides/sets of legs.
I did this again for the next shelf up, then the next, and finally the top shelf piece. Each time, I made sure to keep things square by holding the shelf tight against the table legs (sides) when I nailed them on.
All shelves on.
Step 5: Add additional pieces. Because I wanted nothing getting lost under the shoe rack, I used another 1×2 to run across the very bottom, under the overhanging bottom shelf, to cover the front of the rack at the bottom. This I cut to 23.5 inches long so that it fit inside, between the legs. I attached this front piece by nailing it into the ends of the bottom support pieces. I did lay the rack down with the front side up to make this easier.
Bottom front piece on under bottom shelf.
While I was at it and had the bottom of the rack exposed, I added some screws through my bottom supports into my legs, just to help out my little nails.
Standing the rack back up again, I took my two 8-inch 1x2s and positioned them over the tops of the legs, making sure they sat flush with the ends of my top shelf. I attached these by nailing down through the pieces into the tops of the legs. I was worried this might look weird, but because of all the slats going on – and running in different directions – it looks like added detail that belongs.
Ends 1x2s to cover the top of the legs.
Lastly, I added a crosspiece to the back of the rack to help with stability. I figured out the angle of my cuts by holding the 1×2 in place and then marking lines with a pencil. Once it was marked, I used my miter saw to cut along the lines. I attached the back by nailing each end onto the back of the legs. I like the rustic detail this gives, plus you can’t really see it from the front once shoes are there.
Back support on.
Step 6: Stain or Paint. My wood already had stain…in places. Rather than sanding it all off, I embraced the rugged look this would add. Taking a rag dipped in darker stain, I wiped stain over the whole thing. This gave a really cool, aged effect to the wood where the stain took differently to the stained and unstained wood.
You could paint your rack, obviously. That would look nice too, though I’d suggest a darker color to help hide dirt from the shoes.
Step 7: Set in place and add shoes! The rack fit great in the space – not too big, not too small. I really like how rustic but detailed it looks because of the slats and old screw holes and such. It looks old but in the right way now. 😂 And, most importantly, the girls’ shoes aren’t in a pile!
This project was one of those little things that’s been an eyesore forever, and I finally found a way to make it pretty. Since I did an entryway bathroom door makeover (and still love it), I decided to use a similar look to cover our ugly, old doorbell chimes cover on the wall facing that door.
BEFORE: Old, ugly doorbell chimes cover.
Supplies:
(As an advertising affiliate and Amazon Associate, I earn a small commission from qualifying purchases. But it doesn’t cost you anything extra and helps me keep up my site!)
Step 1: Measure the spot and cut wood pieces. First, I measured the existing cover and decided to go with a new cover of 7×11. That would give me a little wiggle room for placement. I also needed to come out about 3 inches from the wall.
Measuring.
Using spare 1/8 inch plywood pieces, I cut a front piece at 7×11 using my miter saw. (This wood is thin enough that you could easily cut it with a hacksaw or other small saw.) Then I cut 2 side pieces at 3×7, and my bottom piece was 3×11.
To attach these pieces, I found some little 1×1 wood pieces and cut 4 to about 6 inches each. These go on the inside corners, so they don’t have to be perfectly even or pretty.
I sanded all of these pieces lightly to remove any rough parts.
Wood pieces cut.
Step 2: Assemble pieces. I used my brad nailer, but you could use little nails and a hammer or even wood glue, if you have more patience than I do.
First, I attached a side piece to one of the inside corner pieces. I made sure to line up the long edges so the side piece would cover the corner piece, but I didn’t want it to overlap because the front piece would do that, hiding the side piece from the front (see picture). I also made sure to leave a little room at what would be the bottom – this would let the bottom piece fit in place so the side piece would cover/hide the bottom edge. And, I left about an inch of space at the top so the corner piece wouldn’t be visible at all from the top.
Next, I took the front piece and also attached it to the first corner piece, making sure it lined up to cover the edge of the side piece. (Again, see the picture for a visual of how all this lined up. The picture is from the bottom, showing the little bit of room I left for the bottom piece.)
Side and front on a corner piece.
(You may note from the pictures that I used nails that were too long, but these were easy to bend back. Again, you’re not going to see the insides of this little box you’re making. So, if you don’t have small enough nails, no worries.)
With that one side and front piece on the first corner, I nailed on the other side piece and corner piece, lining them up the same way.
Next, the bottom piece was pretty easy because it fit right at the bottom of the 3-sided box I’d made. This bottom piece also helped me be sure everything was square, because I squeezed the front and side pieces to sit right tight against the corners of the bottom piece. One little nail at each end into the corner pieces was all it took to hold this bottom piece in place.
Bottom added.
From there, I could easily add the last 2 corner pieces at the back of my open box. These I made sure to place flush behind the side pieces so they didn’t stick out. I nailed them into each side first, and then I used my bottom piece to again made sure everything was square. One little nail from the bottom piece into the ends of these corner pieces held them in place.
This created a “box” with an open top and back.
Construction complete.
Step 3: (Optional) Add decorative parts. Just toadd a little visual interest, I cut 4 pieces of 1×2 down to 7 inches, used my miter saw to create 30-degree cuts at the ends, and nailed them over the ends of my cover. This created some curves and made the whole thing look less “boxy,” plus it helped cover the nail holes and edges, making the whole cover look a little nicer. You don’t have to do this, but I liked it.
Decorative parts on.
Step 4: Stain or paint. I debated between painting this cover green (like other accents in our living room) or staining it, but I ended up using the same dark walnut stain as the door nearby – the door that gave me inspiration in the first place. I’m glad I used this stain because the wood looks surprisingly nice stained, and the color looks great against the plants I used in the final step.
Step 5: Hang the cover. Because this cover is so light, I was able to just use command strips on the back of either end. I placed mine on the 1x2s along the back, but you could use the back corner pieces instead if you didn’t want to add the 1x2s.
Command strips ready.
After climbing on a stool to reach high enough, I did check to make sure the cover was level before pressing the command strips to stick on the wall on either side of the existing chimes cover.
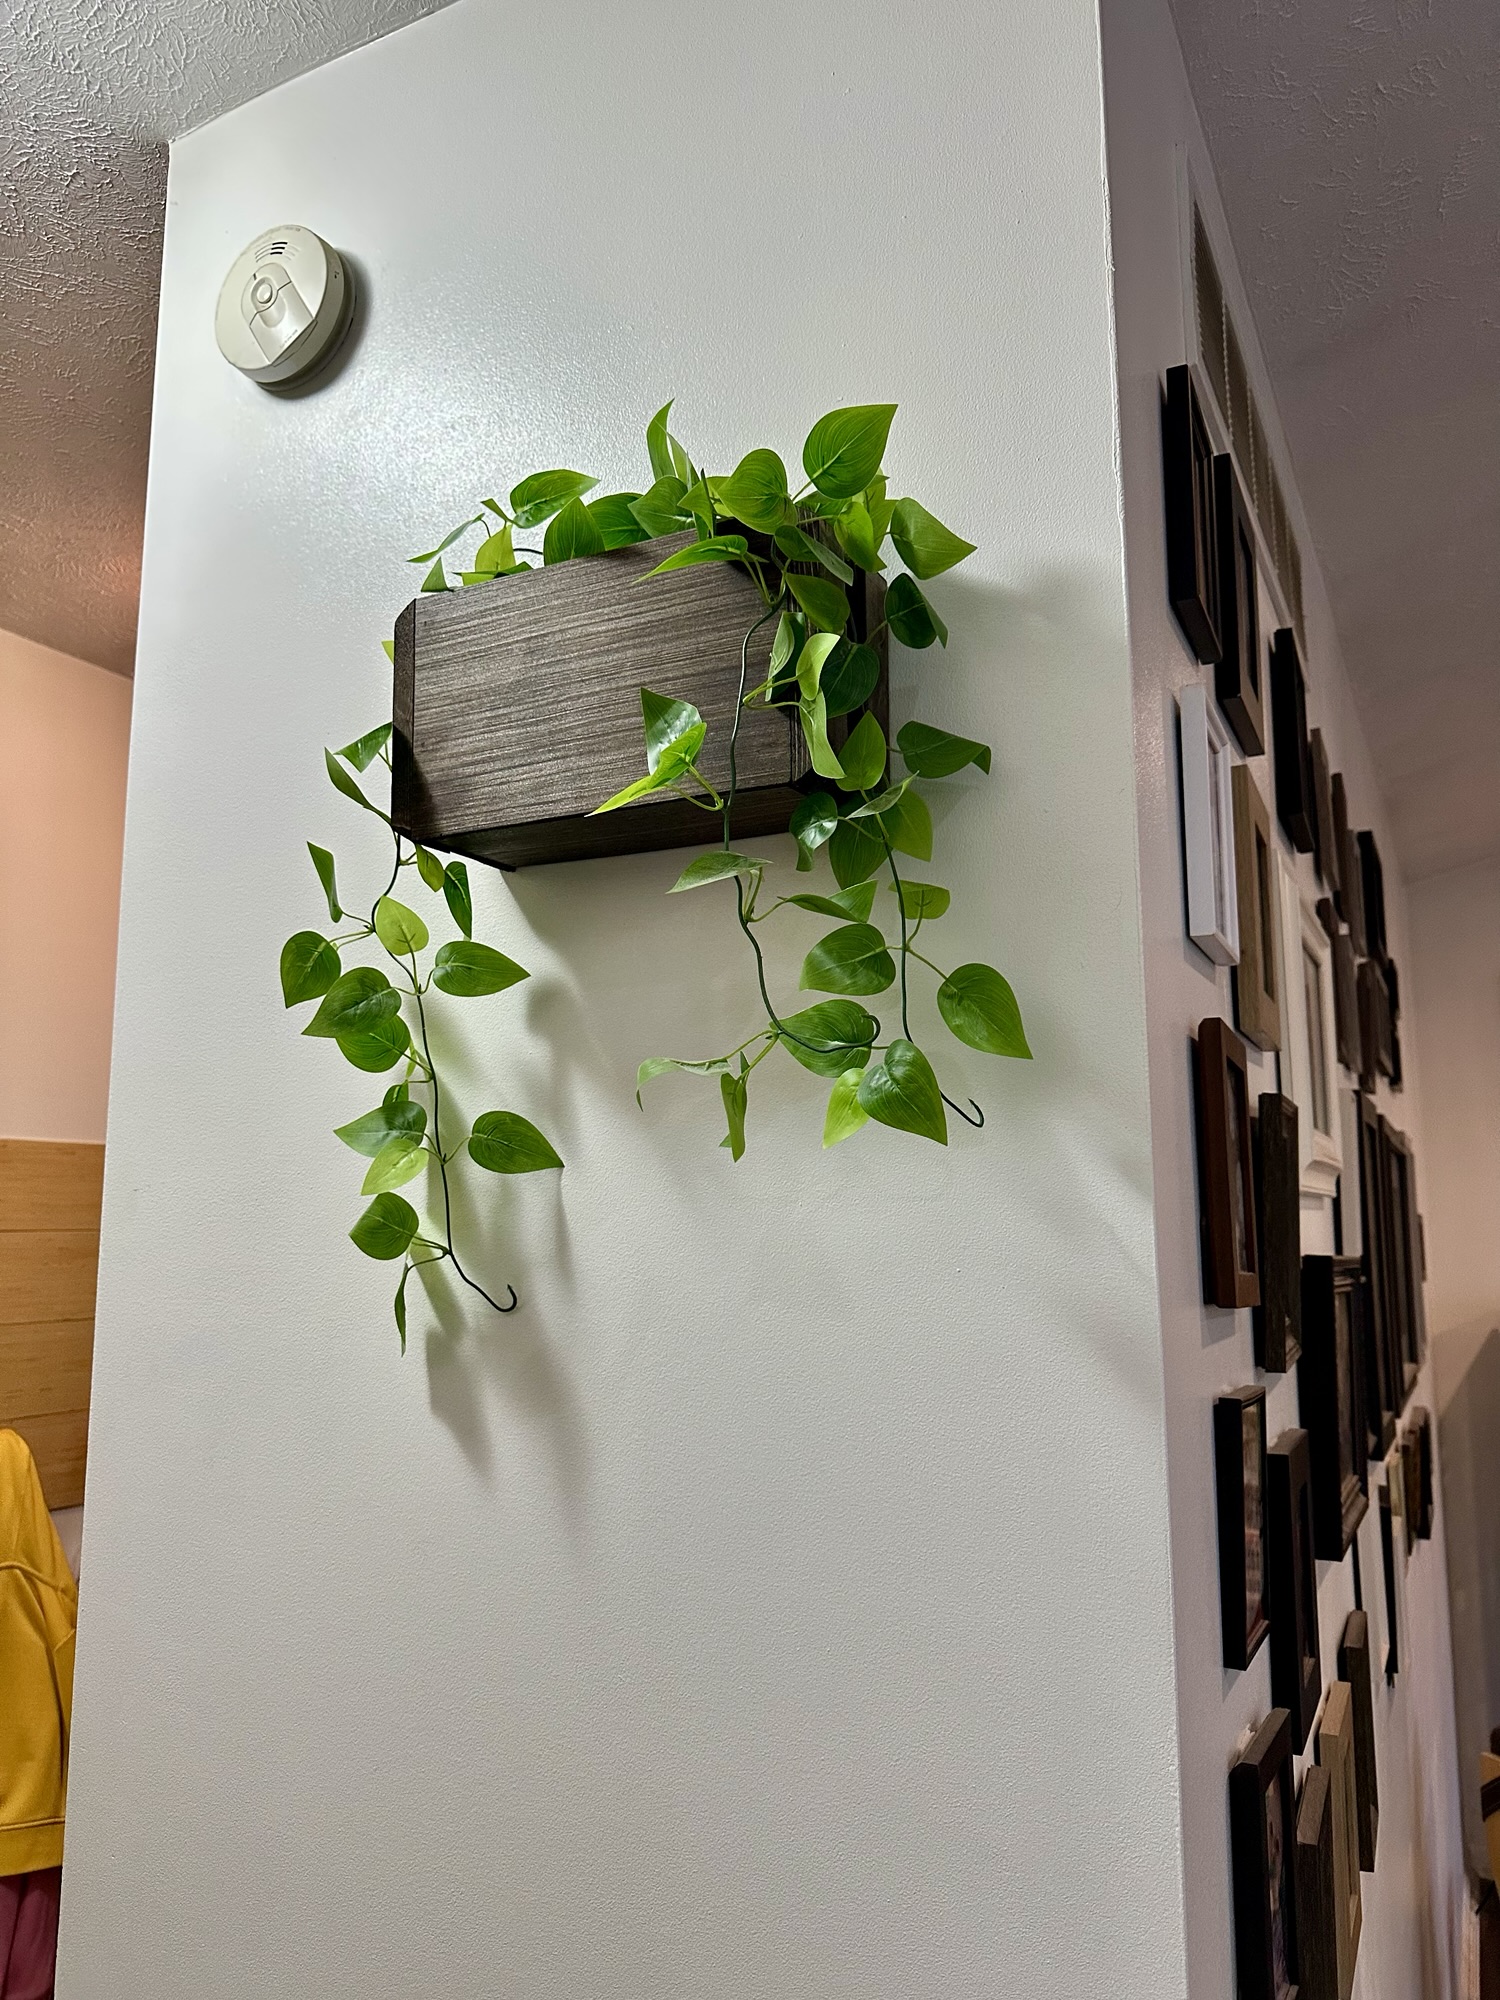
Step 6: (Optional) Add greenery. You could leave the cover as it is – it looks nice alone as a wood cover. But, I really like how it looks after adding a few strands of fake greenery to hang out – it looks like a planter! I didn’t have to secure my fake plants at all because they tucked down around the existing chimes cover, and they hang down over the wood in a way that the leaves help hold it in place.
Greenery added.
That was it! This looks so much better than the old, off-color doorbell chimes cover.
These chairs have needed my attention for quite a while. They were still in sturdy shape, so I knew they had a little life left in them. They just looked terribly worn out.
BEFORE: Chairs in need of love.
Supplies:
(As an advertising affiliate and Amazon Associate, I earn a small commission from qualifying purchases. But it doesn’t cost you anything extra and helps me keep up my site!)
…I’m just now realizing that I intended to use my new paint sprayer on this project, but I completely forgot. 🤦♀️ If you have a paint sprayer, you could do this much more quickly, but I used a cheap brush. You could also use painters tape if you need help with a clean edge between the different paint colors, but I always find I do okay with just a simple little craft brush to make clean lines.
Step 1: Sand and clean chairs. I took my handheld sander and went over every part of the chairs that I could. I used 80 grit sandpaper but only needed one sheet.
Sander ready.
There was some old stain peeling away that needed to be sanded. There were rough spots that I wanted smoother. And there were other places where the wood was just really worn and old, so I sanded those parts down too. Really, you want to sand all over at least a little bit to help the paint adhere.
Once the chairs were sanded, I wiped them down with a wet rag to get off cobwebs, dirt, dust, etc.
Roughly sanded.
Step 2: Spray paint the hardest parts to paint first. Really, you could paint your outdoor chairs a bunch of different ways, but I focused on how the slats ran across the back and seat. The arms of the chairs and sides of the back and seat had pieces that ran a different way, so these slats seemed like they would look good as their own thing.
I went with black. You could use any color as long as it’s a paint that’s intended for outdoor use. I had some leftover black spray paint, so that’s what I used.
For these harder-to-do parts of the chairs, I definitely recommend spray paint (or a paint sprayer 🤦♀️). Spraying on the slats was easier than trying to use a brush and get around all the sides. It was definitely faster. Did this spray paint get on the other parts of the chairs that would be a different color? Sure. But I didn’t worry about this since I knew I’d be painting the other parts next and covering the black anyway.
Basically, start painting the chairs by using spray paint in the color that you want on the majority of the chair, or the most difficult-to-paint parts of the chair. Some might say to use the lighter color first so you can be sure your other paint color will cover it, but my lighter blue covered this black just fine. 🤷♀️
Black spray paint on.
Another good reason to use spray paint first is because it dries quickly, helping you get to the next step.
Step 3: Paint the other chair parts. Once the tricky slats were painted, I took my lighter blue paint and used a brush to paint the arms of the chair, the bottom braces, and the side pieces around the seat and back. There wasn’t much need to spray this paint, since these sections were so large that a brush worked just fine. To paint where the blue met the black of the slats, I used a tiny craft brush and made clean lines of blue paint against the black.
Painted where blue meets black.
If you use a spray for the rest of the chair too, you’ll need to cover the first painted areas and tape along the edges. That seemed like too much effort, and I figured that a brush would be faster than the prep required for my paint sprayer.
Painting the blue.
I did 2 coats of this light blue, just to be sure the coverage was good over the old wood. I also had a 5-year-old helper, so I went over her areas a few times. 😬
Step 4: Seal. Once all the paint was dry, I gave it overnight to gas off and settle in. The next day, I took a clear gloss spray paint and went over every inch of the chairs to seal and protect the paint.
Once that was dry, the chairs were done! These look so much better than before, and they go nicely with the blue decor I have on the rest of my deck. I like that painting them this way looks a little more interesting than just painting or staining them one solid color too.
I let this go for way too long, but this July I finally got around to making our little dog area look decent. I also wanted to get on top of this before another rainy/snowy season when the ground becomes all muddy. Wet and muddy dog prints – not so cute across my kitchen.
BEFORE: Messy dog kennel.
The best fix I came up with was to make a pea gravel bottom instead of dirt, and I used landscape cloth to help deter future weed growth. To help hold gravel in place on the “human used” side of our gravel patio, I’d used some very handy ground cover paver forms (see picture at the very bottom), but I didn’t want to spend that much on the dog side. Long story less long, I should have spent the extra $$ and bought more of the heavy-duty paver forms, but I’d decided to try a less expensive option. You could use the less expensive forms like I did, because at the end I figured out a way to make them work almost as well. But honestly, I really like how the more expensive ones work way better and take less gravel.
Supplies:
(As an advertising affiliate and Amazon Associate, I earn a small commission from qualifying purchases. But it doesn’t cost you anything extra and helps me keep up my site!)
Step 1: Clear area and level the base. I cut back a lot of plants and pulled a bunch of weeds. Our oldest dog is a digger, so I had holes and lumps all over the ground to deal with. Taking a metal rake and a shovel, I scraped along the ground and shoveled dirt around until the area was fairly level. I was careful to keep the side along our house a little higher than the rest to help with drainage.
Weeded and leveled.
Step 2: Enclose the space. The fencing that I used for the kennel area is fantastic. It can run straight or turn at angles where each section of gate connects. It doesn’t look bad if you have to fudge it a little bit by overlapping to make it fit, either. You can buy sections at a time if you’re not sure how much you’ll need, but it was pretty easy to figure out that I needed 10 ft along one side and 13 feet along the other. (The back side was just the house wall, and the last side of the dog area was already enclosed under our deck.)
Starting right against the house, I shoved in a pole/stake to hold that end of the gate in place, then connected the next section of gate with a pole running between the first and second sections. It was easy to do this in a straight line, adding sections of gate and poles until I reached my planter box at the other end. This was my 13-ft side. Here, I took another section of gate to make the corner. Then I ran more fencing along the planter box, overlapping a section in the middle to get the right overall length of about 10 feet. I had a very narrow gap at my planter box’s corner, but I just used a leftover pole/stake and shoved that into the box’s dirt to block off any escape attempts.
Installing this fencing took me literally 10 minutes.
Very easy + Looks nice + Sturdy and secure against my 65-pound mutt = 👍
Step 3: Lay the landscape fabric. I had quite a bit of this leftover from another yard project, but I had to buy a roll to finish. This is pretty easy once your ground is level, because all I had to do was roll it out from the house to the fencing on the far end. Scissors cut the fabric well, and then I took the roll and started again to cover the next strip of ground. I overlapped each strip a little bit to help cover everything, and it helped to use my rakes to hold one end down while I rolled out each strip.
It’s worth noting that I had a sprinkler head right smack in the middle of the space. When I rolled the fabric over this spot, I cut a hole and made sure the sprinkler head had plenty of room to stick through. (More on that later, as I had to take this into consideration with each following step.)
Fencing and fabric done.
Step 4: Lay out the paver forms. Again, I wish I’d bought these paver forms, but I used these more flexible forms and eventually found a way to make them work by adding these anchoring spikes. The flexible forms do NOT come with enough spikes to secure the forms if you’ve got a dog (or kids) that are rough on the space. I found after laying them and after filling everything with gravel that they too easily pulled up in the middle where there were no anchor spikes, and the forms being loose ruined the whole point. 🤦♀️ BUT, if secured with more spikes through the little holes here and there, the forms stayed quite well.
So, learn from my mistake and make sure you secure these forms down really, really well.
Use these for extra securing!
Anyway…I stretched out and unfolded the flexible forms and spread this wide mesh across the space, securing it at one end, then the other. (I now know I should have secured it everywhere I could with extra spikes, so do that now.) I do like that they come with little fasteners to attach one side of one strip to another side of another strip, and it’s pretty easy to make one, big form this way to fill the space. The material also cuts pretty easily with scissors, so you can adjust the size and shape more easily than you can with the more heavy-duty forms.
Fasteners to join sides.
Cutting here and securing there, I eventually covered my space with the forms. I made sure that a big opening allowed my sprinkler head to have space. I also made sure to add extra anchor spikes all along the exposed side to hold that down where the dogs would be running a lot.
Forms done.
Step 5: Fill with gravel. After hauling 10 bags home from Lowe’s in my Jeep, I got smart and ordered 35 more bags to be delivered so I didn’t cause a smelly mess in my Jeep. When figuring out how much you’ll need, take your square footage and look at what the bag says about coverage. I needed 130ish square feet, and it needed to be about 3 inches deep. I ended up needing about 50 bags total.
It was heavy, dirty work, but it was satisfying to dump each bag and then spread the gravel into the forms. I made sure not to fill the circular form I’d made around the sprinkler head, and it kind of looks like a little drain in the middle.
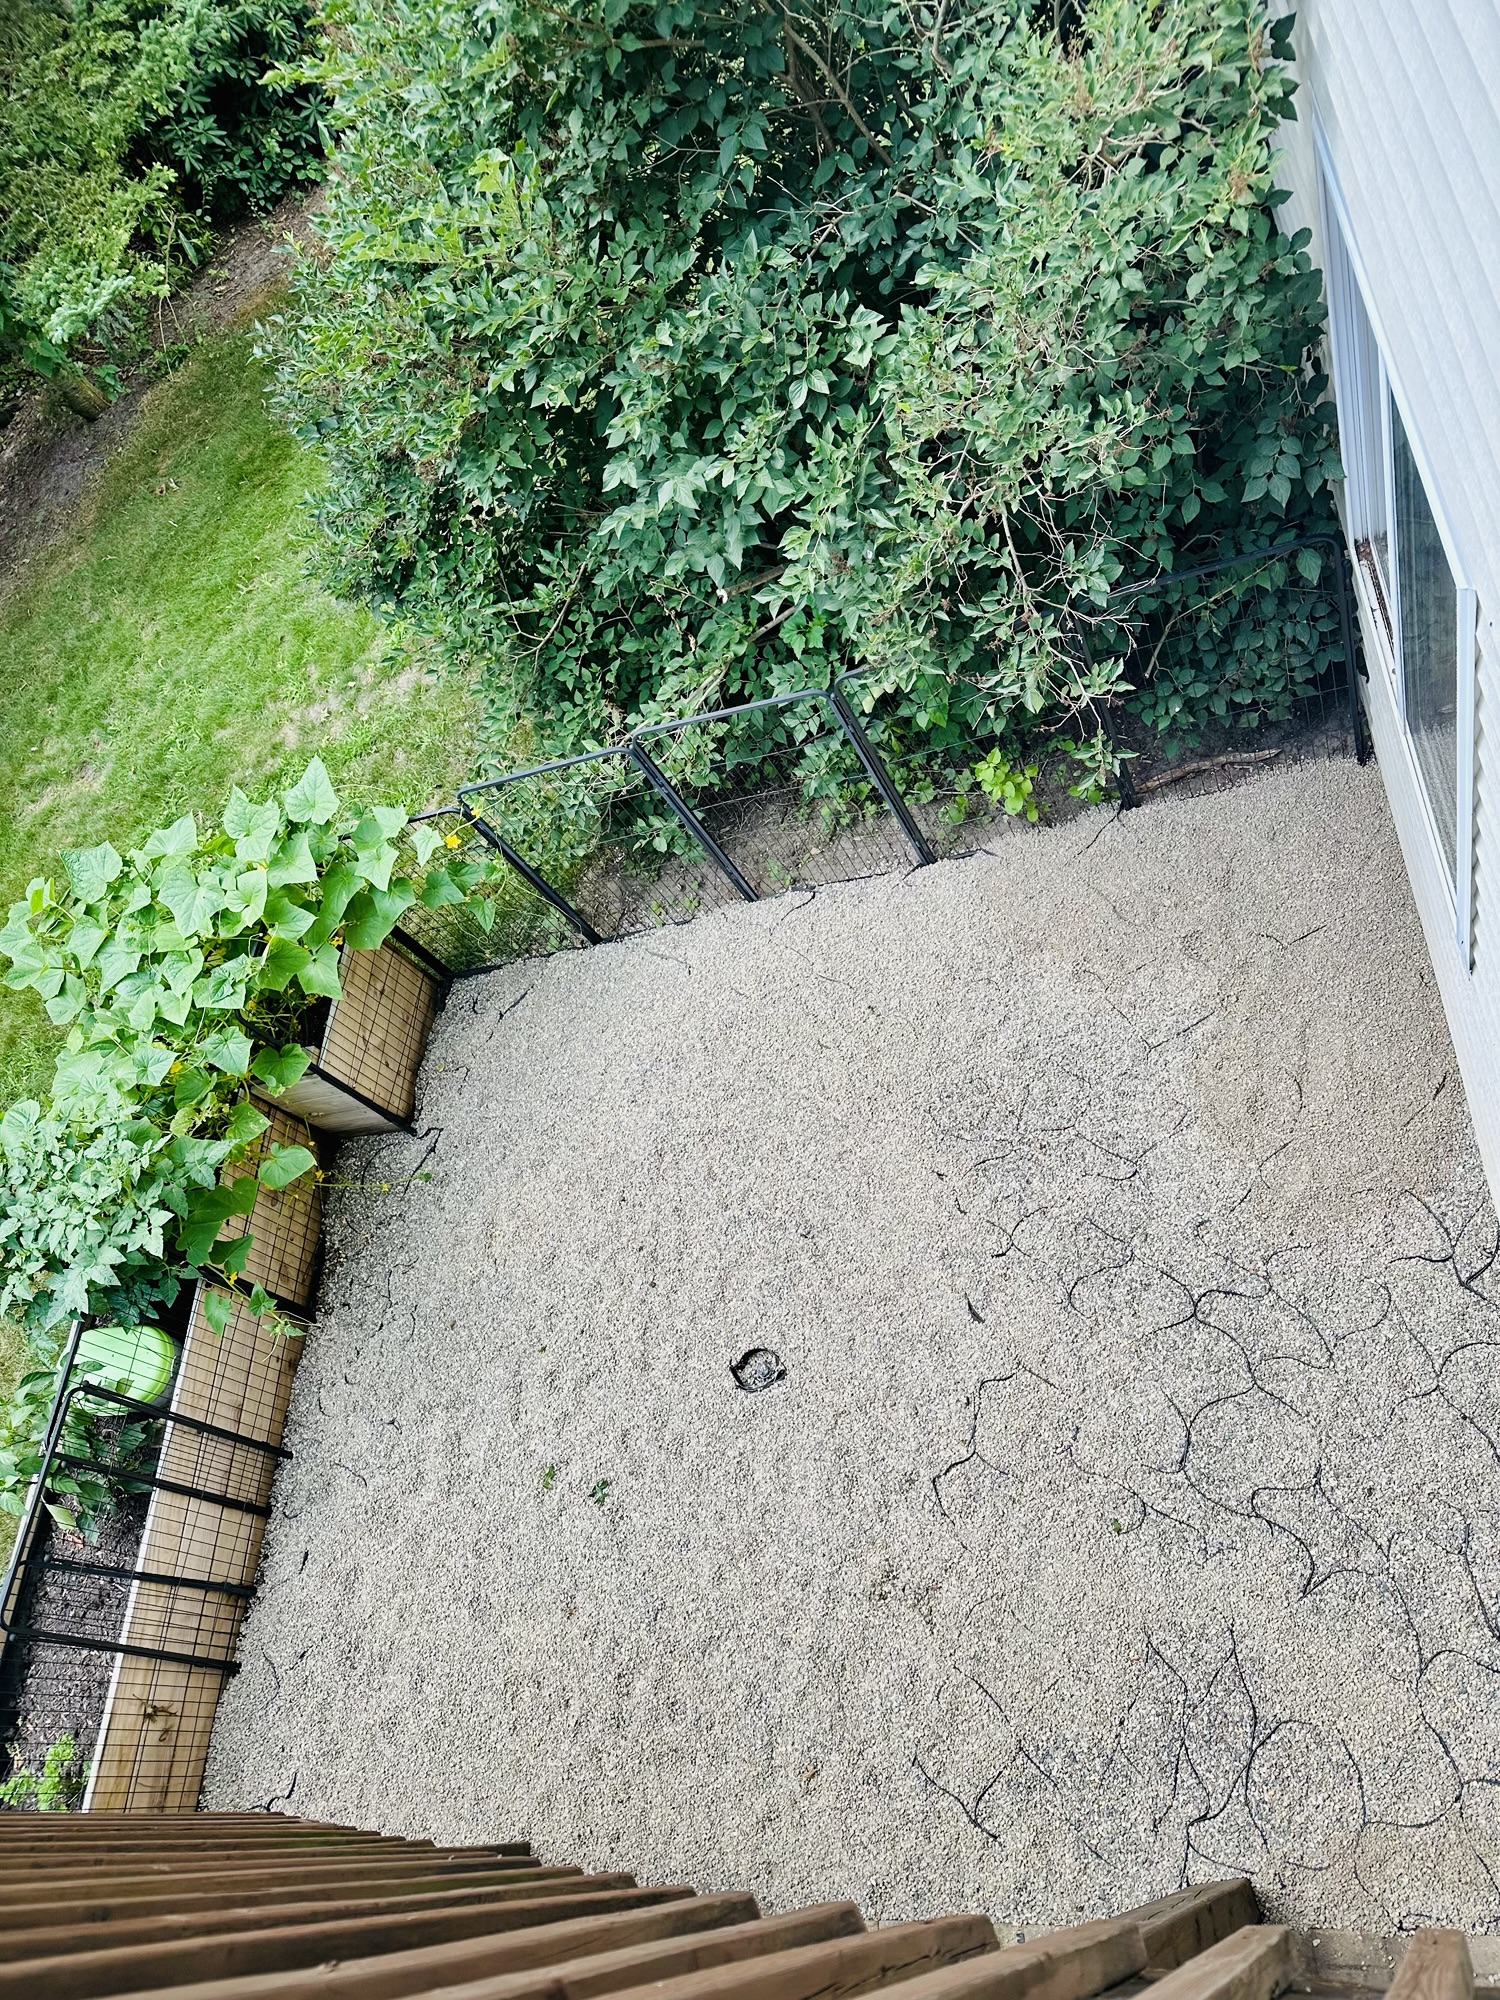
Done! I had some hiccups with this project, but once I got those extra anchor spikes in, these forms worked pretty well. Our older dog can’t dig as easily with the forms in place, and the gravel certainly looks better than the dirt mess that was there before. The below picture was taken about a week after I finished, so you can see how I might want another bag of gravel to cover the forms now that the gravel has settled, but I don’t mind seeing the pattern of the forms a little bit. The important thing is that our dogs can’t move them anymore!
AFTER: Pea gravel dog kennel.
And in case you’re wondering, this is what the end result looks like with the more heavy-duty forms, which I used under our deck and on the side of the patio that we humans use. 🙂