We had too many devices to charge and too little space on our counter to put them. We did have a nice little charging station that we bought on Amazon, so all I really had to do was build a few shelves and set the charging station on top, making sure there were gaps in the shelves to allow cords down through. Including the charging station, this would have only cost about $45 if I’d had to buy supplies – which I didn’t because I had enough scrap! That’s always a win.
Supplies:
(As an advertising affiliate and Amazon Associate, I earn a small commission from qualifying purchases. But it doesn’t cost you anything extra and helps me keep up my site!)
Step 1: Measure and plan. I had about 8 inches to work with as far as height because I wanted to set our Google Nest Hub on the top without being hidden under our cabinet. And since iPads and phones and our Nintendo Switch and things are fairly thin, I didn’t need to make the spacing between shelves very high at all. I decided to make the bottom space between the counter and the underside of the bottom shelf 4 inches tall, leaving plenty of room for my daughter’s headphones to sit while charging. The space between the bottom shelf and top shelf would be about 1.75 inches because I’d use pieces of 1x2s lying on their sides as supports, and these are realistically about 1.75 inches wide. Including the width of the shelves themselves (again 1x2s), this would bring my whole height to about 8 inches.
As for how long my shelves would be, I went with 24 inches for the whole setup. This gave a little bit of room on one side of our counterspace so we could still set miscellaneous junk there behind a little fake plant. 😆 This also gave plenty of room for the charging station to sit on the top shelf beside our Google Hub, plus leaving a little extra room on that top shelf for whatever.
For width, I didn’t want it to stick out too far, and since an iPad is the widest thing that needs to sit here, I went with 6 inches wide for the bottom shelf. The top shelf would be closer to 5 inches because I already had a shelf premade that was about 5 inches.
Also, I didn’t plan for this at first, but I ended up offsetting the shelves a little bit so that the top shelf overhung the bottom shelf to the left and the bottom shelf stuck out farther to the right. This gave me a place to add a little hook on the left for coiled cords I want to keep handy (the headphone cord), and it made a little side shelf on the right for our anti-bark dog zapper (a must in our home).
Step 2: Cut the wood. As I said, I already had a premade shelf for the top shelf – I used a scrap section of our old outdoor table, which really has been the wooden gift that keeps on giving, as I’ve gotten several projects out of that one table! 👍 But, you can easily just use 1x2s to make this top shelf the same way as I made the bottom shelf, just with one less 1×2 for less width.
I played around with my 1x2s and arranged them according to my plan to make sure this looked how I wanted, and once satisfied I started cutting.
Trying out my plan (ignore the 2x2s 😆)
First, I cut the 4 legs for the base of my shelving unit. These 1x2s I cut to my planned 4 inches. Done.
Cut legs.
Then I cut 2 pieces to 6 inches long to use as supports for the bottom shelf, and the legs would connect to these as well.
Next I cut 2 pieces to 5 inches long to use as supports for the top shelf, setting these on the bottom shelf.
For the longer 1x2s for the shelves themselves, I cut 3 pieces to 24 inches long for the bottom shelf. Since you’ll need to do a top shelf too, you’d just need to cut 2 more for that shelf.
With my pieces all cut, I sanded down the rough bits and also smoothed down the corners.
Step 3: Assemble the pieces. One of the smarter things I did was to get my T-square to make sure everything was right. Holding the 4-inch leg pieces so they were square with the 6-inch support sitting across the top of the legs, I used 2 brad nails in each leg to attach them to the support. I repeated this for the second set of legs and their support.
Attaching legs to a 6-inch support.
Next, I positioned the 5-inch supports where I wanted them under my top, 5-inch-wide shelf. For you and your two 1x2s for the top shelf, lay them across the 5-inch supports so they’re flush with each end of the support, and this will leave a nice gap in the middle for cords to go down through. (You’ll actually have a bit more room than my shelf gave me, which would be nice.) It looks nice for the supports to come in a little bit at each side, so I brought the supports in 1.5 inches from each end of the 1x2s. Again lining things up with my T-square, I nailed the top shelf on along the 1×2 supports that sat on their sides under the shelf.
Attaching top to 5-inch supports.
Flipping this over, I attached the bottom shelf’s 1x2s to these same supports. This was when I decided I wanted to offset the top and bottoms shelves, so I put one end of the bottom shelf’s 1x2s exactly flush with the top shelf’s support, and the other ends stuck out a bit farther. (If you don’t want to offset, just position them again 1.5 inches from either end.) First I nailed on what would be the back 1×2 of this bottom shelf, and I made sure it lined up exactly with the back of the support so that the top and bottom shelves would be flush. (See the picture if this doesn’t make sense.) I used 2 brad nails for each end of that first 1×2…and missed a little bit with one, but it’s fine – LOL. For the next, middle 1×2 of the bottom shelf, I used a spare 1×2 as a spacer between them. I wanted this space so cords could also go through this bottom shelf, much like the top shelf. I nailed that middle 1×2 on, then moved my spacer for the front 1×2. Here, however, this 1×2 stuck out a bit farther than my 5-inch support because this bottom shelf would be 6-inches wide (between the 1x2s and the spaces, this shelf’s width comes to 6 inches). So, for this front piece, I only used 1 nail to hold it in place, then removed the spacer.
Adding and spacing the bottom shelf’s 1x2s.
With the top and bottom shelves connected, it was time for the legs and bottom supports. I moved the shelves and stood up the legs and their attached 6-inch supports along my T-square, and I made sure the legs were on the outside with the supports on the inside. Then I set my assembled shelves on top of these legs/supports, making sure the supports between the shelves lined up exactly over the bottom legs. This makes straight lines that seem to run from the bottom to the top of the whole unit. (If you haven’t offset your shelves, the ends of your shelves will be even too.) Because the bottom shelf sticks farther forward than the top shelf, I was able to easily nail the bottom shelf’s front 1×2 onto the legs and supports. For the back, I just drove the nail at a bit of an angle so it went through the bottom shelf into the support. That was enough to hold the whole thing together on either end.
Nailing the shelves onto the legs and supports.
Step 4: Paint or stain. Staining these 1x2s would look pretty. But since my top shelf was what it was, I needed to paint the whole thing. I found the same paint I’d used on my kitchen cabinets, so that was a plus! I quickly found that a small brush worked best to get in all the narrow spaces. I also should have used nail putty to fill in my holes, but I forgot that until I was done. 🤦♀️ Oh, well. Do as I say, not as I forget to do.
Assembled but in need of paint.
Step 5: Add hooks (optional). Since I’d offset the shelves, I had a space under the left end of my top shelf to add a little hook for holding coiled cords. This isn’t necessary, but I can see where it will be handy for cords I don’t want to lose…or even car keys or something.
Added side hook.
Step 6: Arrange charger and cords. Setting our existing charging station on the top shelf next to our Google Hub, I organized our different charging cords coming out of the thing and tucked a few down through the shelves’ gaps, depending on what we’d want to set where. Because the bottom shelf was wider, that’s where the cords for two of our iPads went. I hung the cords for the Switch and newest iPad down through both shelves so these could sit right on the counter, tucked under the shelves. The headphone charger went here too…though my daughter couldn’t find them for the picture, which isn’t worrying at all – LOL.
Really, you can arrange these cords however you want – that’s what’s great about making these things custom, right?
I love that this frees up counterspace and gives our devices an organized home. And it matches my cabinets, which looks extra nice!
Indoor plants don’t do well in my care, but I like the pop of green that a hanging fake plant adds to my bathroom…I just didn’t like staring up at the black plastic basket hanging over my tub. This week, I finally got around to giving the basket a makeover, and it looks way better now.
This little project was basically macrame for a lazy person who didn’t want to actually follow a pattern, and since I didn’t want to see the basket/pot at all, my full wrap job did the trick without actually needing to know what I was doing. Plus, if you’ve already got a hanging basket and hot glue gun, this only costs like $5 for the string.
Supplies:
(As an advertising affiliate and Amazon Associate, I earn a small commission from qualifying purchases. But it doesn’t cost you anything extra and helps me keep up my site!)
Step 1: Prep the basket. As an optional part of your prep, you might want to paint your basket if it’s a dark color and you don’t want to see any of it through the wrapped string. I thought of this after I was done wrapping the basket, and I do like the contrast of seeing the black through the white string to give it a little dimension and depth. But if you want it to look more like a solid wrap job, paint the basket first so your base is the same color as the string.
Before you start, you’ll want to remove the connected fasteners and hook part that hangs the basket. I think most hanging baskets usually have 3 of these ends that go up to the hook, and I cut off the fasteners to use for my new part that would hang the basket. More on those in a minute.
Save these.
Step 2: Wrap the whole basket. With my string ready, I added a spot of hot glue to the very center of the basket’s underside, and I stuck the end of the string there. Then, going around and around from this center, I added dabs of glue to hold the string tightly in place as I circled around the bottom to cover it.
NOT cutting the string, I moved up the basket from the bottom/underside and continued to wrap the string around and around the basket’s sides. I added more glue then I’d planned, so this took a bit of time, but I wanted the string to stay as tight as possible to hide the black basket decently. This was a lot of going around and around. When I reached the top of the basket’s main section, I cut the string and glued the end down tight.
Starting to wrap from the bottom.
If it doesn’t look covered to your satisfaction, you could always go around a second or even third time, if you have enough string. I was satisfied with one layer. You also could make one long braid and wrap that around and around, but that seemed like more braiding than I wanted to do – but it would look nice.
Step 3: Braid 3 equally long braids for hanging the basket. These will be used to hang the basket from the 3 fasteners, and they run down the sides to tie under the basket and make it look like they hold the basket too. I measured…sort of…by stretching my arms wide and cutting each strand of string to that length. You’ll need 9 equal strands, 3 for each of the 3 braids.
After tying 3 strands together at one end, I braided them together and then tied the other end. I did this to make 3 braids of the same size.
Making hanging braids.
Step 4: Wrap and connect the fasteners for the hanging braids, then tie the braids. Using my string again, I tied on an end to a fastener and wrapped it around until all the plastic was pretty well covered, then tied it off again and added a spot of glue to help. I did this for all 3 fasteners.
Then I took my finished braids and found the middle of each, and that was where I stuck on my fastener before snapping the fastener back in place onto the basket. I then tied a knot over the top of the fastener where it stuck up a bit, just to cover the plastic end. Again, I did this for all 3.
Wrapped fasteners and finding middle of each hanger braid.
Once they were on, I took one end of each braid and tied these together, making sure they were equally long so the basket would hang straight.
For the other end of the braid (the other half that wasn’t tied above), I made sure all 3 strands hung evenly to the underside of the basket and then tied them together in a knot right at the center of the basket’s underside. Once this knot was tied and secure, I undid each braid’s tied end and unbraided them so the strings hung more like tassels from the bottom of the basket.
(Forgot to take a picture of the bottom until I was done)
That gives you the look of the basket hanging from a little braided holder.
Step 5: Add thicker braids along the top and bottom of the basket. Once the fasteners and braided hangers were on, I wanted a thicker braid around the top edge. This again took 9 arm-length strands of string, but this time I tied them all together and braided using groups of 3 strands for each section. This made a thicker braid and was actually easier on my fingers. 😆
Taking one tied end of this bigger braid, I glued it just over the inside of the basket, then glued it around the basket’s top to cover the edge AND cover the fasteners. I ended up doing 2 laps around the top to completely cover the top of the basket.
Top thick braid on.
For the bottom, I again cut 9 strands, but these only needed to be about half as long because the bottom of my basket was narrower and I didn’t need to do 2 laps around. Rather than securing a knotted end, I took the end of my thick braid and squeezed hot glue into the strands to secure them together. Then I ran it OVER the three hanger braids and glued it all the way around the bottom of the pot. When I got back to my starting point, I cut the end and again squeezed glue right into the braid’s end to hold it together without a knot, then glued it in place.
Step 6: Add decorative braids. With the base wrapped, hanger braids on, top braid on, bottom braid on – all that was left was adding some decorative braids around the pot. I did a few thick and a few thin, and I glued them all over in loops around the pot, making sure to run them under the 3 hanger braids where they ran down the sides. (I just thought that looked better.)
Glueing decorative braids on.
When my hands were sick of braiding, I was done! Putting my fake plant back in the basket, I hung it over my tub again, and it looks so much nicer now.
Thursdays are karate days, so today seemed perfect for tackling this project. I’d promised to build shelves for our home gym to display my daughter’s karate belts and awards, and I managed this without a trip to the hardware store – so it’s a win for me too!
BEFORE: Scrap wood.
Supplies:
(As an advertising affiliate and Amazon Associate, I earn a small commission from qualifying purchases. But it doesn’t cost you anything extra and helps me keep up my site!)
Step 1: Plan and cut wood. I had a lot of good scrap wood left from when I redid my other daughter’s bed, and these shelves took two 2x2s (mine were 6 ft long), twelve 11-inch 1x4s, and seven 16-inch 1x4s.
I wanted an overall narrow but tall shelf stand, so that’s why I went with 6-feet tall. And by setting my 1x4s across the two 2x2s, I decided I liked 11-inches for the crosspieces and 16 inches for the longer shelf pieces, and this let the shelves stick out 2.5 inches on each side. Pretty easy math that way, so I went with it.
I cut my 11-inch 1x4s first, then my seven 16-inch 1×4 pieces. I didn’t have to cut the 2x2s at all because mine were already 6 ft.
Cutting 11-inch crosspieces.
Step 2: Attach crosspieces. I did all of this by lying my wood across the top of a yard cart, but you can use the floor or a table. The whole project was easy to do with the thing lying down, so don’t worry about standing anything up until the end.
First, I made VERY sure that my 2x2s were evenly spaced and square. You definitely want the bottoms even so it sits straight. Next, I nailed on one of the 11-inch pieces across the top, keeping the edges as flush as I could. With that top piece on, I did the same at the bottom. That kept the overall structure square while I nailed on the crosspieces in the middle. I spaced them semi-evenly, but I was a bit lazy with it – I just did my best to make sure 12 inches went from the top of one crosspiece, skipped the next, and hit 12 inches at the top of the next board.
Attaching crosspieces.
Checking spacing for shelves.
Step 3: Attach long shelf pieces. Using wood glue, these stayed in place nicely. To make things easy, I measured 2.5 inches from each end and marked with a pencil to be sure they ended up in the right position. This seemed like a good idea to help me get them in place quickly once the drippy glue was on.
Positioning shelf.
Then I ran a bit of glue along the top of the chosen crosspieces as well as dabs on the 2×2 where the shelf would connect. Then, I simply set the 16-inch 1×4 pieces on their sides on the 2x2s so the bottom back side stuck on the glue on the crosspiece, which was now “below” the self for a support.
I DID add a few nails at the very topmost board and the lowest board/base to help with stability. Nothing heavy is going on my shelves, so wood glue alone is fine for the middle shelves.
Side note: If you ARE going to put heavy things on your shelves (like statue awards, etc.), you should probably add a few nails into the top of each shelf where they sit on the crosspiece like a base support. To make this easier, you might want to nail them on BEFORE connecting the crosspieces to the 2x2s so your hammer or nail gun has room.
Attaching shelves.
Step 4: Paint. After the glue dried, I sanded the exposed edges and sides smooth. Next, I painted the whole thing in a dark blue…because that’s what I had a lot of. 😆 I used 2 coats but didn’t bother with the backside because that’ll be against the wall. I did paint the insides and outside of the 2x2s because you can see through the spaces between the crosspieces.
Step 5: Secure with a furniture hook. Obviously this would be very tippy if left standing against a wall, so I added a furniture hook to the back wall and screwed a connecting line onto the back of the top crosspiece. This holds the whole shelf secure so it doesn’t fall over, but it’s not a heavy-duty install that would make it difficult to relocate if we want to move the stand later.
Step 6: Add hanging hooks. If you’re hanging medals on these shelves, these hooks are a great idea to add some dimension to the shelves. My daughter wanted her belts to hang up once rolled, so this worked for those too. I decided to screw my hooks in front of each 2×2, positioning them forward enough to spin around.
Screwing in hooks.
Step 7: Add your awards! We’re apparently missing a paper for the orange belt, but otherwise I could put things in order and leave room for belts to come! I hung the belts with just a piece of string wrapped around them and then attached to each hook (I need a few more hooks, but folding a few belts adds variety, right? 😉) I also had a few boards she’d broken, so I added those too. And we framed the little awards she’d been given, so it’s all there for her to be proud of.
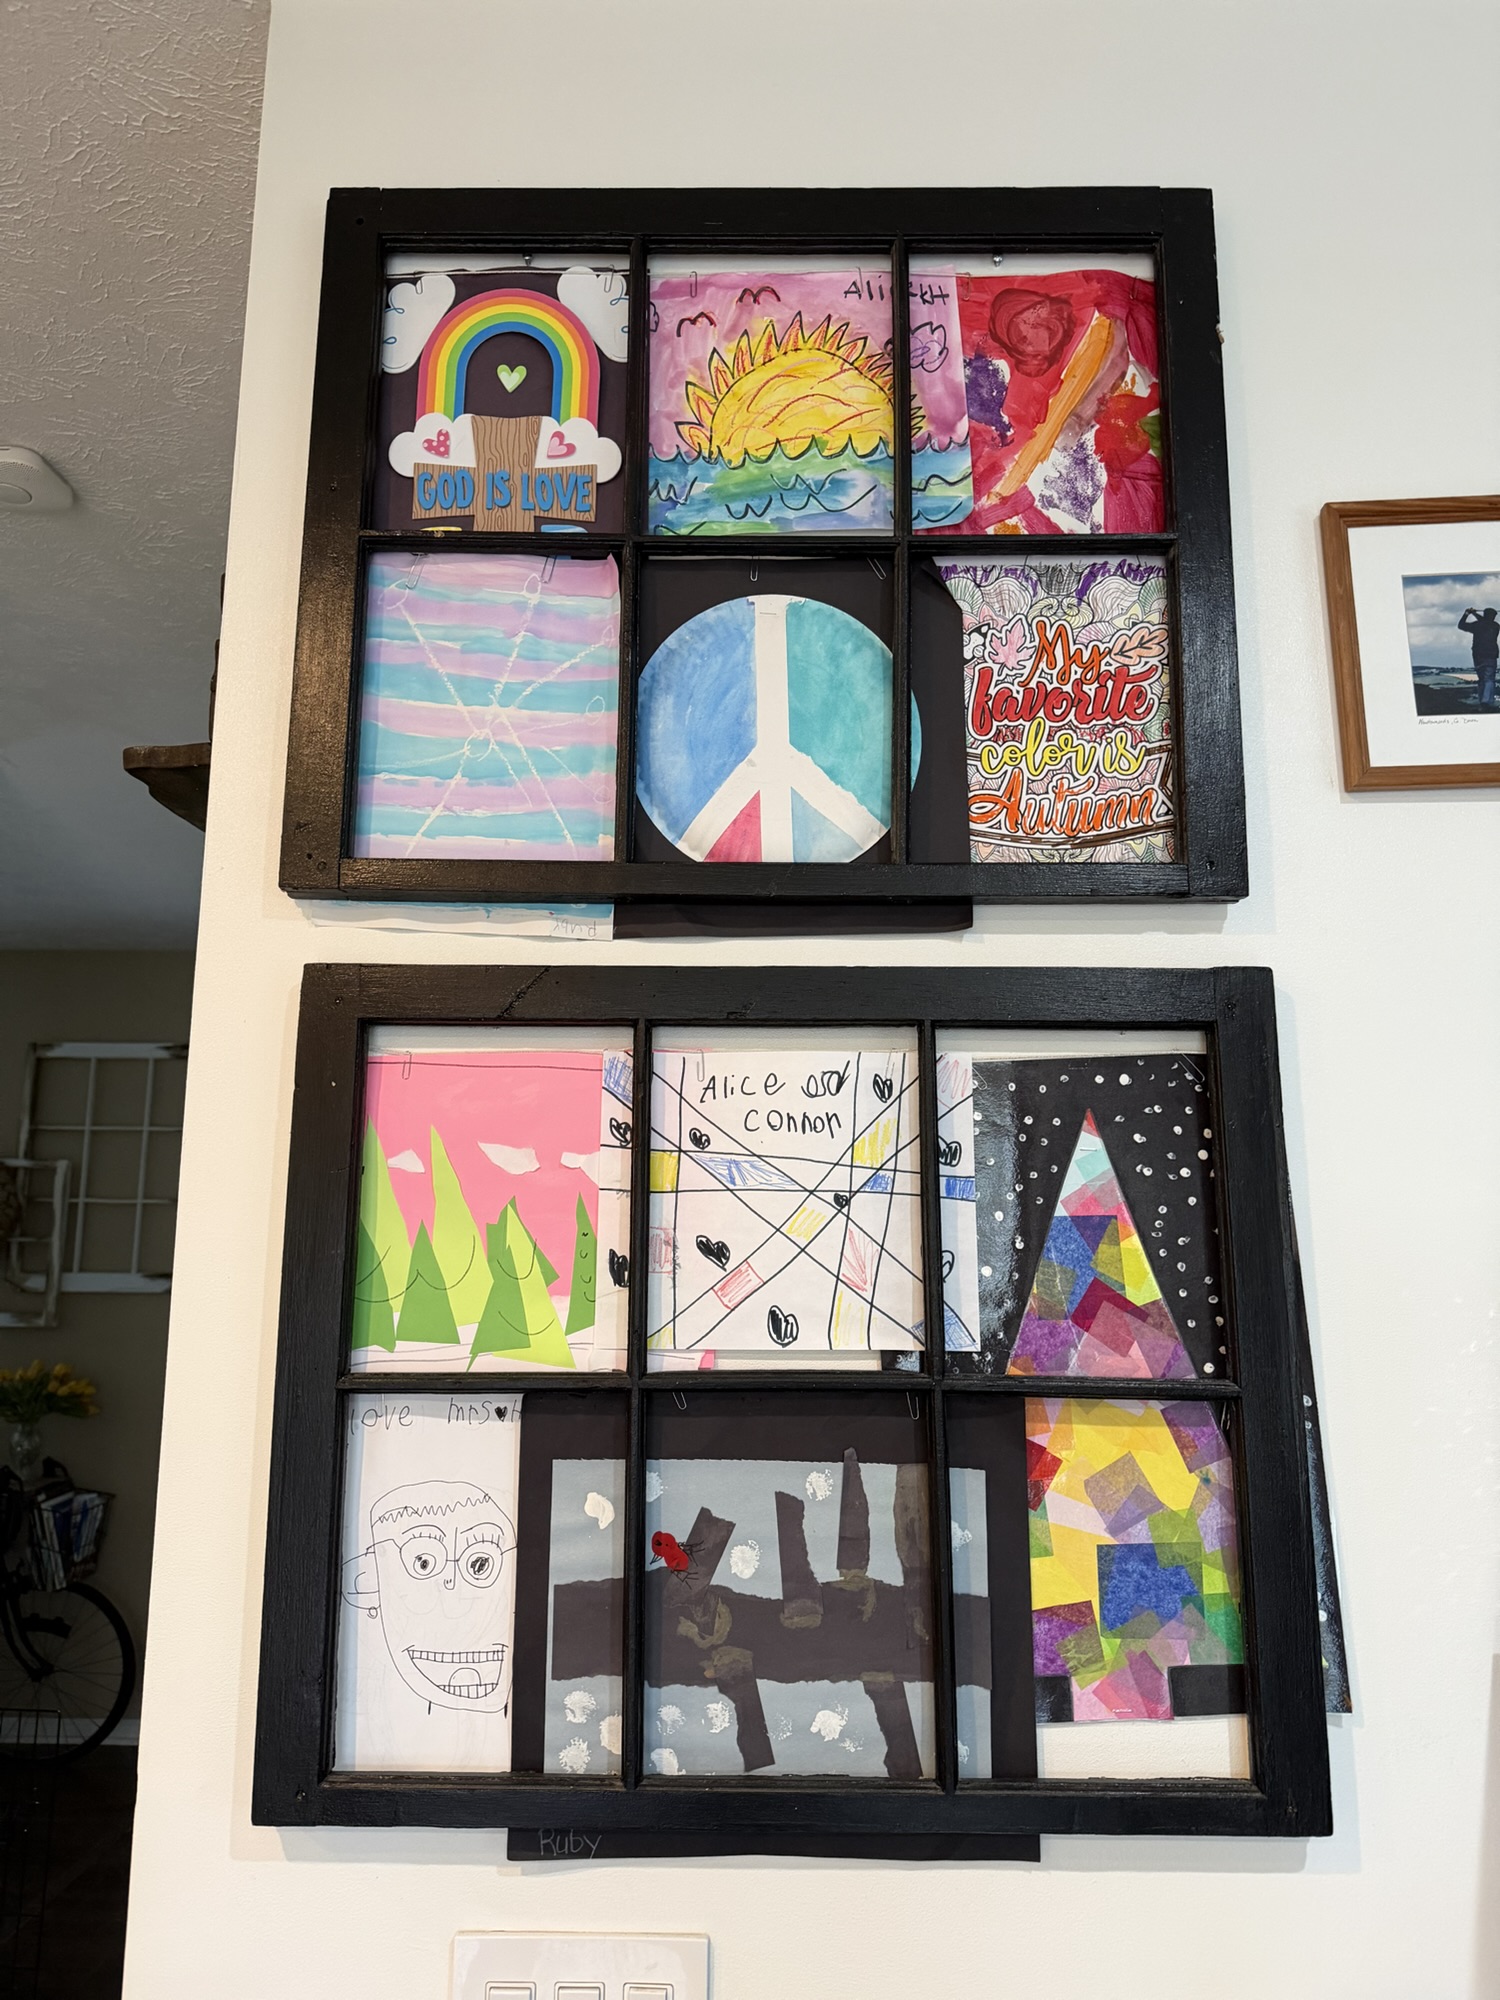
We only have so much room on our fridge for the art my kids make me that we HAVE to keep. I wanted a slightly nicer way to display these masterpieces without just tacking them on a corkboard, and those cute little frames you can buy to display kids’ artwork would never be enough, plus you never know the size of paper that’s going to come my way.
But I did have 2 old window frames, so…
Supplies:
(As an advertising affiliate and Amazon Associate, I earn a small commission from qualifying purchases. But it doesn’t cost you anything extra and helps me keep up my site!)
Window frame (can use craft store window frame with chicken wire removed for smaller frames, or search Etsy for full-sized window frames)
BEFORE: Old window frames, string, and paperclips.
Step 1: Paint or stain the frame. Mine were already painted black, and I thought that would look nice for a distinct frame, so I left them black.
Side note: I know not everyone has spare window frames lying around, but you can buy the same size as mine on Etsy or smaller frames at a craft store – the kind that have chicken wire to clip things onto. If you’re like me and don’t really like the farmhouse-y, chicken wire look, you can snip off the chicken wire and go from there. Or, if you want to be really creative, you can make frames from 1x2s. For my project, I used old window frames all ready to go (like you’d find on Etsy).
Step 2: Cut string. Here’s the thing – I didn’t want to just stick the artwork on the front of the frames because that would hide the frames, and the artwork would flap around from open windows and fall off too easily. So, I wanted the artwork to sit behind the frames and be…well, framed by each section of the frames. This meant I’d need to attach the art papers to the backside of the windows. To do this, I needed something that wouldn’t stick out or keep the window from hanging flat against the wall.
Solution: string, paper clips, and staples, all lying flat against the back of the window so it wouldn’t make the frame stick out or fall off the wall.
Turning the window frames backside-up, I unspooled my string to stretch from one side of the window to the other and cut the string so a little extra would go on either end. I needed 2 strings at roughly the same length for each window.
Cutting the right amount of string.
Step 3: Staple on the string. For the topmost string, I needed to bring it down about a half inch so the hanging screws in the wall would have a place to catch/hold the frame without getting caught on the artwork or string. Starting at one end, I looped the string a bit to add to how it would be held down, and then I stapled the string onto the window frame. Holding that tight all the way across to the other side, I also looped that end and stapled it in place.
To keep the string from sagging, I stapled the string onto the interior divider sections of the frame too.
Stapled top string to a middle divider.
For the lower section, I ran a string from side to side right along the middle divider. Again, I looped each end to add to the grip of the staples, keeping the string tight across the center. Also again, I kept the string from sagging by stapling the string onto the interior divider sections.
Stapled end.
Step 4: Add art papers with paper clips. Lying each piece of art face-down, I arranged one at a time and used paper clips to attach each paper onto the strings. I ended up using 2 paper clips for each paper just because the papers were a bit heavy and I didn’t want them to tilt all crazy.
Placing paper clips.
Step 5: Hang the window frames. I’d already screwed or nailed 2 screws/nails for each window frame, and you just have to be sure they are level and in position to catch the window frames so they hang nicely. Because of that half-inch gap at the tops of my windows, this left plenty of room to hang the windows and see what I was doing without poking into the papers. (Spacing this top string also makes it easier to change out the artwork later, without having to take the whole thing down.)
That was it! I can easily swap these artwork pieces when new artwork comes along by pulling the art off the paper clips and replacing them. I like that they’re secured in place and won’t fall or blow around, and they look nicely framed, kind of like a collage, without needing a dedicated frame for each piece.
Our bookshelves on either side of our fireplace were overflowing with books, wobbly from the weight, and – while pretty and functional – looked too small for the space. So, I decided to create floor-to-ceiling, custom bookshelves instead. This was one of those projects that took a lot of planning beforehand, but once I had things figured out for one, the second one was much easiest and faster to recreate. And it only took 5 trips to Lowe’s, so that beats my average for a project this big! lol
Supplies:
(As an advertising affiliate and Amazon Associate, I earn a small commission from qualifying purchases. But it doesn’t cost you anything extra and helps me keep up my site!)
2x4s – bottom frame (I needed 2 total for 2 bookshelves)
1x4x10s – left and right frame (I needed 8)
2x2x8s – top frame and back frame (I needed 8)
1x12x8s – shelves and interior side pieces (I needed 14)
1x12x10 – side exterior piece (I needed 2)
1x2x8s (nicer wood, like poplar) – fronts (I needed 7)
1x4x10s (nicer wood, like poplar) – fronts (I needed 4)
Note: All of the instructions below are for the bookshelf I did on the left, but I did exactly the same thing for the one on the right, just kind of mirrored. If I learned something better to do while constructing the right one, I included that in my instructions below.
Step 1: Measure, plan, and buy wood. Obviously, your dimensions and the amount of wood you need will be different from what I got, depending on the height of your ceiling and how wide you want your shelves. Also, if you have a straight ceiling rather than a vaulted ceiling, this will be much easier for you! I highly, highly recommend measuring and planning everything out COMPLETELY before buying your wood to save yourself the headache of extra trips, the expense of buying more than you need, etc.
Starting at the left wall/shorter ceiling side, I measured and found that the ceiling right at the corner along the wall was exactly 9 ft. This meant my vertical boards on that side would need to be 9 ft. Because I wanted the whole bookshelf to be 41 inches long, I measured 41 inches out from that left side wall, marked that point, and used a level vertically to find the height at that point on my angled ceiling. That point 41 inches out showed that my right side’s height would be about 9 ft and 10.5 inches. I also knew that I wanted to work with 12-inch wide boards for the shelves themselves, so this would make my bookshelf come out 12 inches from the back wall. Plus, I played around with spacing and decided on 7 shelves total, so that figured into my board shopping list as well.
Okay. So now I knew I needed 10-ft boards for my sides that I could cut down to the right heights – both the 9-ft side and the almost 10-ft side. Because everything going across from side to side would be well under 48 inches, that meant I could use 8-ft boards for everything running lengthwise, and I could cut the number of boards I needed in half that way, by cutting 8-ft boards in half. As for depth, I’d use 12-inch boards (which actually are 11.25 inches) for the shelves. At the front of all this, I’d use 1x4s and 1x2s to cover all the frame and shelf pieces, and since these are actually 0.75 inches, that would bring my whole depth to the 12 inches I wanted without having to add wider or smaller boards anywhere else.
Now, starting with the frame…
To give myself a good bottomframe, I planned to use some scrap 2x4s – one running 40 inches along the back wall, and one running parallel to that one at 11.25 inches out from that wall. The base would only go 40 inches because my right side pieces would attach at the ends of these 2x4s, and eventually all those boards’ width would bring me to the full 41 inches that I wanted for the total length of my bookshelf. Meanwhile, the base would come out 11.25 inches from the wall because this would be exactly the depth of my shelves, including the bottom shelf that would sit right on these 2x4s.
For the frame’sleft side, I planned for two 1x4s running from atop the bottom base up to a little shy of where the wall met the ceiling. These two framing 1x4s would be screwed into a stud and/or connected by construction adhesive to the wall. These pieces could be a little short of 9 ft because I wanted room for the top pieces to run all the way to the wall (more on that later).
For the frame’s right side, I’d again use two 1x4s, this time running the full height from the floor to the ceiling. The bottom ends of these 1x4s would screw into the ends of the 2x4s at the bottom base. As for how these framing pieces would attach at the top…
For the frame’s top, I’d take two 40-inch 2x2s and match what I’d done at the bottom – I’d run one along the back wall where it met the ceiling and run one 11.25 inches out from the back wall. However, because these would be angled on my ceiling, I needed to cut the right-sided ends so the angle would work to meet the 1x4s that needed to connect at the right side. I didn’t worry about angling the left ends because they didn’t have to perfectly match where that end touched the wall since this top framing would be hidden by my front boards eventually anyway.
Note: To find this angle… An easy trick that I learned somewhere is to hold a scrap piece of wood where the angled board will need to be, then take a level and hold it vertically at the mark where the board will need to end. By marking a level line on the scrap wood, that gives you a correct line for where the board needs to be cut at that angle. You can then cut this scrap wood along that line, and by holding this little piece of wood as a template against each board that needs to be cut at that angle, you can easily duplicate that angle over and over.
Picture from later, but how to find the angle.
For the frame’s back, I wanted a 2×2 horizontally going across to help support each shelf and to connect my back right side piece of the frame. These could be screwed into studs on that back wall, plus I’d use construction adhesive. This meant I needed six 2x2s placed at each height where I wanted my shelves, with my bottom base acting as the support for the very bottom shelf.
At this point, it was very helpful to draw a line all the way up my wall to mark 40 inches out, where all these frame pieces needed to reach. HOWEVER, you shouldn’t just keep measuring 40 inches from the back corner because (as I discovered quickly) walls are not always level. Our wall dipped out around the middle and would have thrown off everything if I’d just measured 40 inches to get my line. Instead, I measured from where my bottom base needed to come out 40 inches, and then I used a level to draw my line all the way up, checking occasionally to see that it was close to 40 inches from the corner.
For the shelves and sides…
I didn’t want to see or even use hardware at all, instead resting each shelf on boards running up the sides along the insides of my frame. This allowed me to use the same 1×12 boards for both the shelves and these solid side pieces spacing out between the shelves. The height of each side piece would depend on how much space I wanted between the shelves, but one 8-foot board would easily get me at least one shelf and two sides.
For the front pieces, as I said above, I’d use 1x4s along the sides and the very top to hide the frame, the ends of the shelves, and also the interior side pieces holding up the shelves. The tops of the front pieces running up the sides would have to be cut to angle along my ceiling, and then the top crosspiece would have to be cut to fit between those pieces. SO, be sure to keep that little piece of wood as a template to trace onto these front boards. As for the front pieces on each shelf, I’d use 1x2s cut to the exact lengths of my shelves between the left and right front pieces running vertically.
That was my plan! Confusing? Here’s a picture to help.
Plan drawn.
On Valentine’s Day, my husband and I went to Lowe’s and bought all the 1x12x8s (shelves and sides), 2x2x8s (top and back frame pieces), 1x2x8s (nice front pieces), 1x4x10s (left and right side pieces as well as nice front pieces), and 1x12x10s (covering side pieces) that my Jeep could carry. Really, it was the best date we’ve had in years.
Step 2: Remove old floor and mark final guides/lines on walls. Before you build anything, remove the old flooring so you’re working on a solid, level surface. Also remove the baseboard so everything will go flush against the walls. I started by using a cutting multitool to remove the baseboard 41 inches out along the back wall and 12 inches out along the left side wall. For the floor, I used painters tape to mark the area – again, 41 inches x 12 inches. Then I used the same multitool to cut out the old flooring along my taped lines.
Removing our laminate flooring is always very satisfying. But it’s dusty, so be sure to clean that all up before you start using adhesive.
Floor and baseboards removed.
Also at this time, I made double-sure that the vertical line I’d made on the back wall was 40 inches from the corner BUT MOST IMPORTANTLY level all the way up. After that, I used a level to make horizontal lines on the back wall where each 2×2 would be placed to support each shelf. One end started at the corner, and the other end touched that vertical line at 40 inches. Also on that back wall, I used a stud finder and marked studlines all the way up so the studs would be easy to find when attaching those horizontal 2x2s. Next, I marked on the left wall 11.25 inches out from the back wall. I again used a level and made a guide line vertically going up the left wall at 11.25 inches. Where that line hit the ceiling, I made a mark to show where the top 2×2 should run in a line along the ceiling, again at 11.25 inches out from the back wall. How long was this line? I used a square from the back wall’s line (that 40-inch mark line) and found where my ceiling line should connect that far, at 40 3/4 inches because of the angle.
Basically, I outlined where my frame should sit along the walls and ceiling so that everything would be level and square without having to double-check before placing each piece.
Marking lines for 2x2s at 40-inch line.
Step 3: Build the frame. Starting at the bottom, I cut two 2×4 pieces to 40 inches. I used construction adhesive on the bottom and back side of the 2×4 that I set along the back wall, and I made sure the end was tight against the left wall. To really secure it in place, I screwed it into the floor as well. For the second 2×4, I measured using a square and marked the floor at 11.25 inches out from the back of the back 2×4 against the wall. Then I glued that front 2×4 down along that line so the very front was 11.25 inch out from the back. I also screwed this one into place.
Frame bottom in place.
Next I did the left side. I ended up cutting the 1x4x10s down to closer to 8 1/2 feet to leave quite a bit of room for the top frame 2x2s, and that’ll all make sense a little later. After putting construction adhesive on the backsides of the 1x4s, I pushed one into the wall against the very back corner, with the bottom end resting on the 2×4 along the back wall. I had a stud to work with in the corner, so I added a few screws on the way up to help attach it to the wall too. With that back board in, I put construction adhesive on the second 1×4, set this front 1×4 on the front 2×4, made sure it lined up level with the vertical line I’d marked on the wall, and pressed it into place. I also added a few screws to this board, but they were really just there to help hold it in place while the adhesive dried – without a stud, the screws here don’t do much heavy lifting.
Left frame pieces in place.
Next, I measured what was left of the horizontal lines on my back wall. With the left back 1×4 in place, I still had 39.25 inches of my original 40-inch lines. So, that’s what I cut six 2x2s down to – 39.25 inches each. For each of these, I put construction adhesive on the back side, pushed them in place at my lines, and then screwed them into my studs where I’d marked the stud lines. I paid very close attention to the right ends of these 2x2s because they needed to be exactly even along the 40-inch marked line so that the right frame piece would sit flat and level against these supporting ends.
Back frame pieces in place.
Once I had those six 2x2s going along the back wall, I measured for the very top one that would create the top of the frame along the ceiling. This was where I had to cut the right end of a 2×2 at my angle so everything would line up, but first I measured from the left corner to where my 40-inches line was marked, just to be safe. This was 40 3/4 inches because of the angle. This meant that the longest part of my cut angle needed to be that length with the bottom part of the cut angle slightly shorter. (The picture makes more sense of this.) Taking my scrap piece of wood with my exact angle, I placed it over my 2×2 at the appropriate length and traced a line, then cut at that line. I did this for both the front and back 2x2s for the top pieces of the frame. Honestly, these were probably the two hardest boards to install because I had to hold them over my head while on a ladder, and it was hard to see my marks on our textured ceiling. But with construction adhesive on the tops, they stayed on well enough for me to screw them in place, again making sure the right ends touched my 40-inch marks. I did end up putting an 8.5 inch 2×2 between these two top pieces to connect the right ends, as this helped to keep the front one in place since the back one was screwed into studs.
Top frame pieces going in.
Finally, I added the 1x4s to the right side to complete the frame. Starting with the back one, I cut it to 118.25 inches to stretch floor to ceiling. Setting the base against the side/end of the back 2×4, I made sure the side of the 1×4 was flush against the back wall and the inside was flush against each 2×2’s end at that 40-inch line. Then, I screwed the 1×4 into the 2×4. Working my way up, I put a screw through the 1×4 into each 2×2, including the one at the very top that was angled to sit flat against the 1×4. With that on, I cut the front 1×4 to the same length and set it to line up with the end of the front 2×4. I checked with a level, then screwed it onto the 2×4. Climbing my ladder and carefully holding the board, I lined it up with the top 2×2 and again checked for level before screwing it into that 2×2 as well as the 8.5 inch crosspiece, since it was there anyway.
Right side pieces on.
That was it for the frame. This frame is really just for holding everything to walls and giving the rest of the build the correct spacing. I know that 1x4s might seem a little flimsy for a “frame,”but all the other boards that attach to it add the stability and strength, so don’t worry!
Step 4: Install shelves and side pieces. Starting at the bottom (this is important!), I double-checked how long each shelf needed to be to run from the left 1x4s to the right 1x4s. Again, like my back 2x2s that these shelves would sit in, they needed to be about 39.25 inches long. I say “about” because you have a little wiggle room here as far as spacing. The ends will be covered entirely, so if you’re off a little it won’t show.
I cut a few shelf boards at a time to make my life easier, and because these are the first boards we’ve used that are going to really show, I made sure to sand the corners and any rough bits. However, because the fronts of the shelves are going to be covered by front 1x2s, they don’t have to be perfect.
Starting with the bottom, I set my shelf board on top of the 2x4s and made sure the front edge lined up, which it did because these are 11.25 inches wide, just like my base. The board should also, therefore, line up with the front edge and back edge of the 1x4s on either side. I secured this bottom shelf with a few small nails from my brad gun. HOWEVER, do not nail down the rest of the shelves in case you need wiggle room later.
And now I’m going to tell you what I did at this point when building my second bookshelf on the right side of the fireplace because it made this step much easier and faster. 😆 Before measuring and cutting for the side pieces that would rise on the insides of the bookshelf on top of this first shelf, I took my level and set it along the side 1x4s while resting on the back 2×2. Once level, I drew a line on the front 1×4 to mark where the next shelf should sit to be level. I did this for each 2×2, marking both the left and right side 1x4s to mark where each shelf should sit. Then, with my bottom shelf on, I could measure from the top of that shelf to the marked line to know how tall each side piece needed to be that the next shelf would sit on. (Again, see picture for clarification.)
My first shelf needed to be 17.5 inches tall to fit over our electrical outlet, so I cut two pieces of 1×12 to that length. To make these pieces fit around the back 2×2, I used a jigsaw and cut out the top corner – one for the left side board and one for the right side board. I thought this would create more hassle and be difficult, but it really wasn’t bad at all. With these pieces sanded, I slid them in place on top of the bottom shelf, made sure they ran up to the level lines I’d marked at the left and right, and then used my brad nailer to secure them to the insides of the 1x4s.
Bottom shelf and side pieces on.
I set the next shelf on the back 2×2 and also on the tops of these added side pieces, and the shelf sat perfectly level and sturdy. Then I measured from the top of that shelf to the next marked level line, and these left and right pieces needed to be 15.25 inches for that shelf’s height. I cut these pieces, notched them with my jigsaw, sanded them, slid them in place, nailed them on, and moved on to the next shelf.
Side piece on.
I did that all the way up for each shelf.
For the very top, I measured to cover the whole top base, similar to how I’d done the bottom shelf on the 2x4s. I did NOT worry about angling this board, because the ends were going to be covered anyway. I cut this board to 40 3/4 inches, and I put the left end right against the wall with the higher right end against where the 2×2 connected with the 1×4. I nailed this board onto the 2x2s. Next, I measured the space that was left between that top board and the highest shelf. My left side was 5.5 inches, and this board did not need to be notched with a jigsaw because there was no back 2×2 to worry about. I slid this in place and nailed it onto the left 1x4s, and this board also helps hold the top piece in place a bit should it ever wiggle free (I don’t foresee this happening, but it seemed a good idea to be safe). For the right side, I found it was 10.25 inches, so I cut that board and nailed it in place too.
Top pieces on.
Note: If you want to be fancy, you can cut the tops of these side pieces to match the angle of the top board, but I wasn’t going to mess with that. It was easy enough to fill the small gap with caulk later, and it’s so high up there that you can’t tell anyway, so it didn’t seem worth the hassle.
Step 5: Add exterior side board. With the shelves and side pieces in place, I took a long 1×12 board and cut it to 118.25 inches. This was by far the easiest board to install! After setting it on the floor against the outside of the frame’s 1x4s, I held it level against the front 1×4 and nailed it onto the 1x4s all the way up. There was a little gap at the top because of the angled ceiling, but this was later easily filled by caulk to hide it. If you wanna be fancy and cut the angle, be my guest.
Full side board on.
Step 6: Add front/covering pieces. All that was left to attach now were my front cover pieces of nicer 1x4s and 1x2s.
For the tall pieces running up either side, I DID angle the tops by using the wood template I’d made earlier – just be careful to turn it the right way! Because these will be touched a lot, I made sure to sand the corners really well on the sides that would be exposed. I added these side pieces first, with the left one against the left wall – checking for level before nailing it on – while the right one stood level and flush with the far exterior 1×12’s edge. Obviously these come in a little farther than the frame boards, and this helps to cover the ends of the shelves too.
Next, I did the very top board that runs lengthwise between these side pieces. I was going to be all particular and find my angles the usual way by measuring and using my template, but I ended up cutting a board close to the right length and then holding it over the front side pieces, taking a pencil, and reaching behind to draw a line at either end where it needed to be cut to line up. Once this was cut, I held it in place and nailed it onto the top 2×2.
Side fronts on and planning top front.
Finally, I measured each shelf between these side boards to find my exact length for each 1×2 before cutting. This was a little time-consuming to do it one at a time, but I wanted them as tight as possible to look best. After playing with the position a bit, I decided to attach them with about a quarter of an inch sticking up above each shelf to make a little lip. I positioned them this high, stuck one brad nail in the center, and then used a level before nailing either end too.
Note: If your shelves aren’t quite level, using these covers and making them level is a great way to hide where you’re a bit off. Also, if your shelves don’t come out as far as they should, now is definitely the time to adjust them and pull them forward so they’re lined up with this front 1×2. I’m glad I waited until this point to be sure of their position, but now is when I finally nailed them into the back 2×2 once they were lined up.
Last front pieces on.
That was finally it for building!
Step 7: Add base trim. As a finishing touch to the built-in look, I added some quarter round molding like what’s around the rest of our room’s baseboards. This helped cover the little gaps between the base and the flooring, and it pulled it all together to look like the shelves were always meant to be a part of the room. I also put back some of the baseboard that had popped off earlier.
Added quarter round.
Step 8: Caulk, fill nail holes, and paint. One other thing I did here was to drill holes into the two bottom shelves to allow cords to go down along the back to reach our outlet in the back wall. Definitely do this before painting, if you’ve got a similar setup.
Drilled holes for cords.
Anyway, I first took wood nail filler and rubbed it into all my little nail holes.
Next, using paintable caulk, I used a caulk gun and oozed caulk along all my edges and gaps. I caulked where the front pieces met the side wall and ceiling. I caulked where the shelves each met the back wall, I caulked along each 2×2. I caulked those gaps at the tops of boards that met the ceiling. I caulked the insides of the shelves where the side pieces met at the top and bottom of each, as well as at the notched 2×2 spots. This was very time-consuming but made a HUGE different in the end result. It took the bookshelf from looking like a separate bookshelf to looking like a built-in bookshelf.
Caulking gaps and seams.
It also helps to remember that this caulking step forgives a lot if you’ve got wonky, unlevel walls. This wasn’t much of a problem with my left bookshelf, but our wall on the right side of the fireplace was VERY bowed and left all kinds of gaps – the price I paid for making my shelves level, I guess.
Once all the caulk dried, I painted the whole bookshelf the same color as our surrounding walls – Swiss Coffee. You could paint them any color, really, but it definitely looks better to paint rather than stain the wood. Why? One of the benefits of building the shelves the way I did was that I didn’t need wood along the back, and the wall itself really looks like part of the shelves because it’s all the same color. This wouldn’t really work if you stained the wood. (Also, I wanted the same paint as our walls l because I had about a quarter of my gallon left after I was done with both shelves, and I went around my house and “un-toddlered” my poor walls by giving them a fresh coat of paint. 😆)
Painting.
Honestly, these turned out even better than I’d expected! Somehow, though, we still have too many books. 🤣