Was this one of the first projects I did in our house? Yes. Have I blogged about it yet? No. 😜 But now is the time! I wanted to be really sure this desk would hold up, and 2 years later it’s still working great, so I think it’s safe to say this project is a good one!
When we first moved in, we knew we wanted to convert this small bedroom into an office. It’s right off our master bedroom, and the closet for this bedroom was perfect to make our master closet bigger by breaking down one wall and closing off the wall of our new office. That was a whole project in and of itself, but having 2 solid walls meeting at a corner meant I had a lot more space to work with for a big office desk.


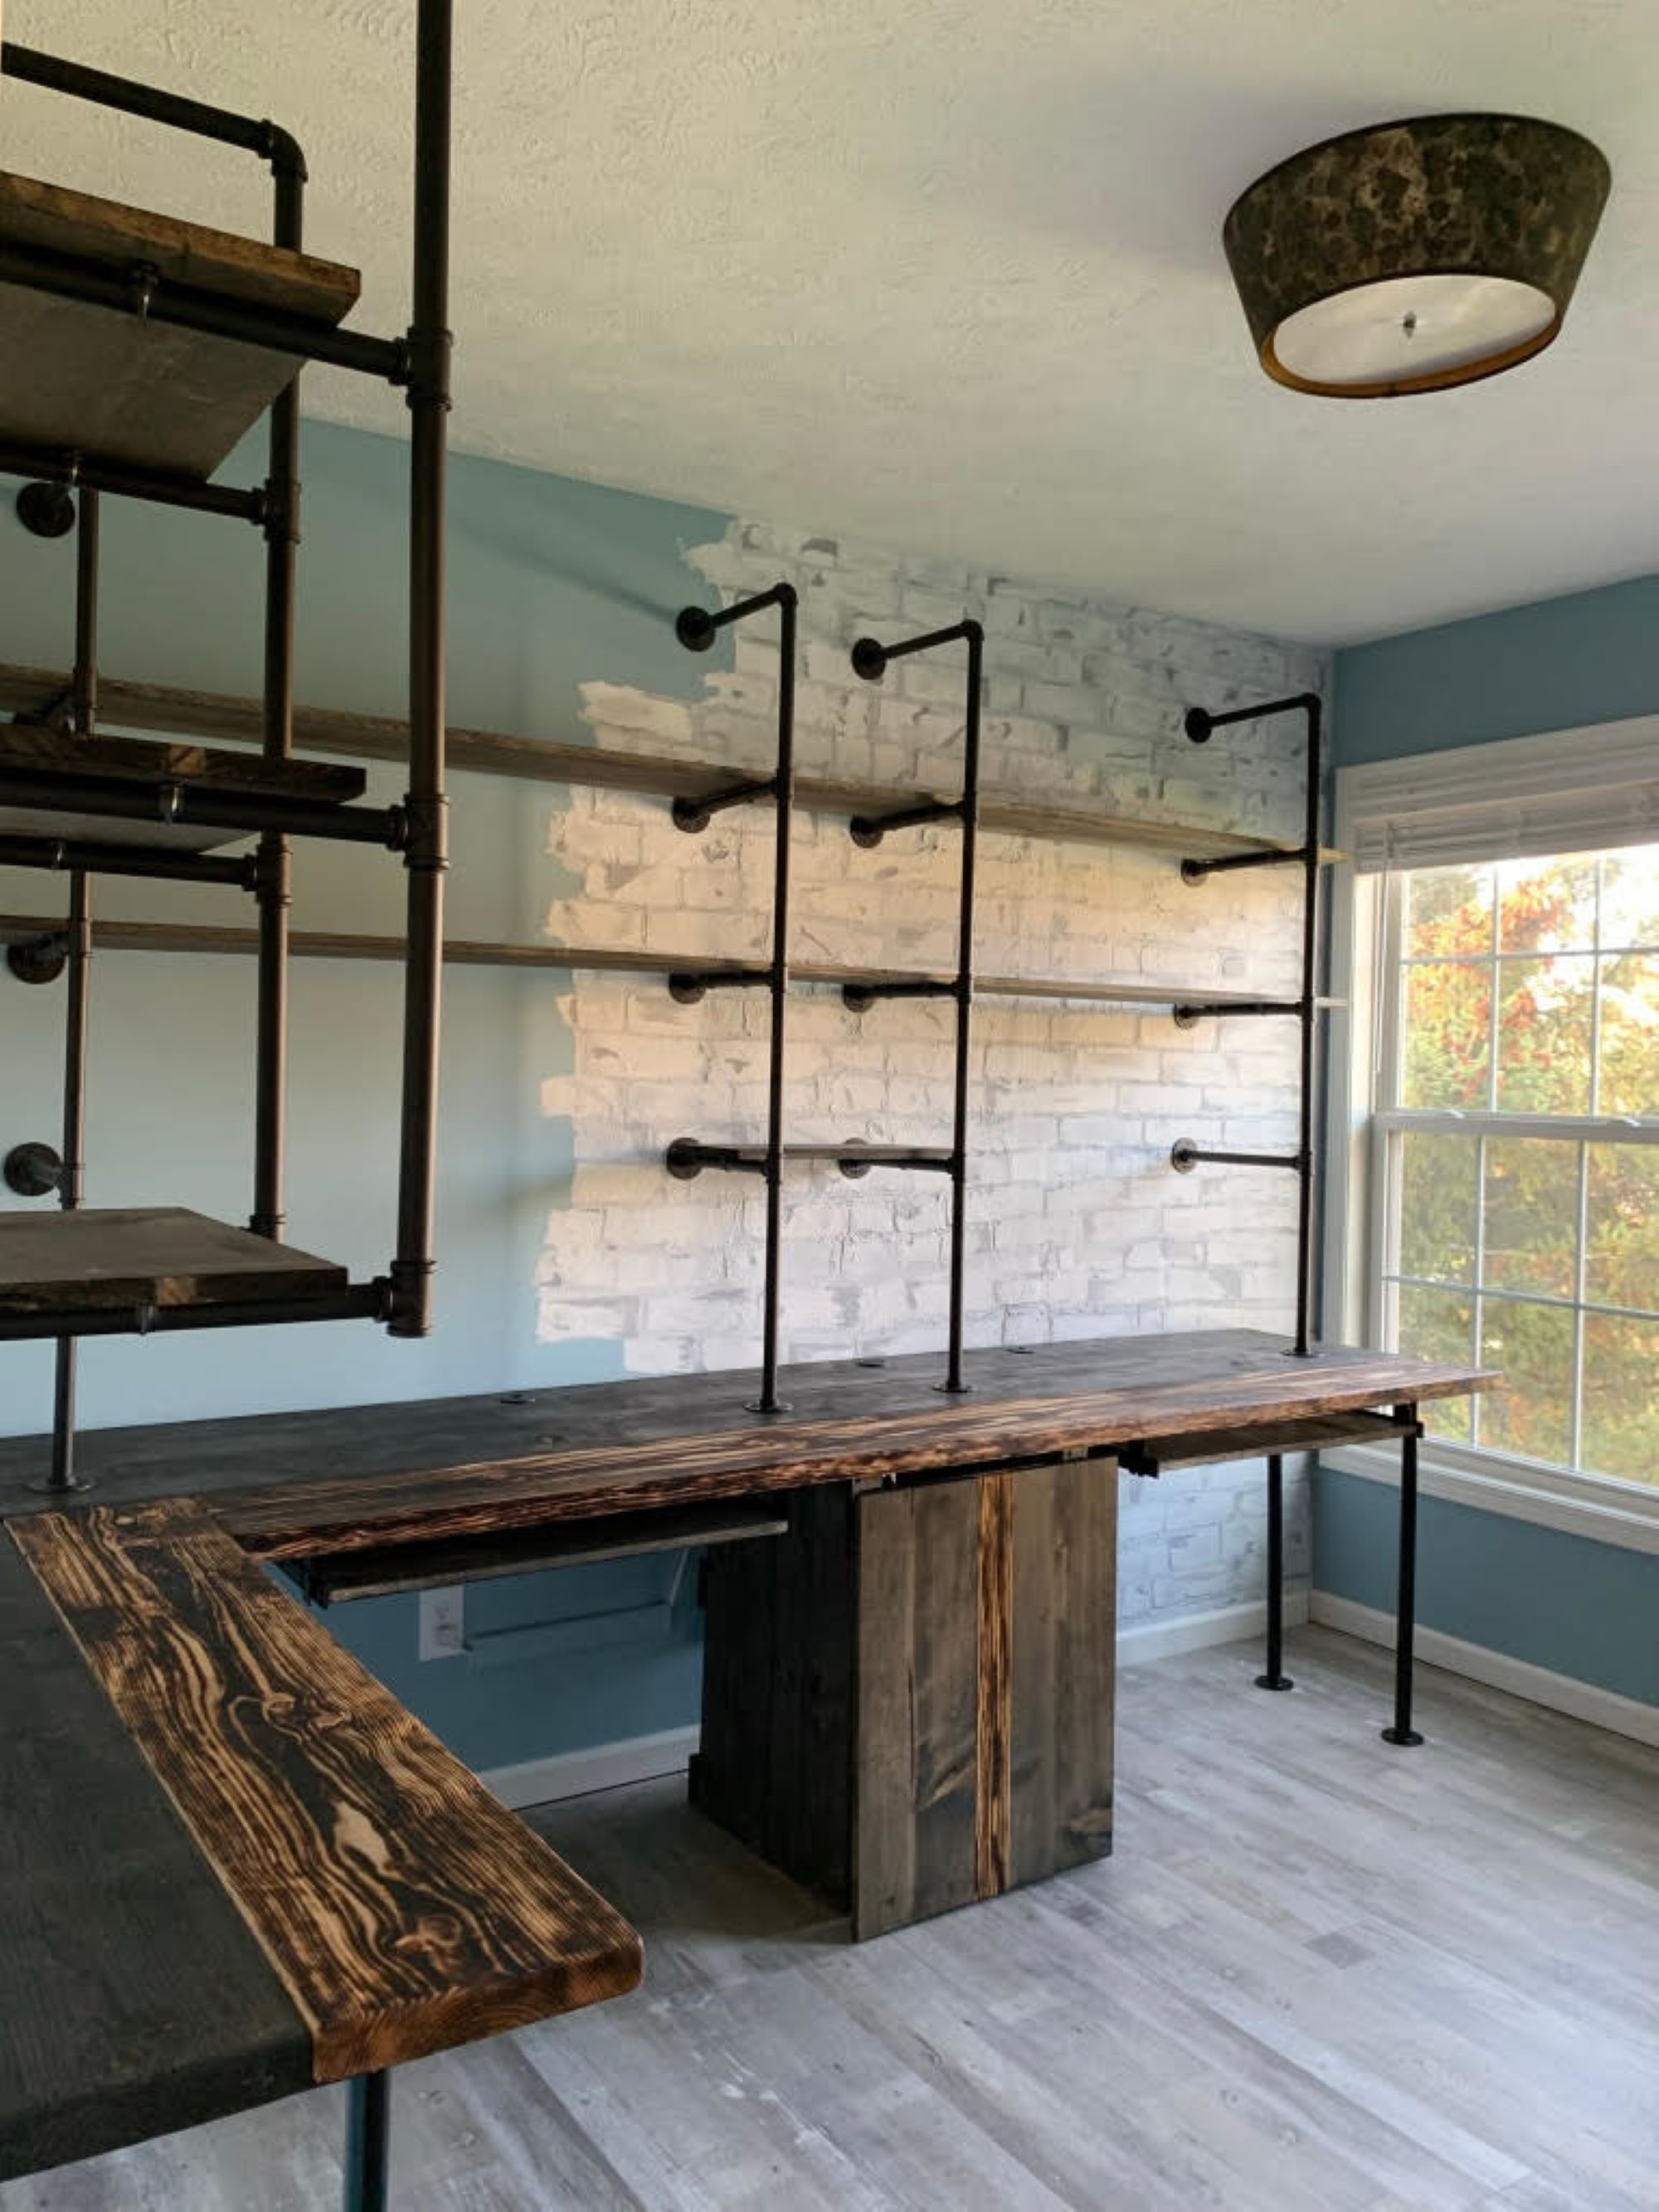
Once done building my wall back together, I ended up making a cool faux-brick effect over where the closet door used to be. (I have a tutorial on how to do the brick look here.) This forgave any less-than-smooth finishes in my construction process. 😆

Before I started on my desk and shelving plan, I tore out the carpet and put down new flooring. And I painted the walls with a blue pretty close to the original, just to give it a fresh coat. Then, it was time for my desk.
Do you have to completely makeover a room before building this desk and shelves? No. But it is important to have the flooring you want first, since the desk legs will rest on the floor for support. Since it’s attached to the wall, nothing moves once you finish building this!
Supplies:
(As an advertising affiliate and Amazon Associate, I earn a small commission from qualifying purchases. But it doesn’t cost you anything extra and helps me keep up my site!)
- 1x10s cut to lengths needed
- 2x10s cut to lengths needed
- 1×3 cut to length needed
- scrap 2×4, 1×6, and 1×2 pieces
- wall-mount iron pipe shelf bracket sets
- iron pipe legs
- Shelf L-brackets
- Mending plates
- Pipe fitting U-brackets
- keyboard tray hardware
- desk grommets and recessed power grommets
- charred wood accelerator or wood stain or paint and/or kitchen torch
- folding shelf bracket hinges
All in, this cost me about $500.
Step 1: Measure and plan. Your measurements will be unique to your room, of course, but you can plan things out like I did. This first step might take time, but once you have this plan, everything is easy to follow from here.
I wanted to use 1×10 wood for the shelves and 2×10 wood for the desk. So how long did these need to be? My long wall was now 10 ft long running from the corner right to the window, so I decided to stop a foot short of the window to leave some room there. So, the desk along that wall needed to be 9 ft long. My short wall was a little over 7 ft from the doorframe to the corner, so I decided on 6 ft for that side.
How many 1x10s did I need? I figured one piece for each shelf would be plenty wide to hold books and things. I wanted 2 shelves running the full length of my long wall. Then I wanted another shorter shelf below those to separate the space between my husband’s area and my area. And for the other wall, I wanted a set of 3 shorter shelves that would kind of mimic the part on the long wall that would have 3 shelves. I decided to make all these shorter shelves 20 inches long.
Shelf total: I needed two 1x10x10-ft boards. Plus, I needed another 1x10x8-ft board for my 4 shorter, 20-inch shelves.
For the desk itself, how many 2x10s did I need? I stared at the empty floor of our office for a while before deciding that three boards deep would be a good size for the main, long part of our desk. This would give plenty of depth for computer screens and whatever, but it wouldn’t jut out too far into the already-small room. So, I needed 3 boards at the full 9 ft. But for the shorter, 6-foot side, I decided on just 2 boards deep to leave more space in the room. This would be more like a side desk anyway, so it didn’t need to be as deep. So, I needed 2 boards at the 6-foot length. (I planned to stagger how these boards all met in the corner, but I figured having boards at the full lengths to start would be safe.)
Desk total: Three 2x10x10-ft boards and one 2x10x12-ft board.
How was I going to hang the shelves and support the desk? I went over a lot of options and ended up wanting an industrial look to complement what I planned to do with the wood. Because the room was small, I knew I wanted everything to look as simple and sleek as possible, like the desk and shelves were open rather than on bulky, built-in bases.
For the shelves… After shopping around, I found these metal pipe shelving bracket sets. To make sure my wood wouldn’t stretch too far without supports, I decided to do 4 sets along my long wall and just 2 sets for the smaller wall. The nice thing about these is that I could space them really however I wanted, so I could find my studs and hang these pipe brackets, then run the wood of the shelves however far they needed to go beyond where my studs were. I needed 6 sets.
For the desk… I decided to get big shelf L-brackets and connect them to my studs, then set a 2×10 on top and connect the wood from the underside. These brackets would connect to the board closest to the wall and also the middle board, since I bought brackets that were 14 inches long. I ended up needing 8.
To give the middle board extra support and to hold up the front board at all, I wanted pipe legs to match the pipe brackets of the shelves. I decided on 28-inch pipe legs to make the top of the desk come to a comfortable 30 inches (once the 2-inch desk boards were on). I ended up needing 5. And to attach the front board to the middle board, I planned to use 2 mending plates near either end to hold them together.
This was where I had to think through the corner where the desk’s boards would meet. I came up with a staggered plan that I drew out like this:

This meant my long back board would go the full 9 ft of my desk. My staggered middle board would be short this by the width of my 10-inch board running along the 6-ft wall. (REMEMBER: Wood measurements in stores are approximate, so a “10-inch” board isn’t really 10 inches wide.) The front board would be short by the width of two 10-inch (approximately) boards on that 6-ft wall. Then, the 6-ft wall’s back board would be approximately 10 inches shy of 6 ft. The front board would be short by 2 widths of the approximately 10-inch boards.
Underneath this staggered pattern, I would use my shelf brackets to form a strong corner support, plus a few pipe legs underneath. This was also where one of my mending plates would hold the middle and front board of my long side together. (It’s a busy corner under there, but the only thing visible is the legs!)
SIDE NOTE: You could cut the corners at 45-degree angles to meet at a nice 90-degree corner. Or, you could run one wall’s boards all the way to the corner and then make the other wall’s boards shorter to make the corner. Personally, I liked this staggered look even if it was a little more complicated. 🤷♀️
“What else do we want?” I asked myself…and my husband, who likes bells and whistles. 🤣
I bought 2 sets of keyboard tray hardware, one for each of us. We decided on 28-inches for the length of our trays, so I added another 8-ft 1×10 to my shopping list for good measure.
And wouldn’t it be nice to have a few grommets in the desktop so we could run cords down to hide? Yes, so I bought desk grommets. And because Amazon suggestions get me every time, I also bought a few power grommets with USB ports. (Ok, I might like bells and whistles too.)
I also decided I wanted some hidden storage. To accomplish this, I figured out how to make a kind of hidden cabinet under the desk between my husband’s area and my area. This would also help support the long side of the desk – the desktop’s wood could rest on top of the cabinet. The plan I came up with meant I needed 4 pieces of 2×10 that would be 28 inches tall to fit under the desk and act as the sides of the cabinet. I’d leave the back against the wall open, but for the front I wanted a cabinet door made of 2 pieces of 1×10 with a narrow 1×3 in the middle to be decorative – all being a little less than 28 inches. I’d also needed 2x4s to attach and brace the whole thing together, and I could rest 2x10s or 1x10s (whatever I had leftover from my other cuts) across these to create a shelf. I could have planned for a normal cabinet door with simple hinges, but no. I apparently thought I needed a challenge that day and opted for folding shelf hinges that would flip up the cabinet door and lock so we could use the it as extra table/desk space.
(The above extras are completely optional, of course, but now I’m happy I added them!)
Step 2: Cut the wood. Fortunately my dad let me borrow his truck to bring all my wood home. In my garage, I marked by boards at the lengths I’d decided on and then simply cut them down as planned:
- 2 boards of 1×10 cut to 9 ft (top 2 shelves, long wall )
- 4 boards of 1×10 cut to 20 inches (bottom long wall shelf, 3 short wall shelves)
- 1 board of 2×10 cut to 9 ft (desk back, long wall)
- 1 board of 2×10 cut to 8 ft 3 inches (desk middle, long wall)
- 1 board of 2×10 cut to 7 ft 6 inches (desk front, long wall)
- 1 board of 2×10 cut to 5 ft 3 inches (desk back, short wall)
- 1 board of 2×10 cut to 4 ft 6 inches (desk front, short wall)
- 2 boards of 1×10 cut to 28 inches (keyboard trays)
- 4 boards of 2×10 cut to 28 inches (cabinet sides)
- 2 boards of 1×10 cut to 26 inches (cabinet door)
- 1 board of 1×3 cut to 26 inches (cabinet door)
- 2 scrap boards of 1×6 cut to around 12 inches (for bracing and connecting the cabinet door’s pieces)
- 6 scrap pieces of 2×4 cut to around 18 inches (for bracing and constructing the cabinet)
Because I trusted my plan from Step 1, all this went pretty quickly.
I wish I could say I had a method to my madness for where I drilled the 2-inch grommet holes with our hole saw, but I kinda just put a few on either end of the back long board, figuring we’d want a few each. I also drilled a few on the back board of the narrow side of the desk in case things needed to be plugged in over there too.
Step 3: Sand. My cut ends all needed to be sanded, as did my grommet holes. Also, I wanted to get rid of rough, harsh corners wherever we’d be most likely to touch against the corners of the desk. I accomplished this by sanding things down to slightly rounded edges at the ends of the boards that would be the ends of my desk. I really, really sanded the front boards along the side that would be the front of the desk. I also paid careful attention to the front corners of the keyboard trays.
This wasn’t too difficult, though time-consuming.
Step 4: Stain/Paint/torch the wood. Yes, I said torch. I wanted to try something to add interest to the desk, so I took my kitchen torch and went over what would become the tops and frontmost sides of the front boards. I also torched the little 1×3 that would add a decorative touch to the cabinet door. I traced the wood grain where I could and used long strokes, painting with fire, so to speak. I love doing this to wood, and it leaves a neat effect.

For the middle and back boards of the desk as well as the shelf boards, keyboard tray boards, and remaining cabinet wood, I used a charred wood accelerator, which is a kind of aging stain. This stuff is really cool and leaves a different texture and finish than normal stain. I applied this with a roller, which I also think adds to the finished look as opposed to a brush. I applied this to the tops and bottoms of the shelves especially, since we’d be able to see the undersides of the higher shelves.

Or, if you want, you could paint the boards or stain them normally. To each their own. 😆
Step 5: Mark the walls. Before I started screwing into my walls willy-nilly, I first marked where my studs were. I used a stud-finder and then a level to draw a light line down my walls. I made sure to start the line pretty high up so I could use it for my shelves later. For now, going around my walls, I marked on my stud lines at the 28-inch point. This was how high my shelf brackets needed to be placed so that the back boards would rest on the brackets at the same height as the front boards where they’d rest on my 28-inch legs.
Step 6: Attach the shelf brackets. I had 8 studs that made sense for placing desk braces, so I used 8 from my pack. I could have used the whole pack, I suppose, but that seemed sufficient.🤷♀️ Starting on my shorter wall seemed easiest, so I held my first shelf bracket in place over the first stud at my 28-inch mark and screwed the bracket onto the wall. Then I skipped a stud and went to the next one, repeating the process to hang the next bracket. Then I moved to the stud nearest the corner and attached another. So, 3 on that short wall.
Moving to the longer wall, I again selected the stud closest to the corner and attached another bracket. This bracket very nearly reached the other wall’s nearest corner bracket, kind of forming a square against the corner. I knew this would help support the staggered wood of my corner pretty well. I then skipped a few studs and secured another bracket. And in the middle of my long wall, where I knew my cabinet would be, I attached another bracket just to help hold the weight since the cabinet wouldn’t have a back. Then, I moved a few more studs down and attached another bracket. Now at the far end of my long wall, near the window, I attached one last bracket to support that end. This gave me 5 on the longer wall.
Step 7: Connect the desk boards in place on the brackets. I have few pictures of this step because it went pretty fast once I got rolling, plus my hands were full! But, I’m glad my husband thought to take a picture as I was attaching the last board!
Before I did anything, I prepped my pipe legs by screwing on the end flanges and measuring to make sure the assembled legs were 28 inches. I wouldn’t attach these legs yet, but I wanted them to prop up the wood as I went.
With the legs ready, I brought my desk boards up to the office and made sure to start with my longest, 9 ft board. This was the board with the holes for grommets, so I made sure the side with the holes was closest to the wall. I lifted this semi-awkwardly onto the waiting shelf brackets on the long wall, shoving it to fit snug into the corner. Then, I started in the middle and knelt down to screw up through the bracket into the wood. After just one bracket was attached, I knew this was going to work because it was really, really secure on that one bracket. I then easily went along the board and screwed through the other brackets into the rest of the wood. First board on!
To make sure things lined up, I next went to the other wall and started with that back board. I made sure the corner end was pushed tight against the long wall’s back board, and then I started at that corner bracket and screwed it on. Moving to the other brackets, I quickly secured those too.
Going back to the long wall, I got ready to attach the middle board. Since the shelf brackets were 14 inches under my back board, this meant they stuck out to also support the middle board. Easily enough, I held the middle board tight against the back board with its end snug against the corner formed by the side board, and I screwed this middle board into the bracket too. I did this all up and down that middle board. BUT, I also grabbed a few of the legs to help support this middle board. I didn’t attach these, but they reassured me that the board wasn’t going to fall.
Next, I went to the shorter wall and took that second board, which would be the front board on this narrower side of the desk. This was my pretty, burned board. I set it on top of the exposed ends of the brackets and supported it in place with one hand while screwing it on with the other. Again to be safe, I placed a pipe leg under either end of this front board until I was ready to attach it later.
All that was left was the last, front board. First, I knelt down and screwed the mending plates to the bottom of my middle board. I did one near the corner and another near the far end of the desk by the window. This at least would give me something to set the front board on, but I wanted to make sure not to leave the full weight of the board on the jutting plates, just in case it was too heavy. Instead, I positioned more pipe legs under where the front board would sit.
Then I lifted the front board in place and carefully set it on both the mending plates and the pipe legs. I continued to hold the board tight against the middle board, and I knelt down by the corner end and screwed through the mending plate to secure the board. I next went to the other end and did the same with the other mending plate.
That held all the boards connected and in place, but I knew the legs would be necessary to really support the weight.

Step 8: Attach the legs. First, I went to the far end by the window. I had 2 legs waiting there, one under the front board and one under where the middle and back board met. I wiggled these legs a bit so that they each were positioned about 6 inches in from the end of the desk. I made sure the front board’s leg was centered on the underside of that board, and then I screwed the top flange into the bottom of that front board. Next, I went to the other leg and screwed that into where the middle board and back board met.

Back in the corner, I wiggled a propping leg under where the 2 front boards met. I was able to screw the flange into both of these boards so that this leg helped support both front boards. Next, because the middle board of the long wall had the least support at this end, I placed another leg centered under that middle board.

Finally, I went to the far end of the shorter desk and attached a leg under the front board, making sure to center and space it the same as I’d done with the long wall’s front board’s leg – 6 inches in from the end.
That was it! Five legs, and the desk was assembled.
Step 9: Attach the keyboard trays. I could have saved this step for later, I suppose, but it helped to visualize where we would be sitting in relation to where I would place the shelves. To attach these, I started with my husband’s space and made sure to come down at least 6 inches from the corner so it wouldn’t be too close a fit against the side desk. I tested by holding the hardware under the desk and pulling the slide part out. When I was happy with how far it would extend from under the desk, I marked the screw holes with a pencil against the underside of the boards. I then attached this first side’s hardware, making sure to measure so it would come out straight. Then, I measured to make space for my 28-inch board that would be the tray, and I held the other side’s hardware here and marked again with a pencil. After double checking my measurements to make sure everything was straight, I screwed that side’s hardware in too.
For my side of the desk, I kind of just figured out how far from the end I wanted to sit, then positioned the tray hardware there. I made sure to match my husband’s side as far as how far back the hardware was positioned so they would look the same. Then I screwed them in place.

Lastly, I pulled out the hardware slides, took the 2 boards for my keyboard trays, and rested them on the hardware. From there, I could simply screw them on from the underside. Done! (Ok, I actually added the boards later, but I don’t know why I waited. Doing it at this point would have made more sense.)
Step 10: Position and secure the pipe shelving bracket sets. To better visualize how this would work, I assembled all 6 of the shelf bracket sets first.

Then I had to think about this a bit. I knew I would have to set the long top boards in place before totally building the shelves because there would be no way to get the boards in place otherwise. So, I started by figuring out the two ends of the long wall’s shelving first. This way, I could lift a board up and set it in place on the lower of the 2 shelves, then place the higher shelf in place. Then I’d be able to install the middle 2 sets of shelf brackets around the board.
Starting in the corner, I found my first stud line and set one of the pre-constructed shelving bracket sets here. I used my level to get it straight up and down, and then I screwed the bottom flange onto the middle board where the pipe met the desktop. Now it was kind of like a tree, “planted” onto the desk with the tiers of pipes sticking out towards (but not yet secured to) the wall. After climbing a ladder, I started at the very top tier of the waiting pipes and flanges. After making sure that two of the flange’s holes went over the stud line, I used a pencil and marked where the third hole of the flange would be. Then I pushed aside the pipe and flange and quickly drilled a hole, then installed a wall anchor where this third hole would be. Moving the pipe and flange back in place, I screwed the flange to the wall.
I repeated this for the other 3 lower tiers. I don’t know that the wall anchors were necessary, considering most of the screwed went into studs and the base was screwed into the desk wood, but it seemed a good idea to make sure these things would be as sturdy as possible.
That side done, I moved to the window side of the long desk and repeated this at the stud nearest that end.
Once these ends were up, I played around with exactly where I wanted the 2 middle shelves to go. I ended up spacing them so there would be equal distance for my area and my husband’s area, and I put them about 18 inches apart – that would give my 20-inch shelves an inch overhang on either side. I marked on the wall where the lowest flange would need to be screwed in. BUT, I didn’t install these shelving sets until I had my top boards in place.

Instead, I moved to the shorter wall and stared at it until deciding that I didn’t want to connect these shelves to the desk at all. Since the pipes came out to the middle board, I would have had 2 pipes weirdly connected to the front of the narrower desk there. So, I ended up taking off the bottom sections of these 2 shelving sets, instead only wall-mounting the shelves. I measured to make sure these shelves would start at the same height up from the desk as the long wall’s shelves, and then I marked at this height on my stud line nearest the end of the desk as well as the next stud line over.
Once on my ladder, I again figured out where my wall anchors would need to go. I drilled for these and pushed in my wall anchors, then started at the bottom and attached that lowest flange to the wall. Then I did the second tier. Because I was tired and I wanted to be sure I was doing this right, I left the top tier off and started on the other shelf brackets to make sure it all lined up like I hoped. I screwed the 2 bottom tiers into the wall, took a break to take a picture, and then secured the top tiers to the wall too.
Fortunately, the whole thing was straight and level. Cue sigh of relief.

Step 11: Attach the boards as shelves. First, I started with the 2 long boards. On my ladder near the corner side of the desk, I lifted the first board up and tilted it so that it fed down through the window side’s space of the third tier from the top. I had just enough space to push it far enough so that the corner end could fit down on the third tier of the corner-side shelving set. I slid the board a little until it had equal spacing at each end. Next, I repeated this for the top shelf’s board, resting this one on the second tier down. At last, I had 2 shelves!
Now, I quickly installed the rest of those 2 middle shelving bracket sets. This was easy enough. I fully assembled each set, then slid them into place under and around the top 2 shelves. I had to lift the shelves a little bit to get the flanges under and behind the boards, but that was easy. I first screwed the bottoms into the top of the desk to make sure they stayed put. Then I screwed the tiers in, adding wall anchors because these didn’t line up with my studs.
After that, it was really easy to set the 20-inch boards in place on my shorter shelves.

When I was happy with the overhangs on either sides of the boards, I took a bunch of pipe-fitting U-brackets and fit them over the pipes along the undersides of the shelves. These screwed in easily with little screws, and they held the shelves in place so they didn’t slide around. (REMEMBER: Just make sure that you buy at the right size brackets to fit over your pipes’ size. Mine were 3/4 inch.)

Step 12: Build the cabinet. Keep in mind that I knew this would be mostly hidden, so I didn’t worry about my construction looking too pretty. LOL.
Basically I took 2 of my 28-inch tall 2×10 boards and stood them under the desk to act as the side of the cabinet on my husband’s side. I made sure to space these about 8 inches away from that nearest keyboard tray hardware, figuring this would be a good way to make equal spacing from each of our sides. Next, I grabbed the other 2 of my 28-inch 2×10 boards and positioned them the same way, this time using my side’s keyboard hardware as a guide. I stood back and eyeballed this, and that looked like pretty good positioning underneath the middle shelves above. I wanted to be sure that the cabinet door wouldn’t stick out farther than the desk’s front, so I wiggled the boards back a bit to allow room for the future cabinet door. It was obvious that 2 boards wouldn’t cover the full depth of the desk’s 3 boards, but I liked that there was room along the back wall to let light from the window through and also to allow cords to run back and forth here. It also gave me wiggle room if I was off with how far the cabinet door would stick out.
I took a pencil and traced lines where the 2x10s met the underside of the desktop, and then I pulled all the wood out to more easily assemble the cabinet in the middle of the room.
Measuring the distance between my marks, I set up my 2x10s again so they stood like the sides of my cabinet. Going quickly down to my garage, I took some scrap 2x4s and cut 6 pieces at a max of 18 inches long. These I took back to the office and placed along the floor on the inside side of either cabinet side, and I screwed the bracing 2x4s into the 2x10s to hold them together. I did this for either side at the bottom, and then I placed one along the back side to connect the 2x4s of either side. (See below)
Next, I went about halfway up and screwed a 2×4 into either side, after quickly making sure they were level. I also put one across the back, like I’d done with the base. This would create a base on which to set a shelf, so I checked the measurements and then went down to the leftover 2x10s I had in the garage. I cut 2 boards that would fit across the cabinet’s shelf space, and after a quick sanding, I took these back up to the office. Setting them on the upper 2x4s, I screwed them on as a shelf.
With all this built, I carefully pushed the cabinet under the desk to line up with the pencil marks.


By this point, I was not thrilled with myself for planning a flip-up cabinet door because I was tired. Also, the hinge hardware was a little wider than I’d realized, and I had to add little scrap pieces of wood onto the fronts of the 2x10s before installing the hinges on the front sides of the cabinet. I also added little strips of 1x2s along the tops of the cabinets where they met the underside of the desk, just because it looked nice finished off that way.

Once the hardware was on, I got to work on the last piece – the cabinet door. I had already stained the two 1×10 pieces and burned the decorative 1×3 strip. Flipping these over to the backside, I made sure they were even and square. Then I took my scrap 1×6 wood pieces and set them with one at the bottom and one at the top, making sure they stretched evenly over all 3 boards. From there, it was easy enough to use little screws and connect these 2 crossing boards to the 3 cabinet door boards underneath.
Next, I found a little shim and set it on the floor in front of the cabinet. Then I set the cabinet door on this shim so the door would have a little gap over the floor and be able to move without scraping into the floor. I shifted the door so that it was evenly positioned in front of the cabinet, sticking out about 2 inches on either side of the cabinet to hide it. Very lightly, I used a pencil and drew a little line on the front side of the desk to mark where the cabinet door needed to be positioned.
All that ready, I moved the door and flipped up the hinges to the locked position. Then, I set the cabinet door on the hinges and lined it up with the pencil marks on the door. I made sure the top of the door was away from the desktop far enough so the door wouldn’t scrape the desk when it opened and closed, and then I crawled under the cabinet door and screwed it onto the hardware.

Holding my breath, I unlocked the hinges and folded the cabinet door back into place. It worked! (See below for the cabinet door in the “table” position.)
Step 13: Bells and whistles. Taking my grommets, I went around my desk and popped them into the holes. For the power grommets, I first fed the cords down through the holes, then popped them into place.

DONE! This was a lot of work, but it turned out better than I had planned. I’m glad its not too bulky for our small office, and it holds a lot of computer equipment, cords…and Legos. The top shelves ended up being used mostly for Legos. LOL. But, I managed to squeeze my own books onto a shelf on my side, so…oh, well. If I ever want more shelving space, I could always add another shelf on that top tier.


BONUS: Much later, we decided we wanted a drawer for pencils and whatnot, so I ended up making a floating pullout drawer on the short side desk. That project got it’s own tutorial, so you can find that at “DIY Hanging Office Drawer” on my blog.
DIY Must-Have Lists


