Indoor plants don’t do well in my care, but I like the pop of green that a hanging fake plant adds to my bathroom…I just didn’t like staring up at the black plastic basket hanging over my tub. This week, I finally got around to giving the basket a makeover, and it looks way better now.
This little project was basically macrame for a lazy person who didn’t want to actually follow a pattern, and since I didn’t want to see the basket/pot at all, my full wrap job did the trick without actually needing to know what I was doing. Plus, if you’ve already got a hanging basket and hot glue gun, this only costs like $5 for the string.
Supplies:
(As an advertising affiliate and Amazon Associate, I earn a small commission from qualifying purchases. But it doesn’t cost you anything extra and helps me keep up my site!)
Step 1: Prep the basket. As an optional part of your prep, you might want to paint your basket if it’s a dark color and you don’t want to see any of it through the wrapped string. I thought of this after I was done wrapping the basket, and I do like the contrast of seeing the black through the white string to give it a little dimension and depth. But if you want it to look more like a solid wrap job, paint the basket first so your base is the same color as the string.
Before you start, you’ll want to remove the connected fasteners and hook part that hangs the basket. I think most hanging baskets usually have 3 of these ends that go up to the hook, and I cut off the fasteners to use for my new part that would hang the basket. More on those in a minute.
Save these.
Step 2: Wrap the whole basket. With my string ready, I added a spot of hot glue to the very center of the basket’s underside, and I stuck the end of the string there. Then, going around and around from this center, I added dabs of glue to hold the string tightly in place as I circled around the bottom to cover it.
NOT cutting the string, I moved up the basket from the bottom/underside and continued to wrap the string around and around the basket’s sides. I added more glue then I’d planned, so this took a bit of time, but I wanted the string to stay as tight as possible to hide the black basket decently. This was a lot of going around and around. When I reached the top of the basket’s main section, I cut the string and glued the end down tight.
Starting to wrap from the bottom.
If it doesn’t look covered to your satisfaction, you could always go around a second or even third time, if you have enough string. I was satisfied with one layer. You also could make one long braid and wrap that around and around, but that seemed like more braiding than I wanted to do – but it would look nice.
Step 3: Braid 3 equally long braids for hanging the basket. These will be used to hang the basket from the 3 fasteners, and they run down the sides to tie under the basket and make it look like they hold the basket too. I measured…sort of…by stretching my arms wide and cutting each strand of string to that length. You’ll need 9 equal strands, 3 for each of the 3 braids.
After tying 3 strands together at one end, I braided them together and then tied the other end. I did this to make 3 braids of the same size.
Making hanging braids.
Step 4: Wrap and connect the fasteners for the hanging braids, then tie the braids. Using my string again, I tied on an end to a fastener and wrapped it around until all the plastic was pretty well covered, then tied it off again and added a spot of glue to help. I did this for all 3 fasteners.
Then I took my finished braids and found the middle of each, and that was where I stuck on my fastener before snapping the fastener back in place onto the basket. I then tied a knot over the top of the fastener where it stuck up a bit, just to cover the plastic end. Again, I did this for all 3.
Wrapped fasteners and finding middle of each hanger braid.
Once they were on, I took one end of each braid and tied these together, making sure they were equally long so the basket would hang straight.
For the other end of the braid (the other half that wasn’t tied above), I made sure all 3 strands hung evenly to the underside of the basket and then tied them together in a knot right at the center of the basket’s underside. Once this knot was tied and secure, I undid each braid’s tied end and unbraided them so the strings hung more like tassels from the bottom of the basket.
(Forgot to take a picture of the bottom until I was done)
That gives you the look of the basket hanging from a little braided holder.
Step 5: Add thicker braids along the top and bottom of the basket. Once the fasteners and braided hangers were on, I wanted a thicker braid around the top edge. This again took 9 arm-length strands of string, but this time I tied them all together and braided using groups of 3 strands for each section. This made a thicker braid and was actually easier on my fingers. 😆
Taking one tied end of this bigger braid, I glued it just over the inside of the basket, then glued it around the basket’s top to cover the edge AND cover the fasteners. I ended up doing 2 laps around the top to completely cover the top of the basket.
Top thick braid on.
For the bottom, I again cut 9 strands, but these only needed to be about half as long because the bottom of my basket was narrower and I didn’t need to do 2 laps around. Rather than securing a knotted end, I took the end of my thick braid and squeezed hot glue into the strands to secure them together. Then I ran it OVER the three hanger braids and glued it all the way around the bottom of the pot. When I got back to my starting point, I cut the end and again squeezed glue right into the braid’s end to hold it together without a knot, then glued it in place.
Step 6: Add decorative braids. With the base wrapped, hanger braids on, top braid on, bottom braid on – all that was left was adding some decorative braids around the pot. I did a few thick and a few thin, and I glued them all over in loops around the pot, making sure to run them under the 3 hanger braids where they ran down the sides. (I just thought that looked better.)
Glueing decorative braids on.
When my hands were sick of braiding, I was done! Putting my fake plant back in the basket, I hung it over my tub again, and it looks so much nicer now.
Thursdays are karate days, so today seemed perfect for tackling this project. I’d promised to build shelves for our home gym to display my daughter’s karate belts and awards, and I managed this without a trip to the hardware store – so it’s a win for me too!
BEFORE: Scrap wood.
Supplies:
(As an advertising affiliate and Amazon Associate, I earn a small commission from qualifying purchases. But it doesn’t cost you anything extra and helps me keep up my site!)
Step 1: Plan and cut wood. I had a lot of good scrap wood left from when I redid my other daughter’s bed, and these shelves took two 2x2s (mine were 6 ft long), twelve 11-inch 1x4s, and seven 16-inch 1x4s.
I wanted an overall narrow but tall shelf stand, so that’s why I went with 6-feet tall. And by setting my 1x4s across the two 2x2s, I decided I liked 11-inches for the crosspieces and 16 inches for the longer shelf pieces, and this let the shelves stick out 2.5 inches on each side. Pretty easy math that way, so I went with it.
I cut my 11-inch 1x4s first, then my seven 16-inch 1×4 pieces. I didn’t have to cut the 2x2s at all because mine were already 6 ft.
Cutting 11-inch crosspieces.
Step 2: Attach crosspieces. I did all of this by lying my wood across the top of a yard cart, but you can use the floor or a table. The whole project was easy to do with the thing lying down, so don’t worry about standing anything up until the end.
First, I made VERY sure that my 2x2s were evenly spaced and square. You definitely want the bottoms even so it sits straight. Next, I nailed on one of the 11-inch pieces across the top, keeping the edges as flush as I could. With that top piece on, I did the same at the bottom. That kept the overall structure square while I nailed on the crosspieces in the middle. I spaced them semi-evenly, but I was a bit lazy with it – I just did my best to make sure 12 inches went from the top of one crosspiece, skipped the next, and hit 12 inches at the top of the next board.
Attaching crosspieces.
Checking spacing for shelves.
Step 3: Attach long shelf pieces. Using wood glue, these stayed in place nicely. To make things easy, I measured 2.5 inches from each end and marked with a pencil to be sure they ended up in the right position. This seemed like a good idea to help me get them in place quickly once the drippy glue was on.
Positioning shelf.
Then I ran a bit of glue along the top of the chosen crosspieces as well as dabs on the 2×2 where the shelf would connect. Then, I simply set the 16-inch 1×4 pieces on their sides on the 2x2s so the bottom back side stuck on the glue on the crosspiece, which was now “below” the self for a support.
I DID add a few nails at the very topmost board and the lowest board/base to help with stability. Nothing heavy is going on my shelves, so wood glue alone is fine for the middle shelves.
Side note: If you ARE going to put heavy things on your shelves (like statue awards, etc.), you should probably add a few nails into the top of each shelf where they sit on the crosspiece like a base support. To make this easier, you might want to nail them on BEFORE connecting the crosspieces to the 2x2s so your hammer or nail gun has room.
Attaching shelves.
Step 4: Paint. After the glue dried, I sanded the exposed edges and sides smooth. Next, I painted the whole thing in a dark blue…because that’s what I had a lot of. 😆 I used 2 coats but didn’t bother with the backside because that’ll be against the wall. I did paint the insides and outside of the 2x2s because you can see through the spaces between the crosspieces.
Step 5: Secure with a furniture hook. Obviously this would be very tippy if left standing against a wall, so I added a furniture hook to the back wall and screwed a connecting line onto the back of the top crosspiece. This holds the whole shelf secure so it doesn’t fall over, but it’s not a heavy-duty install that would make it difficult to relocate if we want to move the stand later.
Step 6: Add hanging hooks. If you’re hanging medals on these shelves, these hooks are a great idea to add some dimension to the shelves. My daughter wanted her belts to hang up once rolled, so this worked for those too. I decided to screw my hooks in front of each 2×2, positioning them forward enough to spin around.
Screwing in hooks.
Step 7: Add your awards! We’re apparently missing a paper for the orange belt, but otherwise I could put things in order and leave room for belts to come! I hung the belts with just a piece of string wrapped around them and then attached to each hook (I need a few more hooks, but folding a few belts adds variety, right? 😉) I also had a few boards she’d broken, so I added those too. And we framed the little awards she’d been given, so it’s all there for her to be proud of.
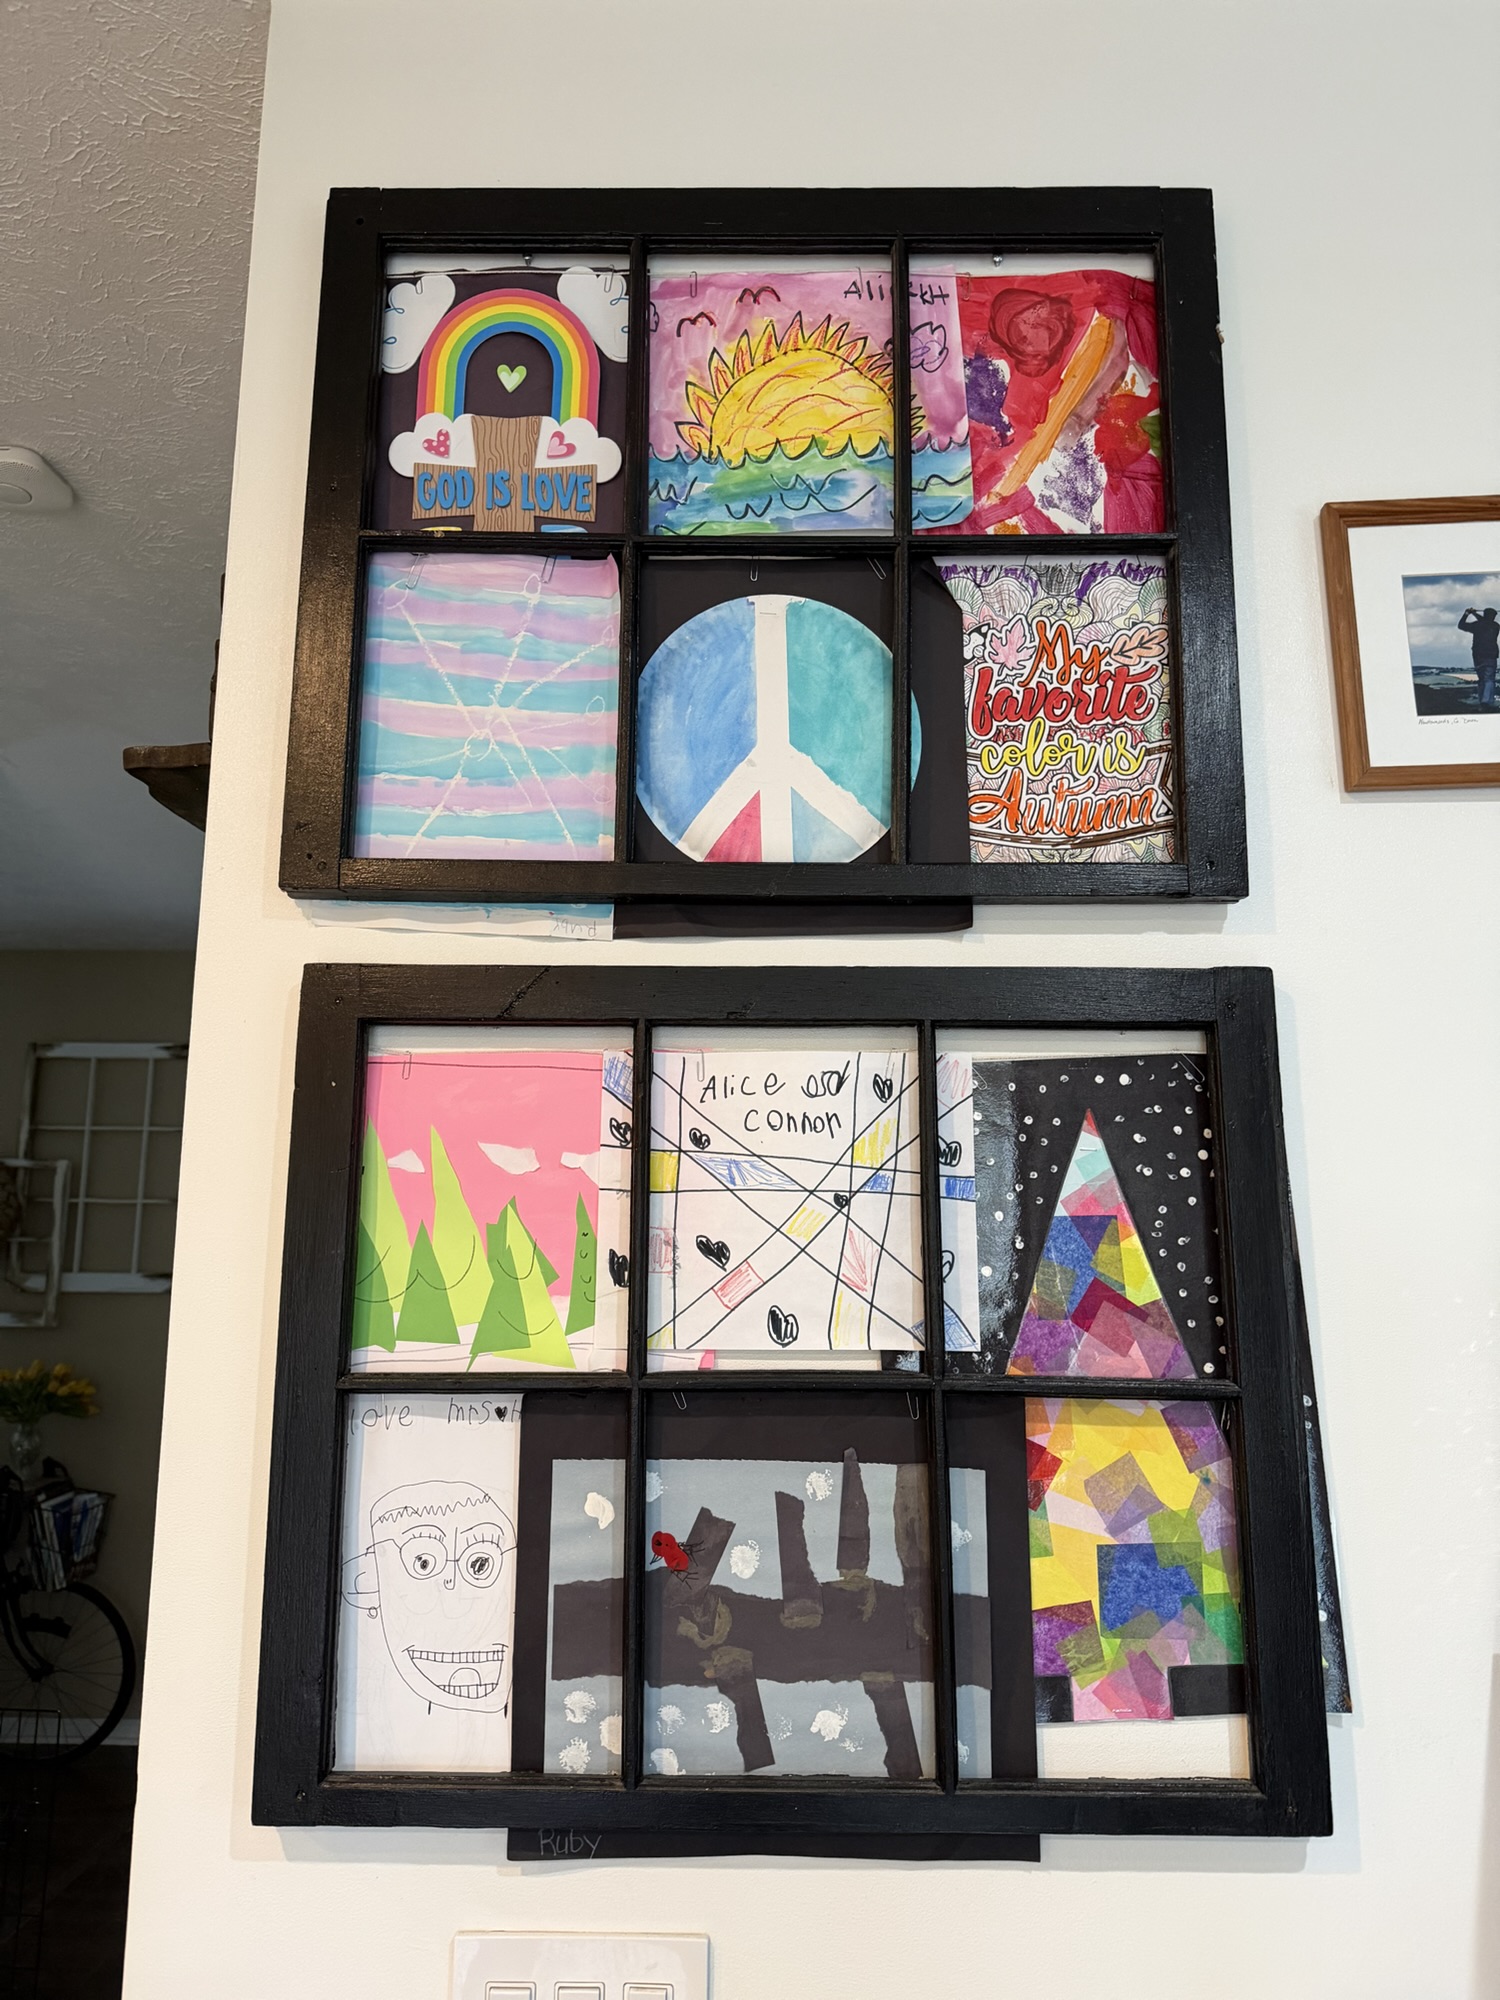
We only have so much room on our fridge for the art my kids make me that we HAVE to keep. I wanted a slightly nicer way to display these masterpieces without just tacking them on a corkboard, and those cute little frames you can buy to display kids’ artwork would never be enough, plus you never know the size of paper that’s going to come my way.
But I did have 2 old window frames, so…
Supplies:
(As an advertising affiliate and Amazon Associate, I earn a small commission from qualifying purchases. But it doesn’t cost you anything extra and helps me keep up my site!)
Window frame (can use craft store window frame with chicken wire removed for smaller frames, or search Etsy for full-sized window frames)
BEFORE: Old window frames, string, and paperclips.
Step 1: Paint or stain the frame. Mine were already painted black, and I thought that would look nice for a distinct frame, so I left them black.
Side note: I know not everyone has spare window frames lying around, but you can buy the same size as mine on Etsy or smaller frames at a craft store – the kind that have chicken wire to clip things onto. If you’re like me and don’t really like the farmhouse-y, chicken wire look, you can snip off the chicken wire and go from there. Or, if you want to be really creative, you can make frames from 1x2s. For my project, I used old window frames all ready to go (like you’d find on Etsy).
Step 2: Cut string. Here’s the thing – I didn’t want to just stick the artwork on the front of the frames because that would hide the frames, and the artwork would flap around from open windows and fall off too easily. So, I wanted the artwork to sit behind the frames and be…well, framed by each section of the frames. This meant I’d need to attach the art papers to the backside of the windows. To do this, I needed something that wouldn’t stick out or keep the window from hanging flat against the wall.
Solution: string, paper clips, and staples, all lying flat against the back of the window so it wouldn’t make the frame stick out or fall off the wall.
Turning the window frames backside-up, I unspooled my string to stretch from one side of the window to the other and cut the string so a little extra would go on either end. I needed 2 strings at roughly the same length for each window.
Cutting the right amount of string.
Step 3: Staple on the string. For the topmost string, I needed to bring it down about a half inch so the hanging screws in the wall would have a place to catch/hold the frame without getting caught on the artwork or string. Starting at one end, I looped the string a bit to add to how it would be held down, and then I stapled the string onto the window frame. Holding that tight all the way across to the other side, I also looped that end and stapled it in place.
To keep the string from sagging, I stapled the string onto the interior divider sections of the frame too.
Stapled top string to a middle divider.
For the lower section, I ran a string from side to side right along the middle divider. Again, I looped each end to add to the grip of the staples, keeping the string tight across the center. Also again, I kept the string from sagging by stapling the string onto the interior divider sections.
Stapled end.
Step 4: Add art papers with paper clips. Lying each piece of art face-down, I arranged one at a time and used paper clips to attach each paper onto the strings. I ended up using 2 paper clips for each paper just because the papers were a bit heavy and I didn’t want them to tilt all crazy.
Placing paper clips.
Step 5: Hang the window frames. I’d already screwed or nailed 2 screws/nails for each window frame, and you just have to be sure they are level and in position to catch the window frames so they hang nicely. Because of that half-inch gap at the tops of my windows, this left plenty of room to hang the windows and see what I was doing without poking into the papers. (Spacing this top string also makes it easier to change out the artwork later, without having to take the whole thing down.)
That was it! I can easily swap these artwork pieces when new artwork comes along by pulling the art off the paper clips and replacing them. I like that they’re secured in place and won’t fall or blow around, and they look nicely framed, kind of like a collage, without needing a dedicated frame for each piece.
It was time to give my 4-year-old a different bed. Her room is fairly tiny, so I thought for quite a while about how to give her the most space but also a bigger bed. (She’s a wiggler – she needs a bigger bed than a twin.) I finally decided to go up for more real-estate. She liked the idea of bunk beds, so I figured this would help with sleepovers while also, on an average day, giving her more room to play up on a second level. We had a spare, full-sized box springs and mattress, so I planned to put this under a lofted bunk bed…with some extra levels for playtime.
Supplies:
(As an advertising affiliate and Amazon Associate, I earn a small commission from qualifying purchases. But it doesn’t cost you anything extra and helps me keep up my site!)
wide board for headboard, batting, and cloth (optional for headboard)
2 L-brackets, 2-inch size (optional for the headboard)
staples and staple gun (optional for the headboard)
Step 1: Build the bedframe. I did use the frame of her old bed that I’d built before, so you do need to follow those instructions first. I’ve included those supplies in THIS supply list above, but the full instructions for this first step can be found at “Using a Pallet to Make a Toddler Daybed With Bookshelf Headboard.” The only thing different is that you don’t want to attach the pallet bookshelf to the head of the bedframe, because that will be used in a different place later. This frame is very simple to make, and I’d also recommend painting it now (as I obviously had done) because that makes it easier to reach before it’s up as a bunk bed.
BEFORE: Bed frame and wood ready to make a loft!
Step 2: Assemble sides of loft. Using 2x4s and screws, I made two tall side braces that would stand at either end of the bedframe to hold it aloft.
I cut 6 of these 2x4s to 55 inches, and these were the vertical pieces. I cut 4 to 41 inches to act as the crosspieces sitting at the top as well as running along the outsides at the bottom for stability. (These bottom pieces I removed later because the pallet bookshelf holds the one side plenty secure without it, and the other side ended up having a 51-inch piece across the bottom for the climbing platform. So, if you want to cut that one bottom piece to 51-inches now, that saves some trouble later.)
Starting with what would be the pallet bookshelf side, I took 3 of my 55-inch pieces and lay them on the floor with the 41-inch top piece sitting up against the ends. I brought the 2 side pieces in 2 inches so that I would have room to screw up through that top brace into the bedframe that would sit on top. (You can see one of my prepped screws at one end in the picture below.) I also wanted to leave room for myself to screw up into the middle 2×2 of the bedframe, so I moved the middle 55-inch piece slightly back. This left me about 15 inches of space between the back 55-inch piece and the middle 55-inch piece while the middle to front pieces had a 17-inch space. Using my drill, I screwed 2 screws into each end, securing the 55-inch pieces onto that top 41-inch piece.
For the other end of the 55-inch pieces, I lay another 41-inch piece over the boards so that it would be on the outside of the loft side. Then I used 2 more screws for each and screwed them in place to hold the whole rectangle together.
MAKE SURE everything is square, or everything from now on will be off, end up less level, and potentially result in an unsteady bed frame. These sides are literally responsible for all the heavy lifting.
Loft side 1 (future bookshelf side).
With that first side done, I stood it up and tested out placement in the room. It worked out that I could run an entire 8-foot 2×4 along the back wall and still have the space I wanted, so to make things easier, I put that back 2×4 in place now and used 2 screws to attach my first completed side into that back support. (See picture above, with one screw in and 1 waiting for me to take the picture.)
For my other side, I repeated the process same as for the first side. The only difference would be to use a 51-inch 2×4 along the bottom outside instead of a 41-inch piece, since that’s what I ended up needing later to complete my climbing platform on that end. Again, I screwed the second completed side into the back 2×4 brace, making sure this was placed at the 76-inch mark, where it needed to sit under the bedframe. Also, you can again see where I left a few inches at the top and readied screws in place for the bedframe above.
Loft side 2 (future climbing platform side).
SIDE NOTE: If you have bigger kids and want to make this extra secure, you could add another 2×4 back piece about midway up, going across from side to side. This would be easy to install later if you decide it needs it, too. I might do this someday and add a little shelf across, which would be nice for a phone, glasses, etc.
Step 3: Set bedframe on the loft sides. Impatient for help, I hulked out and lifted the bedframe up onto my loft sides all by myself. (5/10, do not recommend.) After minor adjustments, I got the bedframe exactly in place so that the top 2x4s sat directly under the 2×2 braces along the bottom of the bedframe. Also make sure the front ends of the supports don’t stick out farther than the bedframe’s front side.
Once the bedframe was in place, I used those prepped screws on the undersides of the top supports to screw up into the bedframe at either end’s front, back, and middle 2x2s.
Bed frame on loft sides.
Step 4: Build the climbing platform. First, I cut 2x4s into 3 short legs at 26 inches each. These I lined up along the wall at the end where I’d left a space between the bed and the wall. (This is where that back 2×4 sticking out longer than the bed comes into play.) Next, I took a 51-inch 2×4 piece and lay that across the tops of these legs. Using 2 screws for each, I screwed down into the legs. I also took a single screw and used that to secure the back leg to the back 2×4 that connected everything.
As you can see from the picture below, I had a vent to work around, so spacing of my legs was completely arbitrary around that. Basically, just space them evenly so they’ll support the platform, and be sure to have one right at the front end.
Platform far side ready.
SIDE NOTE: Again, this whole bed was planned because my daughter’s room doesn’t have a lot of space, so I knew this climbing platform would be nice and secure, stuck in that corner. If your climbing end is more in the open, you might want to build this a little more sturdily. You could add another 2×4 across the back from the back leg to the back of the loft side. Once the other side of the platform’s support is on, you could add a 2×4 across the front end too.
For the other side of the platform’s support, I took another 51-inch 2×4 and ran that across the outside of the loft’s side so that the top was level with the wall side’s support. I then took a few screws and screwed that (making sure it was level!) onto the 3 vertical loft 2x4s – these worked as legs for that side.
With the 2 sides of my platform’s braces/supports ready, I cut a bunch of 1x6s to 18 inches. These I very easily lay across the braces and used a nail gun to secure them in place.
Underside of platform.
As you can see from the picture above, my 51-inch support on the loft’s side stuck out farther than that side. This gave the platform a little extra length. But it also meant I needed another leg at that end, so I cut a 28-inch piece of 2×4 and screwed that to stand at the end of the support ALONG THE OUTSIDE so that it rose to be level with the top of the 1×6 going across to make the platform.
This was also when I decided I needed a 51-inch support along the bottom, but you should already have that in place. You’ll want to screw the leg onto that as well, adding stability.
With the platform done, I cut a 16-inch piece to create a step where the platform stuck out farther from the loft side. This I secured with 2 screws at either end – one end on my new leg and one end on the front loft piece. Again, make sure the step is level. (You could also put a step at the end of the platform rather than this side spot, but I wanted to be able to slide my daughter’s crib through the space at the end.) I DID take 28-inch pieces of 1x4s to cover the front ends, hiding the less pretty 2x4s. (See the picture a ways below that shows the painted platform.)
Above the platform, I took 2 more 2×4 pieces and cut them to about 20 inches, then screwed them on as steps to climb from the climbing platform onto the top bunk. I put these across the loft side 2x4s that were closest to the wall. This left an empty space between the other loft sides so there’s room to crawl up there from the bed, if she wants.
Testing the climbing platform stairs.
Step 5: Secure pallet bookshelf and/or make shelves along the other loft side. Again, how to make this pallet bookshelf can be found on my earlier blog post about how to make the bedframe (link at the top). We still really liked it, so I set the bookshelf pallet on the inside of the other loft side. Pretty easily, I screwed this into the 3 vertical 2x4s of that loft side. This also REALLY helped stabilize the whole frame. I was then able to get rid of the 2×4 running across the bottom of that loft side.
Bookshelf/pallet screwed on.
SIDE NOTE: If you don’t want to use a pallet for a bookshelf, you could also make shelves all up and down that loft side. Or, you could just leave the bottom brace on and also add steps all up that side. For us, we needed more bookshelves!
As for how to add shelves, I added one above the pallet because we needed a little more room for books. I had a dresser sitting against the outside of that loft side, so this worked as a back for our shelves. If you want shelves, you could use similar furniture or else just take a sheet of plywood and secure it to the outside of the loft side.
For the shelves’ braces, I grabbed 4 little scrap pieces of 2x4s (2 for each shelf). These little pieces I screwed into the insides of the loft side’s 2x4s, making sure they were level across from each other.
Shelf braces ready.
Next, I set my 2x4s on top of these braces, made sure the edges lined up, and secured each end with a screw into the braces. I did one shelf between the front 2×4 and the middle 2×4 and one shelf between the middle 2×4 and the back 2×4.
Shelves on.
In order to keep the books in place, these shelves needed a front piece, so I took a nicer, thinner piece of scrap baseboard and put that across the entire loft side, right in front of the shelves. (This baseboard was the same as I’d used on the pallet bookshelf.)
Step 6: Build the front rail. I cut a bunch of 1x4s to18 inches, since this would match the back/original rail that goes along the wall. These I placed on the original bed frame (the new bunk) along the inside of the 1×4 front piece that ran along the bedframe. Using my nail gun, I nailed these 1x4s vertically onto the front piece. I spaced these so they ran evenly across the front.
That done, I took a long, 76-inch 1×4 and nailed it along the tops of these to complete the wood rail. To cover the kind of ugly ends where the bedframe connected to the loft sides, I also took two 20-inch 1×6 pieces and used them to cover either end of this front rail, hanging low enough to cover the loft side top pieces.
Front rail complete.
Step 7: Build a headboard. I made this more complicated than it needed to be because I wanted a solid headboard that I could hang a stuffed animal-holding net from. If you’re doing stairs all the way up instead of bookshelves, you don’t need to do a headboard. Or, you could do the same thing as what I did for the front rail.
Here’s what I did. First, I took a 2×4 and screwed it across the loft’s side to act as a support brace for the headboard to sit on. Next, I took a solid piece of wood that ran the full width of the bed and rose about 10 inches, and I wrapped some batting around this board, stapling it on. Then I took an old curtain (she has blinds now) and wrapped the board from the underside, leaving the front and top unwrapped for now. I used a staple gun to secure the curtain all along the bottom of the board.
With this headboard prepped, I set it on that 2×4 support and screwed it into the main loft side’s top 2×4 along the bottom. Now I wrapped the curtain the rest of the way around the board, and I used my staple gun to hold the curtain tight around the headboard, stapling along the bottom where the back of the board met the bedframe.
Headboard on.
To really help hold on the headboard, I took 2 little L-brackets and screwed them into the back of the headboard and also the backsides of the front and back rails. This made the headboard very secure and strong. (Strong enough for me to attach the stuffed animal net, which she can reach from the top bunk.)
L-bracket securing headboard.
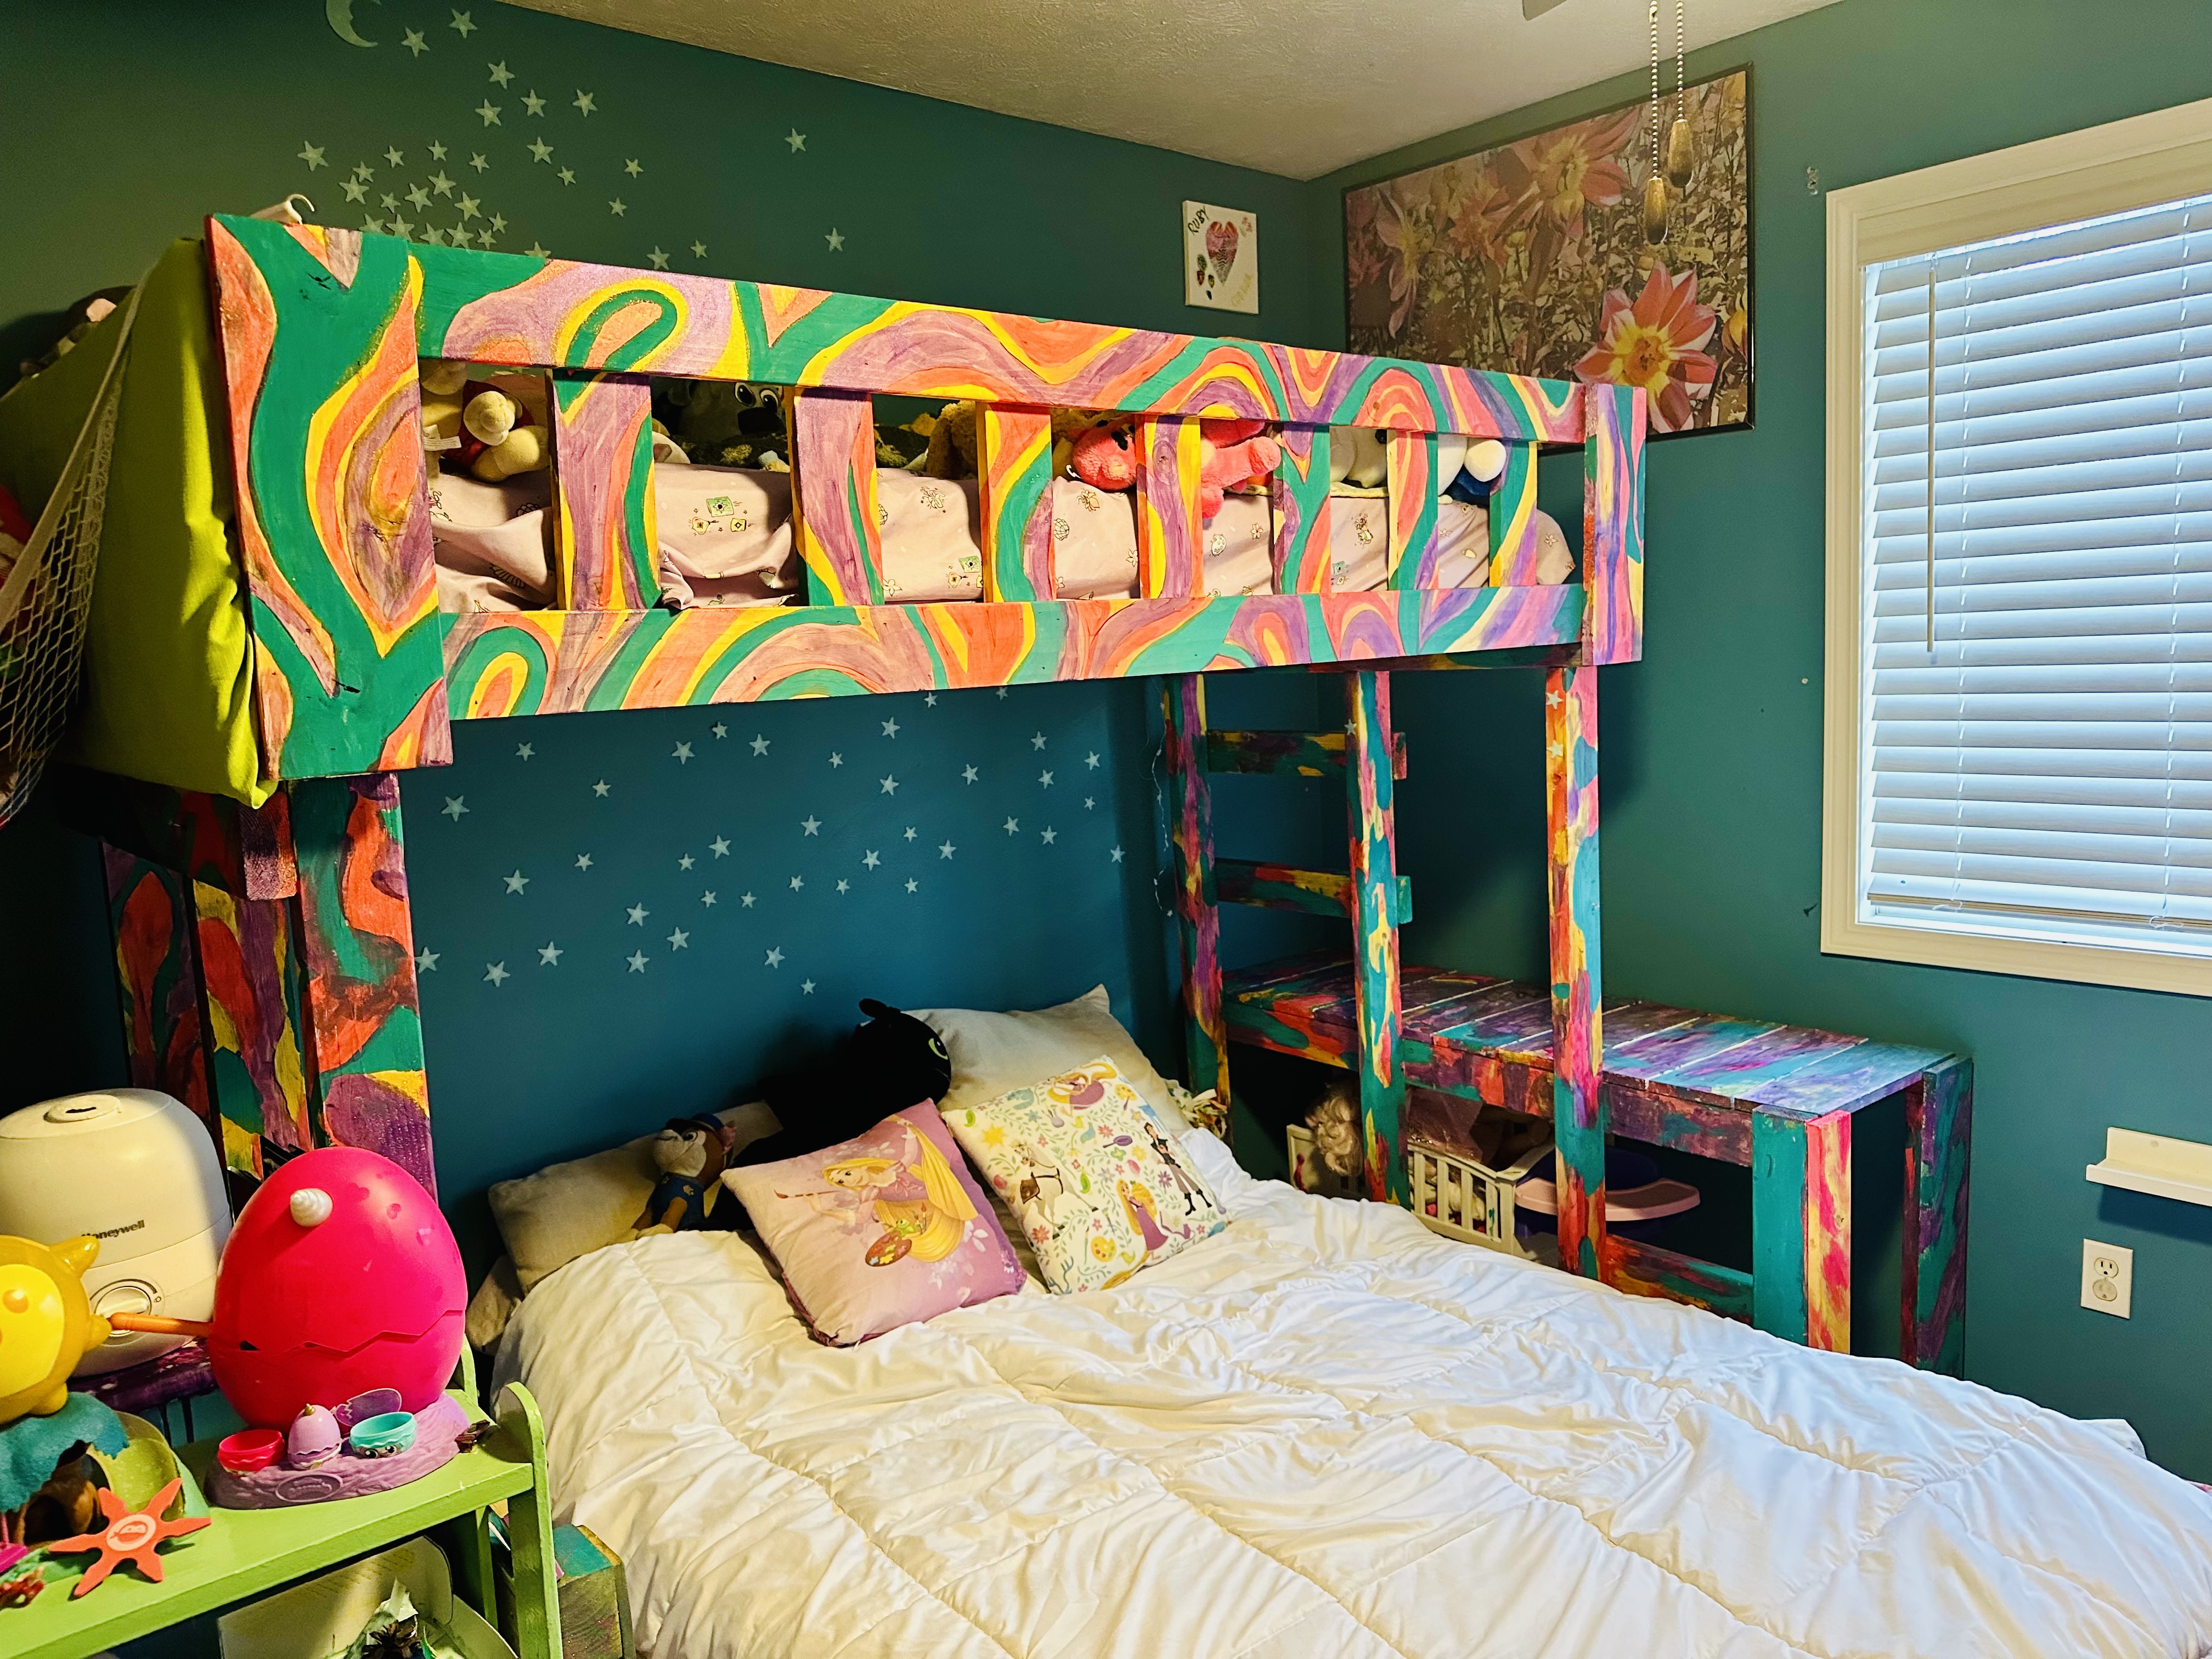
Step 8: Paint! We went crazy. 😜 My daughter loves anything fitting a “rainbow theme” and wanted to use the same unicorn paint that we’d used on her original bed. This worked out in that it made the bunk bed, climbing platform, and new loft sides match. It was a little rough, however, because mommy wanted to make pretty swirls and my daughter…did her own thing. 😂 But she loves the colors and how it turned out, so okay.
Starting to paint!
Yay! Now she has a “Big Girl Bed” to wiggle in at night, plus a climbing platform to play on, plus a whole bunk to use as a fort and for sleepovers. And as an added bonus, her baby’s crib fits under the climbing platform, so her doll gets its own little room too. Plus, the stuffed animals are completely out of the way but have their own, accessible home!
During the January that will never end, we’ve had many, many snow days. This equals a mess. And when we don’t have snow days, we gear up for every trip outside. This also equals a mess, plus puddles. And so many mittens.
A while ago, I removed the doors to the closet right off our garage and inserted a bench with a shoe rack, plus moved in two little cupboard/shelving units to hide stuff away. Can my family be bothered to put things on these shelves? No. And since the bench didn’t quite fill the whole expanse, I always intended to use that extra space on the sides for bags and bigger items… But of course mittens and all sorts of “precious” things ran for their lives and disappeared down these sides. Also, my girls had to stand on the bench to reach the coat hooks, but with the bench against the wall, there wasn’t room without them falling over backwards. They also could barely climb over all the shoes to get to the bench.
None of this was working.
BEFORE: Ill-fitting bench.
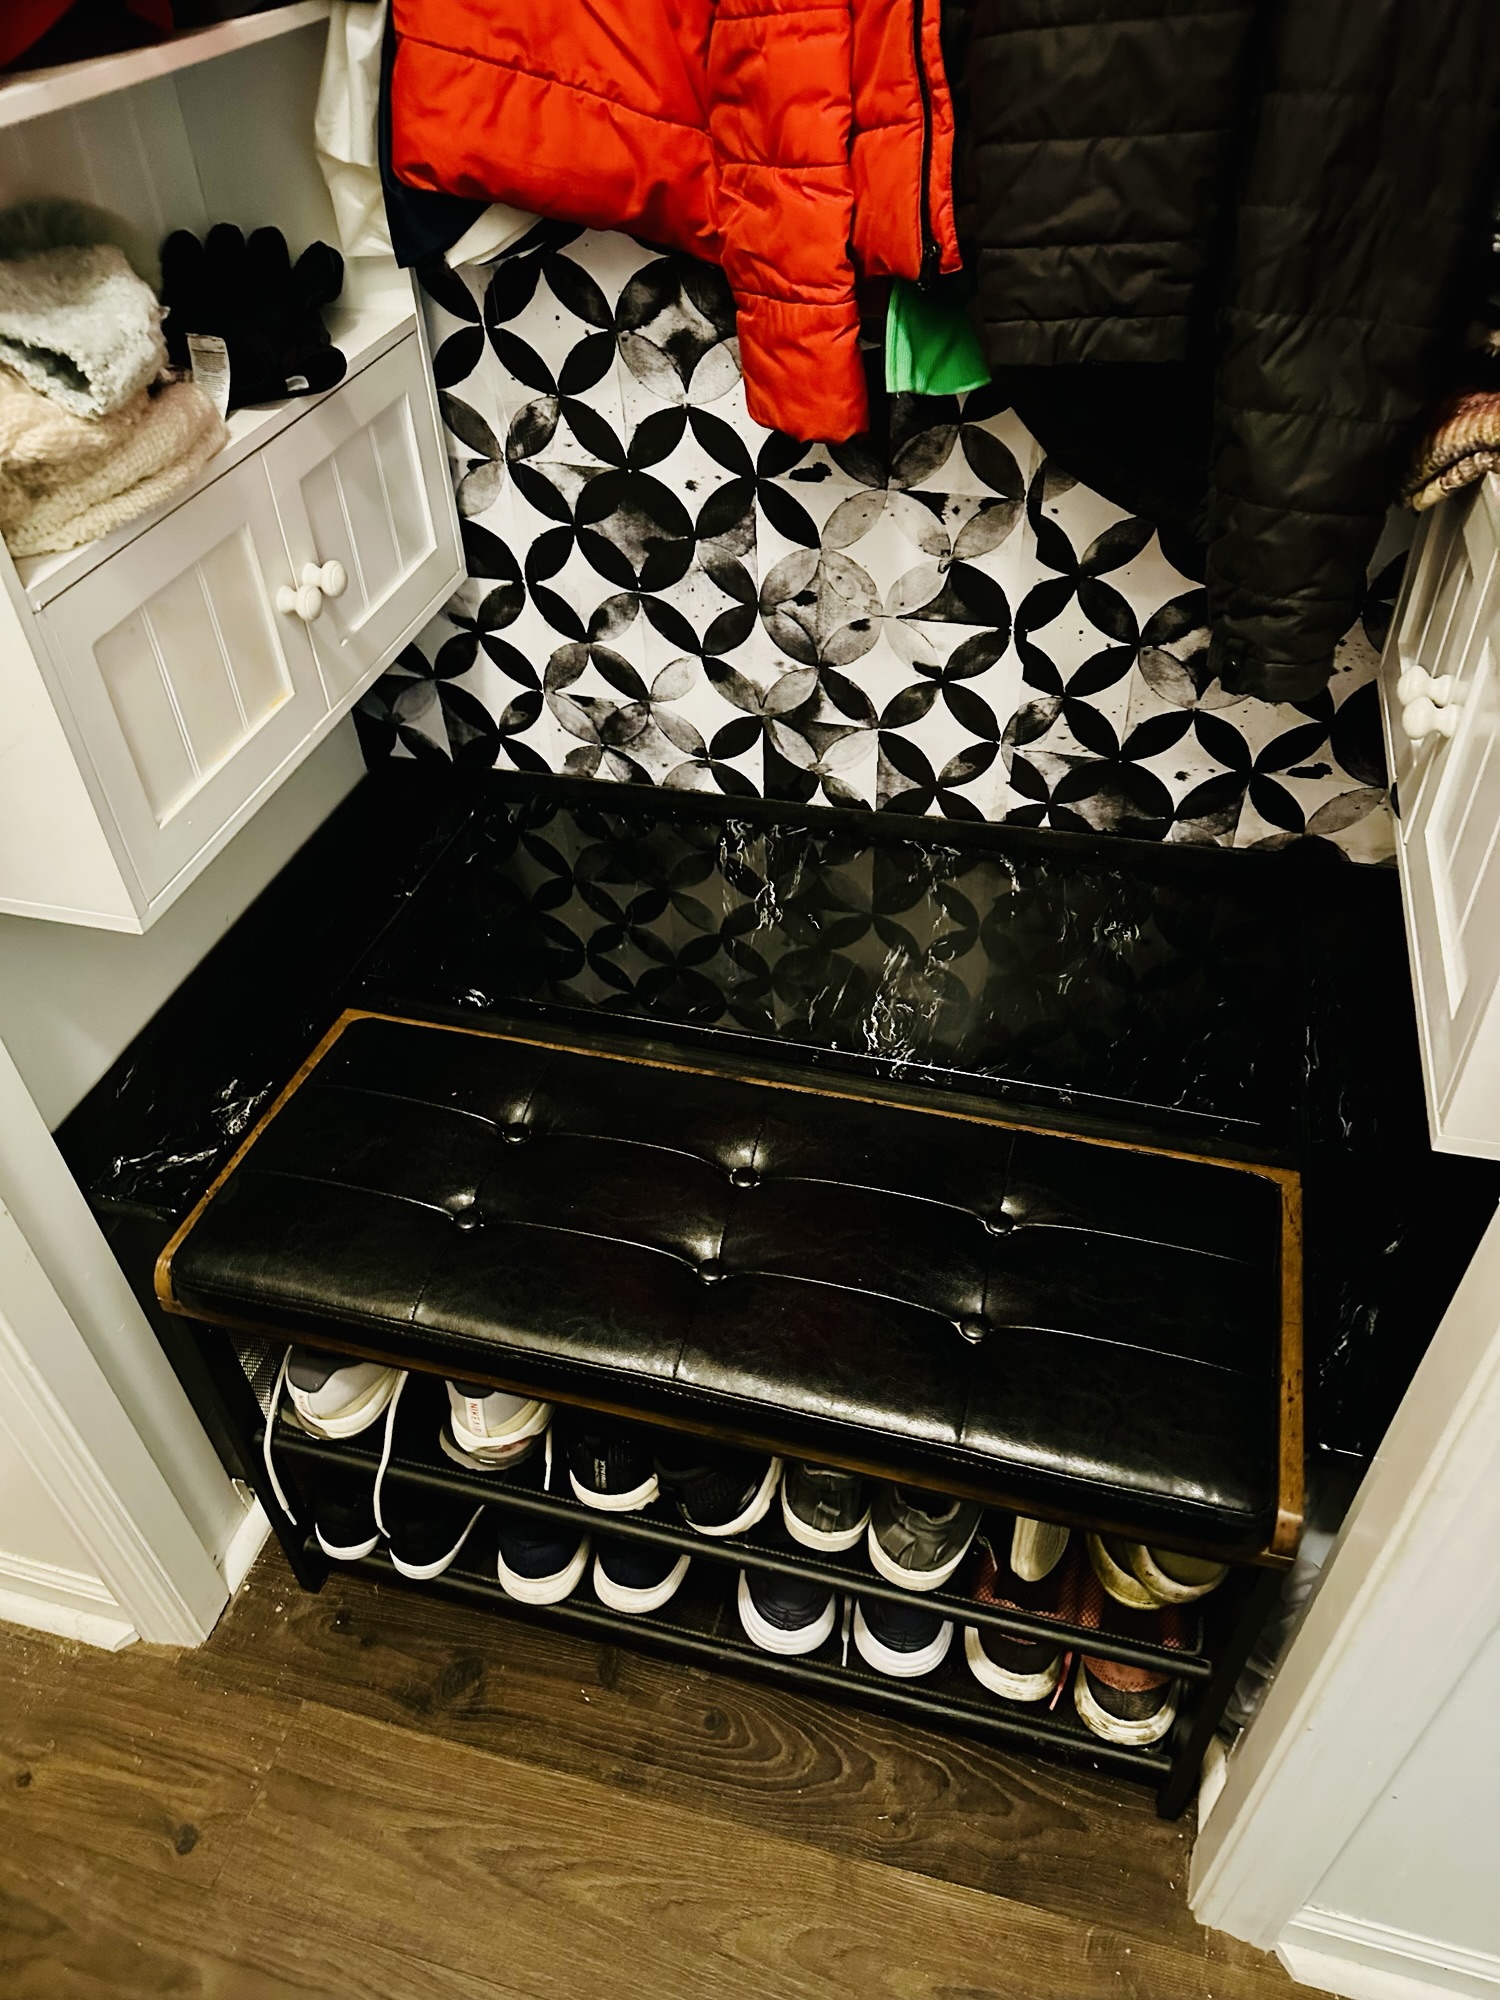
So, I finally snapped a few weeks into January and found a way to block precious items from ever falling into the abysses again. By building a kind of stand/bench around the nice bench I already had (I didn’t want to get rid of it, since we really like it, but it needed to be more functional) I created a place to set wet things while they dry. And, now the girls can stand on the bench and reach the coat hooks without falling over. PLUS, this gives me hidden storage for extra boots, bags, etc.
The nice thing about doing this custom is that it fits exactly into our closet space. I could have built a whole new bench insert and shoe racks (I know people will point that out) but I genuinely like the bench we have, and it looks nicer than what I would’ve come up with.
Supplies:
(As an advertising affiliate and Amazon Associate, I earn a small commission from qualifying purchases. But it doesn’t cost you anything extra and helps me keep up my site!)
Step 1: Remove closet items and measure. Our closet has one side wider than the other. I don’t know why, but it made measurements a little complicated. I decided that I liked the bench centered in the doorframe rather than centered between how far the shelves stick out. This left me with 5 inches on one side of the bench, 8 on the other, and 15 inches between the back of the bench and the back wall. I wanted ALL of that space covered, with absolutely no space for things to fall through. The bench was also 19 inches high, so I wanted the top of my stand to be level with the bench’s seat.
Step 2: Cut bracing pieces and assemble. Using 2x4s, I cut two pieces to cover the full width of my closet, 41 inches. (Yes, you can see from the lower picture below that I used one shorter scrap piece. This worked fine, but if you’re living in a perfect world, splurge and cut yourself two pieces at the full width. 😆)
For the front piece, I cut 3 legs at 16 1/4 inches, since this would bring my whole height once completed to 19 inches, like my bench. Basically, just figure out the height you want and make sure that the legs + the piece going across + the stand’s top = the height you want.
Also note, I didn’t need legs for my back wall piece, since I knew where the studs were. If you don’t want to screw into your studs, create extra legs for that back piece going across too.
To assemble these braces, I stood up my 3 legs and lay the long piece across. I made sure to bring in the 2 legs on the ends so that the closet’s baseboard wouldn’t be in the way. I only used 1 screw to secure on each leg. You could use 2 if that feels sturdier. Just be sure that the heads of the screws don’t stick up higher than the wood.
Adding legs to brace.
Once that front brace was assembled, I set it in the closet and tested placement by setting the bench where I wanted it to be. I nudged and wiggled until the brace was exactly lined up and straight, then I just made little marks on the walls at either end so I’d know where to line things up if it got bumped. You don’t have to secure this brace to the walls at all, which makes this pretty easy! Once I knew the correct placement, I took the bench back out again so it wasn’t in the way.
For the back piece, again, I just screwed it into the back wall’s studs.
Placing braces.
Step 3: Make the stand’s top pieces. You could use plain wood, then paint or stain it. You could use countertop stone pieces… There are probably many options for how to create the top of this bench surround. I decided that I wanted something dark (to match the look going on with our wallpaper) and something waterproof (so we could lay wet stuff on it to dry). Since I had a bunch of leftover MDF and epoxy, that’s what I went with. I also chose this because I could match the bathroom countertop in that same area of the house, and I plan to do the same with our laundry room counter nearby – we can have a matching “wing of the house” this way. 😜
First, I checked my measurements for the 2 side pieces I’d need. One was 5 inches wide (wall to side of bench) and 24 inches long (back wall to front doorway’s inner side. The other was 8 inches wide and again 24 inches long. I cut these 2 boards of MDF, then tested their fit. 👍
Testing the top pieces’ fit.
For the bigger, middle piece that would sit behind the bench, I decided to leave a little wiggle room so my fingers could get in there to lift off this part. Under here was where I’d get that extra storage. So, I went with 14 inches deep (back of bench to back wall) and 26 1/4 inches long (left top board to right top board, leaving a little room, about 1/2 inch either side).
For my FULL process on how I epoxy counters, etc. see this post. Basically, if you go this route, follow the instructions of whatever epoxy you’re using. I use StoneCoat Countertop epoxy, and it’s always worked great for me. For this project, I used only 2 Solo cups’ worth of epoxy – first for the color coat and then for a clear, protective coat overtop.
Ready to epoxy.
First, I sanded the corners of my MDF, especially the sides that would be facing the bench, not facing the wall. Next, I used plain-old latex paint and put on a coat of black. I gave this about 4 hours to dry.
Next, I mixed the epoxy according to instructions – I can do this by look and feel at this point, but be sure to follow your instructions if you’re new to this because mixing it well is very important. Then I added a little black epoxy dye into my epoxy, stirred, poured that on my boards, and sprinkled on a little gold mica powder. Using a glove, I wiped around until I liked the look of it, being extra carful to make sure it went over my corners to get the sides. Then I took a few drops of white acrylic paint and wiped that around to make little, broken, marble-like lines. NOTE: This acrylic paint will shrink up and get crackly, so keep an eye on the look as it progresses, because it won’t necessarily end up looking like what it looks like right away.
Once done with my design, I hit the surface with a quick pass of my kitchen torch to get out bubbles, let it sit for 20 minutes, torched out bubbles again, and then let it set for 10 hours. Once it was not tacky to the touch, I poured on my clear coat, torched it, and again let that set.
Ignore the mess 😜
Again, different epoxies vary, but I let mine set for a week to cure. After that, it was ready for light use, even though it takes a full 30 days to completely cure. When my pieces were ready, I sanded the undersides to remove the dried bumps of dripped epoxy. Then they were ready.
Again, you could use something else for the top pieces of your stand/surround, but I really like how this epoxy always turns out, plus it’s super-durable.
Step 4: Installation and finishing touches. Taking my top pieces to my waiting braces, I started with the 5-inch side. Making sure I had that 5-inch piece turned so the nicer edges were away from the walls, I set it in place and found that it fit perfectly.
Before securing it in place, I went underneath and installed a little bracket thing. This I screwed to the inside of the front wall/doorframe side. If you don’t have these, use a little L-bracket, which honestly would work better and easier. (I just happened to have these things and was looking for a way to use them. lol)
Anyway, I added this bracket with the top board in place so that placement was easier – I could see exactly where it needed to go to be a level support.
Once done testing the placement of my 5-inch top board, I removed it and applied a little wood glue on the tops of the 2 braces where they’d touch my top piece.
Glue and bracket ready.
Once ready, I pushed the 5-inch piece into place on the wood glue. I next went under the braces and screwed up through them – don’t get too long of a screw!! – to secure the brace and the top piece together. I also went under and screwed the bracket to the underside of the top board.
I repeated all this for the 8-inch side’s top board.
All of this keeps the loose brace in place rather than having to attach it to the side walls because, if your top side pieces sit snug enough in the space, this whole stand/bench surround won’t even wiggle.
8-inch side on.
It was at this point that I decided I wanted to paint the braces in the same black as the paint I’d used for my top pieces’ base layer. You could do this earlier, if you choose, but I liked seeing everything in place and knowing exactly how much would be visible anyway – I needed to be careful with the little paint I had left.
Painted braces black.
For the middle top piece, I considered putting hinges on it. But, I can easily imagine little fingers getting pinched with a slam. Or, I could’ve put handles on it, like drawer pulls, to make lifting it out of place easier. But, I wanted everything to look nice and smooth, without anything to catch on little butts if they sat back on this part. So, I opted just to put little cupboard bumpers on the bottom corners of the big middle piece. This lifts it slightly where the piece rests on the 2×4 braces, making it both easier to grab and also more stable so it doesn’t move around or do any damage when set back in place.
Step 5: Place the bench in place! With everything secured, I slid my bench back into place in the gap. It fit great, with no room for losing treasures, and looks really nice. My 3/4 inch MDF worked perfectly to bring the full height of my stand to match the bench’s 19 inches, so it all looks like it is meant to go together.
The best part? The next snowstorm, the girls threw all their stuff on the bench’s surround, everything dried without making a soggy mess, and no mittens were lost.