Posted on Leave a comment

Window Frame Kids’ Art Display

We only have so much room on our fridge for the art my kids make me that we HAVE to keep. I wanted a slightly nicer way to display these masterpieces without just tacking them on a corkboard, and those cute little frames you can buy to display kids’ artwork would never be enough, plus you never know the size of paper that’s going to come my way.

But I did have 2 old window frames, so…


Supplies:

(As an advertising affiliate and Amazon Associate, I earn a small commission from qualifying purchases. But it doesn’t cost you anything extra and helps me keep up my site!)

  • Window frame (can use craft store window frame with chicken wire removed for smaller frames, or search Etsy for full-sized window frames)
  • String
  • Staples
  • Paperclips

Tools:

An old wooden window frame with six panes, a staple gun, a ball of twine, and a small container of colorful push pins, placed on a marbled surface.
BEFORE: Old window frames, string, and paperclips.

Step 1: Paint or stain the frame. Mine were already painted black, and I thought that would look nice for a distinct frame, so I left them black.

Side note: I know not everyone has spare window frames lying around, but you can buy the same size as mine on Etsy or smaller frames at a craft store – the kind that have chicken wire to clip things onto. If you’re like me and don’t really like the farmhouse-y, chicken wire look, you can snip off the chicken wire and go from there. Or, if you want to be really creative, you can make frames from 1x2s. For my project, I used old window frames all ready to go (like you’d find on Etsy).

Step 2: Cut string. Here’s the thing – I didn’t want to just stick the artwork on the front of the frames because that would hide the frames, and the artwork would flap around from open windows and fall off too easily. So, I wanted the artwork to sit behind the frames and be…well, framed by each section of the frames. This meant I’d need to attach the art papers to the backside of the windows. To do this, I needed something that wouldn’t stick out or keep the window from hanging flat against the wall.

Solution: string, paper clips, and staples, all lying flat against the back of the window so it wouldn’t make the frame stick out or fall off the wall.

Turning the window frames backside-up, I unspooled my string to stretch from one side of the window to the other and cut the string so a little extra would go on either end. I needed 2 strings at roughly the same length for each window.

Close-up of an old wooden window frame with a partially painted edge, resting on a surface. A yellow tool is visible next to the frame.
Cutting the right amount of string.

Step 3: Staple on the string. For the topmost string, I needed to bring it down about a half inch so the hanging screws in the wall would have a place to catch/hold the frame without getting caught on the artwork or string. Starting at one end, I looped the string a bit to add to how it would be held down, and then I stapled the string onto the window frame. Holding that tight all the way across to the other side, I also looped that end and stapled it in place.

To keep the string from sagging, I stapled the string onto the interior divider sections of the frame too.

Close-up view of a wooden frame with black and white paint, featuring a piece of white string threaded through a corner joint.
Stapled top string to a middle divider.

For the lower section, I ran a string from side to side right along the middle divider. Again, I looped each end to add to the grip of the staples, keeping the string tight across the center. Also again, I kept the string from sagging by stapling the string onto the interior divider sections.

Close-up view of a wooden window frame with a black finish and visible weathering, featuring a tied rope secured with a metal clip.
Stapled end.

Step 4: Add art papers with paper clips. Lying each piece of art face-down, I arranged one at a time and used paper clips to attach each paper onto the strings. I ended up using 2 paper clips for each paper just because the papers were a bit heavy and I didn’t want them to tilt all crazy.

A person holding a paperclip while attaching a string to the back of a picture frame with a glass front, resting on a textured surface.
Placing paper clips.

Step 5: Hang the window frames. I’d already screwed or nailed 2 screws/nails for each window frame, and you just have to be sure they are level and in position to catch the window frames so they hang nicely. Because of that half-inch gap at the tops of my windows, this left plenty of room to hang the windows and see what I was doing without poking into the papers. (Spacing this top string also makes it easier to change out the artwork later, without having to take the whole thing down.)

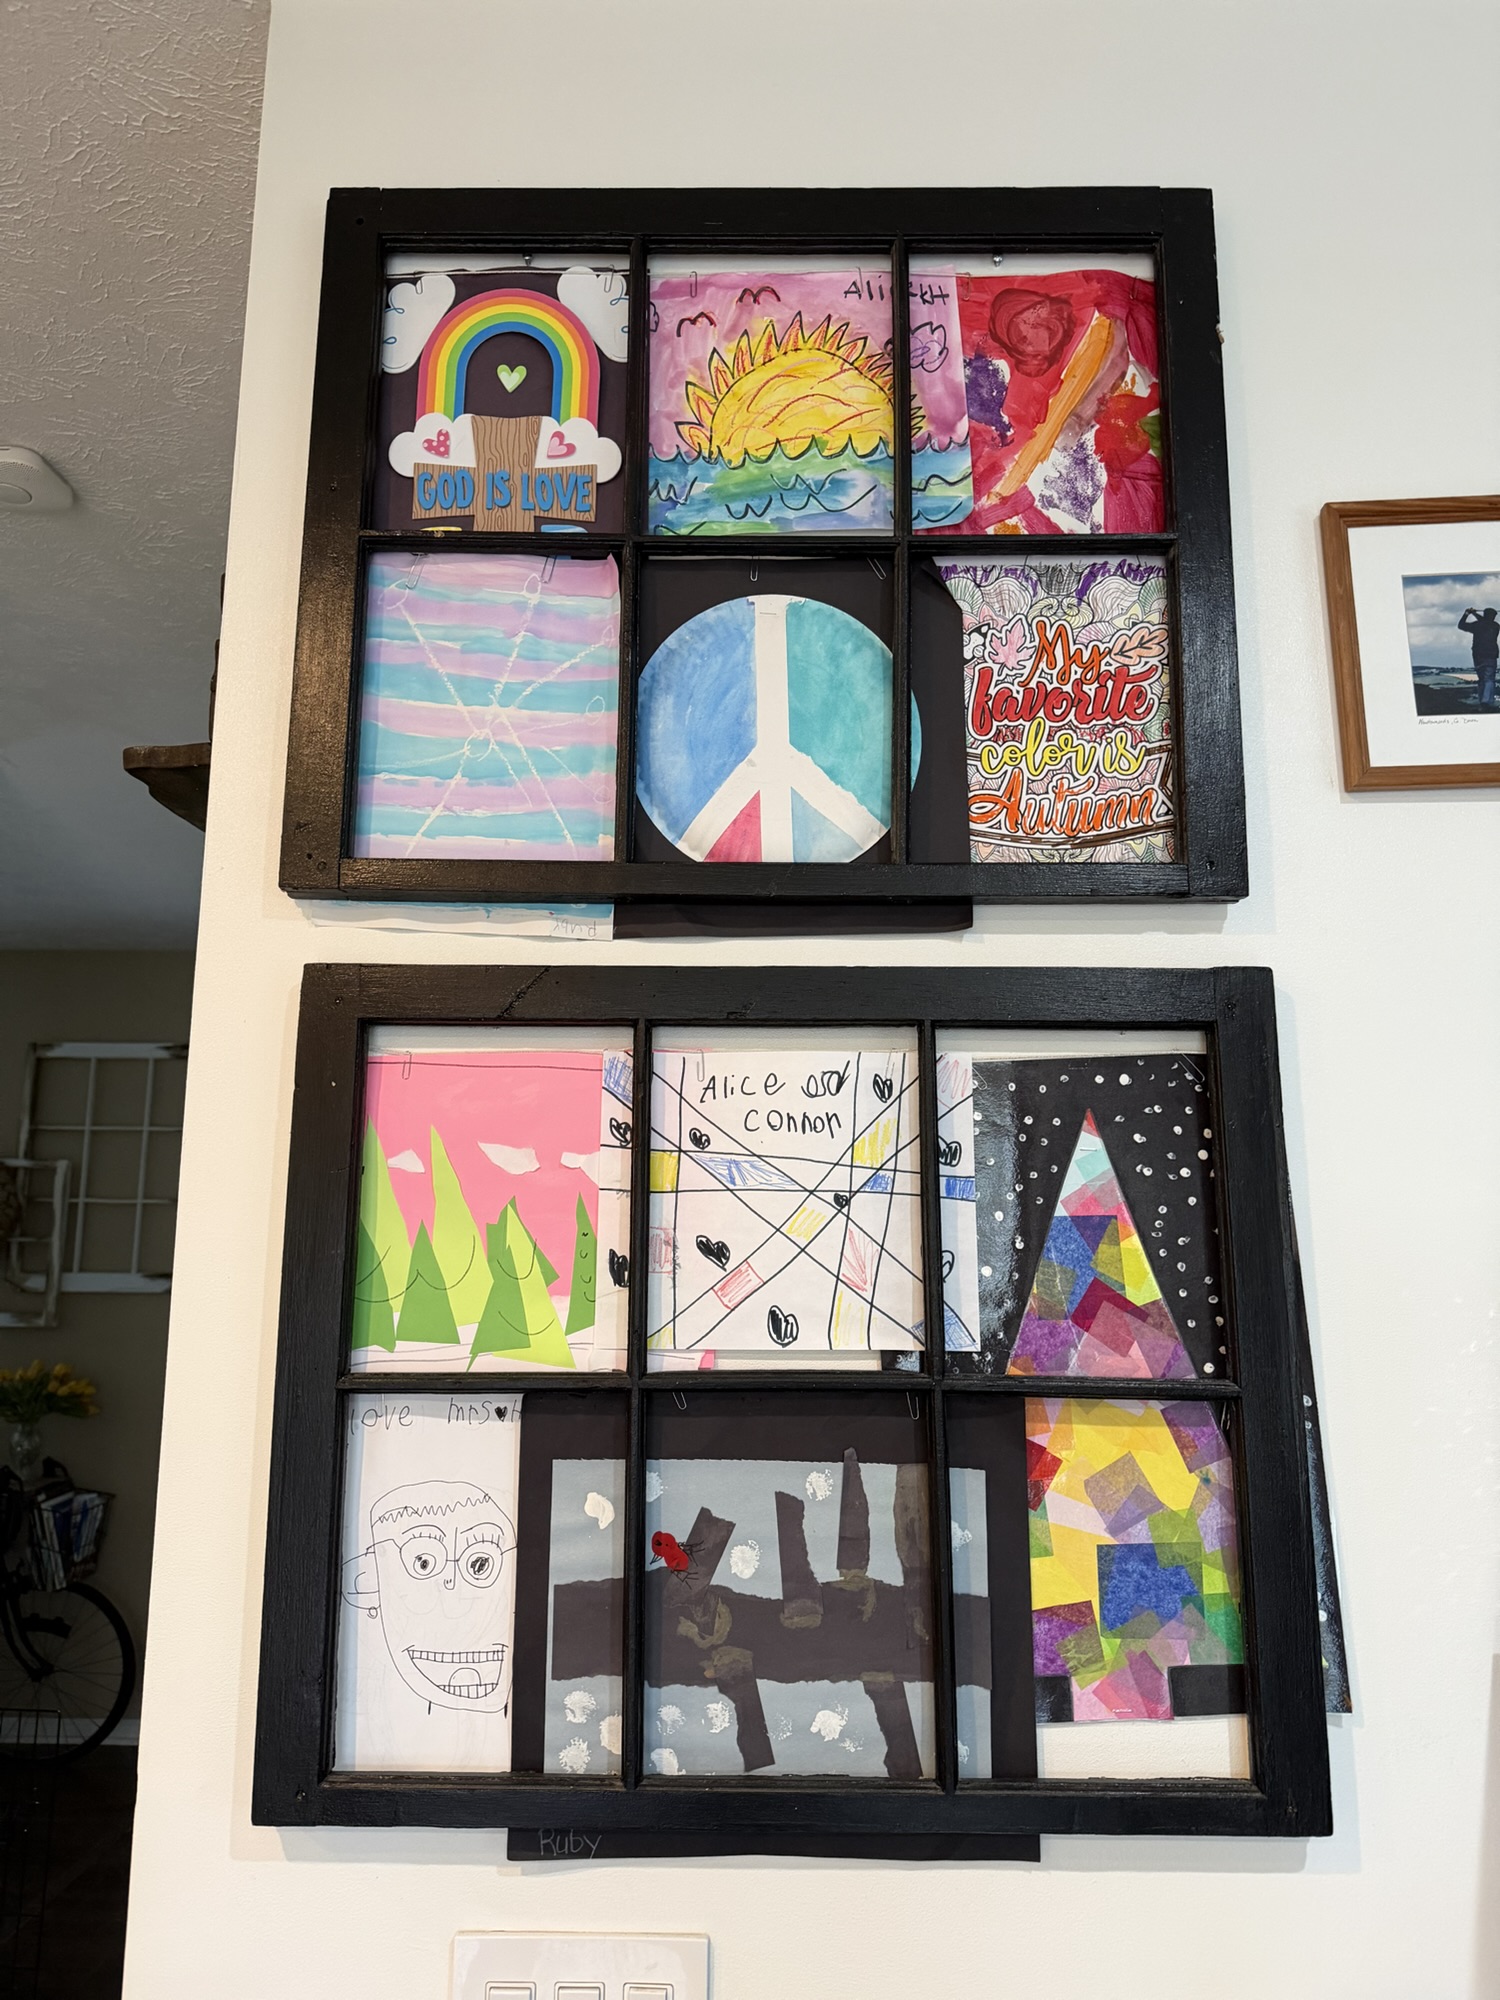
That was it! I can easily swap these artwork pieces when new artwork comes along by pulling the art off the paper clips and replacing them. I like that they’re secured in place and won’t fall or blow around, and they look nicely framed, kind of like a collage, without needing a dedicated frame for each piece.

A collage of colorful children's artwork displayed in a black-framed grid. The pieces include drawings of a rainbow, a sunset, a peace sign, and various abstract patterns.
AFTER: Kids’ artwork display!


DIY Must-Have Lists

Click to see more!
Click to see more!
Click to see more!
Posted on Leave a comment

Homemade Magnet Bookmarks

Last month was my birthday, and all I asked for was books. Now, I have a lot of new books! And while I love the scuffed up and torn bookmarks my kids have made me, I wanted to try something.


Supplies:

(As an advertising affiliate and Amazon Associate, I earn a small commission from qualifying purchases. But it doesn’t cost you anything extra and helps me keep up my site!)

Tools:


A collection of colorful ribbons in various patterns and textures, alongside a glue gun and small square magnets arranged on a table.
BEFORE: Scrap ribbons and magnets.

Step 1: Cut ribbons. I had a lot of ribbon to play with, and I’ll tell you right now that the simpler ribbon worked best for this. I really liked the look of the thicker, super-decorative ribbon that had stiffer edges, but the wire in the edges stopped the ribbon from bending easily like I wanted for these bookmarks.

I made these bookmarks a few different ways, but I cut each ribbon about 4-5 inches long. This gives you room to fold the cut ends over to protect and hide the ends, and it leaves enough room so the loop sticks out nicely from the book to look cute.

Step 2: Glue ends folded over. To protect the ends and hide the cuts, I first folded over each end slightly and used a little trail of hot glue to pin the end down. I did this for every ribbon’s ends, then moved on.

Step 3: Glue magnets onto the ribbons. With each ribbon’s “ugly” folded side facing up, I positioned a magnet at each end, covering the folded, glued part. I put the glue on the ribbon rather than the backside of the magnet, then pushed the magnet gently onto the ribbon until it stuck in place.

Close-up of a handmade ribbon bookmark with a black magnet attached at one end, held by a hand. The ribbon features a decorative edge, and there's visible hot glue securing the magnet to the ribbon.
Gluing magnets to ribbon.

Before gluing them down, BE SURE that the sides of the magnets that will face each other attract rather than repel.

For my widest ribbon, I put 2 magnets at each end just because I thought that would work better, and it helped this one be more stable at the end too.

A person holds a small magnet over a piece of black ribbon on a beige surface, showing the process of creating a magnetic bookmark.
Positioning magnets on wider ribbon.

Step 4: Add decorative finishes over the magnets. If you’re happy with how your magnets cover the ribbon at this point, you honestly could end here and the magnet bookmark would work fine. For my narrow ribbons, the magnet/ribbon combinations left a little space around the sides of the magnet that I didn’t want to see. I didn’t want to make these too bulky because then the books wouldn’t close very well, so I needed thin options for covering the magnet ends.

Option A: For one of my narrow-ribbon bookmarks, I simply added magnets onto the front too. This way of doing it was probably my favorite (certainly the easiest). I like that the magnets can connect either from the front or back this way too.

Two black rectangular magnets with glue, and a long black ribbon with silver trim laid on a marble surface.
Assembling option A.
A person holding a homemade ribbon bookmark with two black magnet pieces on either end, featuring a decorative ribbon in the center.

Option B: For my narrow green ribbon, I wanted to do something a little fun because these were for my girls. Since my eldest’s favorite book (which is completely coincidentally written by her mother) is green and purple, I took about 2.5 inches of purple ribbon and first glued the cut ends folded over.

Then I put a few dabs of glue on one side of the magnet, lined up the ribbon to cover this side, wrapped the ribbon around the magnet, and put dabs of glue on the other side so that the magnet was covered by the ribbon.

A close-up of a purple ribbon attached to a magnet, with a glue gun in the background.
Assembling option B.

These kind of look like little book covers themselves on the ends of the ribbon, and that would be a REALLY CUTE way to decorate these, if you draw on these ends to make them look like little books. You could even use a paint marker and put initials with little borders, or something. Lots of options!

I was a little worried that the ribbon around the magnets would keep them from working, but my magnets were strong enough to still have a good hold, even with the ribbon and several pages between them when I tested this on a real book.

Hand holding a decorative bookmark made of purple and green ribbons, resembling a small book.

Option C: For my widest ribbon, I could have left it alone because the magnets were definitely covered by the ribbon. But, I wanted to add a little decorative touch to this one . You could use other ribbon along the ends or lace or something special to you…but I liked this Kleenex box’s art and used that. 😆

Cutting off some of the box’s cardboard, I glued it onto the ends of the ribbon on the outer, decorative side rather than the side where the magnets would connect. This doesn’t block the magnets from connecting at all.

A colorful bookmark made from patterned ribbons, featuring vibrant tropical designs on the ends, placed on a textured surface.
Assembling option C.

DONE!

That was it for each one I did. You could do these a lot of different ways, but this was the basic method I followed, and I like how these turned out. I even did the shake test for each one, and they held in place inside my books really well! My paper bookmarks certainly don’t stay put, and now I have a great way to hold my place when reading any of my new birthday gifts…although I did take pictures with my own books. 😆

A hand holding a book titled 'Alterni' with a dark cover featuring an illustrated hand and colorful smoke effects.
AFTER: Option A magnet bookmark.
A person holding a book open with two handmade ribbon bookmarks sticking out, one purple and one green, placed in the pages.
AFTER: Option B magnet bookmark.
A close-up view of a multi-colored magnetic bookmark positioned inside an open book, with a plant and artwork in the background.
AFTER: Option C magnet bookmark.
Shake test – stays in place!


DIY Must-Have Lists

Click to see more!
Click to see more!
Click to see more!
Posted on Leave a comment

TP Roll Christmas Ornaments

Here is yet another craft idea I found on Pinterest, couldn’t find instructions for, and figured it out myself. It was pretty easy to collect these materials (free!) and easy to make these too. You could make as many as you want, but I used 11 TP rolls and 1 paper towel roll to make 2 angels and 10 flowers.

I also like the variations you could make to these. I used gold tape to add some sparkle, but you could paint them or use stickers or whatever to change the color. I like the simple but pretty look of the “natural” paper color with the light brown/white beads and gold accents, especially because that looks nice around my gold-ornamented Christmas tree.

BEFORE: TP rolls and supplies.

Supplies:

(As an advertising affiliate and Amazon Associate, I earn a small commission from qualifying purchases. But it doesn’t cost you anything extra and helps me keep up my site!)

Step 1: Cut the rolls into rings. For my flowers, I mostly cut the TP rolls into 4 equal sections. I did this by first pushing down on the rolls to flatten them a bit. Then I just used scissors and eyeballed my measurements. If you want to be sure you’re precise, you could use a ruler and mark them into equal parts, then cut.

For the angels, I cut more narrow strips – the same width as the gold tape, so be sure to do that if using colored tape! I didn’t worry about how many narrow strips I cut per TP ring, since I could use the paper towel roll to make up however many I needed after my TP rolls were used up.

Cutting rings.

I also used the paper towel roll to cut some extra pieces to finish off some flowers, so it’s a good idea to leave yourself some extra (whether a TP roll or paper towel roll) if you need more as you go.

Once you’ve got your rolls cut, you’re left with a whole bunch of rings. I grouped them together by width, with my bigger ones in flower piles and smaller ones in piles for my angels. I needed 5 rings for each flower. Each angel needed 1 for the head, 3 for each wing, and 6 to make the 3 bottom skirt parts. It was at this point that I cut up the rest of my paper towel roll to finish off my piles if I needed more. I also had a few extra narrow rings, so I cut enough narrow rings to make a few narrow flowers too.

Grouping rings.

Step 2: Adjust shape/size for certain pieces. First, for my angels’ bottom skirt parts, I cut rings (6 per angel) at one bent side. Then I took pairs of these and connected them together, making bigger rings. I used just a little bit of hot glue to connect the cut ends. This left me 3 larger rings for each angel.

Making bigger pieces.

For the angels’ heads, I took one ring for each and unbent them as much as I could so they were round again.

Step 3: Tape/Color/Decorate angel rings. Next, for each of my bigger angel rings, I took strips of gold tape and ran the tape around the rings evenly before smoothing it on. I did the outside of the rings first, then decided I wanted the insides to have gold tape too, since they were so visible. Running the tape around the inside of the bigger rings was a little tricky for my fingers, but it ended up looking nice.

I also did the outside and inside for each round head piece.

For the angel wings, I only did the outsides of the rings. The insides ended up so squished that you couldn’t see them much anyway, but you could do these insides too, if you want.

Taping rings.

Again, you could paint or color or use glitter or whatever you want for decorating these! I left my flower rings alone during this part, but you could decorate those as well.

Step 4: Assemble the rings into flowers and angels. The flowers were VERY easy to assemble. I took my grouped piles of 5 and arranged them like flowers. Taking my hot glue gun, I smeared on a little glue and held them together, adding one at a time, until they were all connected.

Making flowers.

For the angels, I took the 3 wing parts for each side and glued them together, first the wing at the left side onto the one on the right side, then the next on the left, then the next on the right, then the other on the left, then the other on the right. When all 6 (3 on each side) were together, I added a little glue to the inside of the rings and squeezed to make these ends more smooshed and flat where they met.

Making wings.

For the bottom skirt pieces, I held the ends of the three pieces together to make sure they were even, and then I glued the sides to each other where they met at that end. Either side of the middle piece connects to that side of the side pieces, basically.

Adding bottom to wings.

To connect the bottom to the wings, I glued the undersides of the bottommost ring pieces and stuck the bigger rings against those. I made sure to hold the bottoms all the way up against the wings until the glue dried and held them in place.

Finally, I took the round head piece and glued that on where the wing ends overlapped – like a head on shoulders.

Step 5: Add final decorations. To cover where all the glued wing pieces met, I took a little white ribbon and tied it on to cover the “body” of each angel. This also added little back wings where the ribbon tied.

Adding ribbon.

For the flowers, I took little wooden beads that I had leftover from other projects and glued them on in a number of different ways. For the thicker flowers, I had to decide which side was front and which was back so the beads showed up best at the front. The beads stuck on the TP rolls really well, which was good because I was initially worried about them falling off.

Adding beads.

For other narrower flowers, I took some more of the gold tape in about 1-2 inch strips and stuck that on the ends, folding it over each tip.

Adding tape tips.

Step 6: Add hangers. I used clear fishing line and tied them in loops through a ring of each decoration. You could also use twine or ribbon.

That was it! These turned out pretty cute, considering they were basically free and made from TP rolls! 😂

AFTER: Christmas decorations!


DIY Must-Have Lists

Click to see more!
Click to see more!
Click to see more!
Posted on 1 Comment

Mini Present Decorations

I’m a Thanksgiving purist, in that I insist we wait until after thanksgiving before we get all Christmasy. But now that we’re here, I’m onboard with kicking off Christmas!

I’ve had this idea for a while, and fortunately I was at my mom’s house for the weekend – she has a LOT of scrap Christmas paper plus blocks of wood that were perfect. I’ve been saving/hoarding ends of cut wood at our house too, so I’m sure I’ll be making even more of these once I get back to my house. Either way, if you’ve got scrap blocks of wood, odd bits of Christmas paper, and ribbon, this DIY decoration is free and easy to make! You can make as many or as few as you like, too – little stacks are cute, and giant stacks would be cool too.

Supplies:

(As an advertising affiliate and Amazon Associate, I earn a small commission from qualifying purchases. But it doesn’t cost you anything extra and helps me keep up my site!)

  • Scrap blocks of wood
  • Scrap Christmas wrapping paper
  • Ribbon
  • Tape and scissors
BEFORE: Scrap wood and wrapping paper.

Step 1: Prep the blocks. If you’ve cut all these blocks, they might have rough edges that need to be sanded down, otherwise the edges might rip through the paper. My mom, fortunately, had sanded these blocks a while ago because she’d originally wanted to make colorful building blocks out of them for my girls.

Step 2: Wrap the blocks. I tried to do 3-4 blocks for each wrapping paper that I had, just to get colorful variety. You could also do these as all the same wrapping paper for a more unified or minimal look.

Very simply, you just wrap the blocks like you would a real present. If you don’t have big enough strips to cover the whole block, I found it was fine if the bottom still showed some exposed wood – you won’t see the undersides anyway.

Wrapping the blocks.
Any size will do!

Step 3: Add ribbon ties. I considered using a hot glue gun to connect each “present” and hold them secure, but the ribbon held them pretty well once it was wrapped around a few times. If you’re doing a giant stack, you might want to hot glue them together to help with stability. Or, if you don’t want ribbon at all, you could glue them for a different t look entirely!

First, I practiced stacking the presents to see what heights I wanted and which paper looked best side by side.

Setting up stacks.

Again, basically wrap the ribbon around the wrapped blocks like you would do for a real present. I found that once I got the ribbons around once tightly, the blocks stayed in place and it was fairly easy to wrap the ribbon up and down and around again to get the look I wanted.

For a few of the stacks, I used bigger, prettier ribbon, and that I only had to put around once. That would look really pretty with fancier wrapping paper, especially with golds or whites. Again, we were going for colorful, but a mom can dream. 🤪

Ribbons on.

Step 4: Set them out! I arranged my stacks on my mom’s little ledge around her staircase, and they look quite cute all sitting together, but we might space them around once other decorations go up. They’d also look cute with garland or greens or lights behind and around them.

AFTER: Mini Present Decorations!

That’s it! I’m glad these look cute, and it was a great way to use all those scrap pieces of wood, not to mention the odd sizes of Christmas wrapping paper that were just waiting for a use.


DIY Must-Have Lists

Click to see more!
Click to see more!
Click to see more!
Posted on Leave a comment

Fake Pumpkins for Fall

This idea was inspired by 2 different things I saw on Pinterest. Apparently I’m late to the game – there are a ton of people who knew you could make fake pumpkins out of grocery bags! I wasn’t exactly going for real-looking pumpkins with mine, so I used the basic instructions I found combined with another idea for how to decorate them. And, my kids helped, so this was a fun way to make decorations for Fall that we all can take some credit for. Best of all – it cost me practically nothing!

BEFORE: Piles of grocery bags.

Supplies:

(As an advertising affiliate and Amazon Associate, I earn a small commission from qualifying purchases. But it doesn’t cost you anything extra and helps me keep up my site!)

  • plastic grocery bags
  • painters tape
  • twine and/or clear line
  • joint compound or glue
  • sturdy paper towel
  • acrylic paints
  • petals, tissue paper, leaves – whatever you want to decorate with!
  • hot glue and gun

Step 1: Stuff and bundle grocery bags. We have an embarrassing pile of plastic grocery bags in our garage, waiting to be taken for recycling. Now for this project, I was glad we had them! Taking one bag, I fluffed up a bunch of others and stuffed them inside. For 3 of my pumpkins, I also added an empty, cleaned gallon jug to fill some space. You could add newspaper too, or packing paper – whatever will fill the main bag and still let it be squishy around the sides.

Once I had a bag full and generally sphere-like, I tied the top handles together so this could become the stem layer.

Tied stem.

Step 2: Wrap to make dividing grooves and stems. I tried to make pumpkin grooves a few different ways.

For one pumpkin, I used painters tape. Starting at the top “stem” (which I wrapped in tape to create), I put on a long strip of tape and held it tightly near the stem, then ran it down and around the bottom of the bag. I did this a few more times around to make dividing sections around the bag. This worked okay but didn’t make as obvious grooves as other methods.

Tape grooves.

For another pumpkin, I used twine to make the grooves. I tied it around the stem, then wrapped it down and around the bottom of the bag, spacing it a bit and wrapping it around and around until I had a bunch of denting divides. This was my favorite look and worked the best, in my option. When I was happy with it, I tied off the twine at the stem again.

Twine grooves.

Unfortunately, I ran out of twine, so next I tried fine, clear fishing line for the last 2 pumpkins. This worked okay but slipped around a lot more than the twine had done. It was also harder to tie off and keep tight. But, it worked pretty well to make a lot of deep grooves.

Line grooves.

As I’d done for the first pumpkin, I used painters tape to make the other pumpkins’ stems. Holding up the tied handles, I wrapped the tape around the handles to make a stiff, single stem. You can bend these a little bit to give the stems different shapes sticking out the top of your pumpkins.

Pumpkins formed and ready.

Step 3: Paper mache the pumpkins. I’ve seen a lot of paper mache recipes that use flour, but that seemed kinda gross to me and I didn’t want a mess. 🤷‍♀️ Instead, I took about a spoonful of joint compound and stirred it around to dissolve in a bowl of water. If you don’t have joint compound, you could use glue – just be use you get the mixture right so that it sticks and hardens when dry.

You also normally use paper/newspaper, but I used sturdy paper towel. This worked really well because it was pliable and also had a nice texture. Be sure to use a good, thick paper towel so it doesn’t fall apart when wet, though.

Strips ready.

After ripping the paper towel into smaller strips, I dipped each strip in the bowl’s mixture, let it drip off against the side of the bowl, and then stuck it on the pumpkin/grocery bag. I made sure to push the paper towel down into the dividing groves around the pumpkin to keep that shape.

Adding the strips.

It worked really well to set the grocery bag on a whole paper towel to catch the excess water – once this was wet enough, I flipped the pumpkin and used that paper towel to covered the bottom side of the bag. I then added a layer of paper towel strips around the edges of that bottom piece to help it stay on and also blend the edges.

Spreading the bottom piece.

Once I had the whole bag covered, I added a few strips over places where some edges didn’t stay flat. A good trick was to make sure all sides of my strips were ripped so that the wet edges really blended in. This looked better than leaving the paper towel strips with straight, blunt edges.

Step 4: Dry and paint stems. I set my pumpkins in the sun to help them dry, but mine still took overnight to completely dry and harden. The joint compound on the paper towels makes them just stiff enough to hold the pumpkin solid so that you can work with a harder surface for the following steps.

Drying.

Step 5: Paint the pumpkins. Because you’re painting paper towel, little acrylic paints work just fine. One pumpkin I wanted to have a white base, so that one was easy to paint white, barely brighter than the dried paper towel was naturally anyway.

Another pumpkin I painted with a “realistic” orange , then added some brown touches in the groves.

Painting the orange pumpkin.

The remaining 2 pumpkins were claimed by my daughters…and I let them go nuts since I planned to mostly cover these anyway. 😁 They had fun, and the reds and yellows in particular added a cool touch to the end result.

Also, to finish the stems, I took a dark brown paint and painted each stem, covering the blue painters tape.

Girls painting with me.

You don’t have to paint the pumpkins if you’re going to cover them, but I thought it was a good idea to do so in case anything showed through in the end. (I also considered painting a pumpkin in a light brown, since the paper towel looked a lot like burlap – so that’s another option if you’d like to try it for me and see how it looks! lol)

Step 6: Cover the pumpkins in…

For my white pumpkin, I took an enormous, dried hydrangea that I’d spray painted with a rose gold paint last Fall. Pulling off a bunch of individual petals, I glued them on one at a time all over the pumpkin. I even took a few of the dried leaves from the hydrangea and added those around the stem. This option took a lot of time, but it looks really pretty!

LOTS of petals.

For my “realistic” orange pumpkin, I took a lovely tissue paper and cut it up into strips that I then glued onto the pumpkin. Yes, I covered the whole thing, but I’m glad I painted the pumpkin because you can slightly see through the tissue, and this way the pumpkin looks like the real thing. Once I had all the tissue paper on, I added a little strip of burlap tied around the stem for an added decorative touch.

Adding strips of tissue paper.

For my girls’ pumpkins, we headed outside and collected a whole bunch of fallen leaves. This was quite fun. We brought them inside and set them on paper towels to dry, and I placed a paper towel over them along with plates on top to keep them flat.

Taking the biggest leaves first, I spread a little hot glue around the edges and then pressed them onto the pumpkins, pushing them especially into the groves to keep the pumpkin shape as much as I could. I put mostly green leaves down first, then added the prettiest orange and red leaves on top, layering them like a collage.

Adding leaves.

Fun fact: if you spread hot glue on wet, green leaves, they make a smell like cooked spinach. 🤣🤣🤣 I learned after a while to turn the glue gun off if it got too hot, and it was much less painful on my hands to press the leaves on if the glue wasn’t so hot.

Because I didn’t want all their painting efforts to be lost, I left a few gaps where the red or yellow or even blue paint could show through. Much to my surprise, these leaf-covered pumpkins ended up being my favorite.

All finished, here were the end results:

AFTER: Petals pumpkin.
AFTER: Tissue pumpkin.
AFTER: Leaf pumpkin 1.
AFTER: Leaf pumpkin 2.

There are a LOT of ways you could decorate these fake pumpkins. Let me know what you come up with! I ended up putting mine on the top of my kitchen cabinets for some added Fall decor, but you could use them as centerpieces on a dining table or on a mantle or on bookshelves – anywhere they’d look nice! It’s great that they won’t rot like real pumpkins, so all our crafty efforts might even be enjoyed next year.


DIY Must-Have Lists

Click to see more!
Click to see more!
Click to see more!