Posted on Leave a comment

Color Splash Furniture Makeover

This would have gone a little differently without the help of my 4-year-old, but she wanted to help and I didn’t want to disappoint her. It was fun to work together, and at least she’s proud of her work. So, here’s how I made over her dresser…with a few pointers on how I’d planned on doing it by myself.

When we first moved into our current house, I did a quick paint job for my old dresser that had been revamped MANY times already. I didn’t figure a dark brown would be very kid-approved, so I painted the whole dresser a plain white for the time being and added cute knobs. But I didn’t even do 2 coats, and clearly it needed something new.

BEFORE: Plain dresser in need of love.

Fast-forward to now, and it was time for something more fun. Ruby wanted a “color splash” and, boy, did we find a way to make that happen. 😜

Supplies:

(As an advertising affiliate and Amazon Associate, I earn a small commission from qualifying purchases. But it doesn’t cost you anything extra and helps me keep up my site!)

Step 1: Prep and base coat. Our dresser had a glossy white paint that first needed to be cleaned off (think years of sticker gunk and…slime, possibly?). Taking the dresser into my garage, I next removed the drawers and sanded the main body of the dresser. I used my little handheld sander, but you could just use a strip of sandpaper. I went over the whole dresser, sanding over the glossy paint to roughen it up a bit so that new paint would adhere better to the surface.

Lightly sanded.

If your furniture has fresh, never-painted wood, you’re probably fine to just paint a base coat of whatever color you want.

If your wood is stained, you definitely want to sand that down before painting a base coat. If your paint is peeling, you definitely want that off too. There are a lot of videos out there about stripping paint, but basically, just get your wood to the point where new paint will adhere.

Because the pouring paint won’t cover every part of the dresser, you want to give the dresser a base coat of paint that the pouring paints will go over. I left most of our dresser white. For the front pieces that would be exposed around the drawers, however, I used a purple spray paint and quickly did a base coat of that for the front. I didn’t worry about it getting on the top, sides, or bottom because I figured that might look kinda cool with the pouring paint going over these places anyway.

Whatever you use for this base coat, it doesn’t have to be perfectly flawless, since the “color splash” will cover a lot.

Base coat of purple added.

Step 2: Remove hardware. I had an interesting situation where I’d had to use washers to make the drawers thick enough for screws to tighten on the knobs. I’d apparently put on these washers when the white paint had been a little wet, because most of they would NOT come off. So, I decided I’d simply paint over the washers to help hide them anyway.

You can probably just remove whatever knobs or pulls are on your drawers and set them aside for later use.

Hardware removed.

Step 3: Make a plan and set up. I planned to do one drawer at a time simply because that’s what I had room to do. You could try all at once if you have a bigger space, but I liked taking my time too. Just be sure that you put something (I used cardboard) under where you’re working, because the paint will drip. Each drawer should stand on their backside, with the drawer front facing up. Also be sure they are fairly level so the paint will flow evenly.

I kept all of the drawers ready nearby and carried them over one-at-a-time to my piece of cardboard where I was working. I also made sure I had space to set them to dry once each was done – I used my kitchen island for this, since I’d be able to easily wipe off any paint that dripped while drying.

As for the pouring paints, I/we picked the colors we wanted and set these out so they were ready. We used neon yellow, purple, hot pink, and light pink from my box set of pouring paints. (Ruby picked her own, completely different colors for the sides of the dresser that she was painting…yay.) I also kept the Floetrol bottle open and ready next to my pouring paints as well. And, I ran an extension cord for my blow dryer so I’d have room to maneuver. Lastly, I kept a few spare gloves ready if I needed them – though I ended up only using one, and you don’t necessarily have to use a glove, because the paint washes off easily.

Narrowing down colors 😜

It really helped to have all of this ready first so I wasn’t making a mess as I moved things around, and it helped me be able to work more quickly.

Side note: I set up so that I could do the drawers first. However, you could start on the main part of the dresser rather than the drawers…which would have been my plan if I’d had my way. I would start with the top, and once that was dry, then I would turn the dresser on its side and do one side, let that dry, and then turn it over and do the other side. This process would take quite a while because you’d need to let each side dry before moving to the next, but at least I could’ve started the process and given the drying time a head start before starting on the drawers. It is probably easier to practice and get the hang of pouring paints on smaller drawer fronts, but you could tackle the main dresser first if you’re confident!

Step 4: Pour the paints! It is absolutely necessary to use Floetrol for this project, or else the paints won’t flow like they should. I had a leftover bottle that wasn’t even half-full, so it doesn’t take a lot. Also, it’s important to use the appropriate kind of pouring paints for the colors, because regular acrylic paints don’t flow as well. You could mix acrylic paints with Floetrol, but buying the right kind in the first place seemed easier. 🤷‍♀️

Anyway, start by pouring a little bit of Floetrol on each drawer front and then wiping it around so that it covers the whole surface. You also want the Floetrol going over the edges slightly, as this will help the colors flow over the sides instead of building up at the edges.

Floetrol on.

Once the Floetrol was on (and keep in mind that this will basically disappear, so don’t count on it for color coverage), I took each paint color and squeezed out lines, drips, and swirls over the drawer fronts. It doesn’t have to look pretty! The trick is really to just get enough colored paint on so that you’ll be able to blow it around and cover the space you want – you get a feel for this as you go.

Colors ready.

With the Floetrol and pouring paints on, I took my blow dryer and turned it on high. (Yours might work better at a different setting, so practice a few times to get the feel for what you need.) Holding my blow dryer pretty close to the paint, I blew it around and moved in different directions until I got the look I wanted. This is the fun part!

Blowing colors around!

Once all your color is blown around and no longer shows lines or dripped circles, you can stop. Be careful not to overdo it, or your colors will run together too much and get all muddied.

If you make a mistake and don’t like it, you can wipe it off quickly and start over – that’s another nice thing about the Floetrol. Or, if you don’t like a part of the painting, you can add more colors and blow that around to fill in or go over that part.

Step 5: Dry. After I was done with each drawer, I carefully went around the undersides and wiped off the dripping, excess paint with my finger. This helped get rid of the majority of the dripping right away so that I could move them to dry on my counter. I lifted each drawer and kept the top level, making sure they didn’t touch each other in case the drying paint stuck.

As I finished more and more drawers, I paused every now and then to wipe the undersides if I saw drips. After a while I stopped seeing drips altogether, so I just left them alone to dry.

Drawers drying.

I let the drawers dry overnight to be sure they were entirely dry before putting the dresser back together.

Side note: Now is when I poured paint for the top of the dresser. I used the exact same process as I’d used for the drawer fronts, only this was a bigger space. Ruby liked the drips over the sides of the dresser (which she’d painted herself), so I sucked it up and left them be. As I explained above, I would have done the sides of the dresser the same way too. This would have required more time as each side dried before turning the dresser for the next side, but the process would have been the same, repeating the steps above.

Painting the top…with supervision.
Top painted.

Optional step: Apply a clear coat. You could go over the dried paint with a spray-on, clear gloss if you want a protective finish. I opted not to bother, since I’m hoping someday to talk her into letting me do the sides. 😉 But, it would help to protect the paint and also to give the dresser a nicer finish.

Step 6: Return hardware. I used the same knobs I’d used before, but you could always change it up if you like.

After putting the drawers back in place, the dresser was finished! This certainly is a fun way to add some color to a bedroom, and it completely changed the look of the boring white, banged up dresser. My daughter also really likes that she can switch which drawers go where, changing the look even more if it gets too “boring” in this current configuration…which I don’t see as a likely issue, but what do I know? 😆

AFTER: Color splash dresser!


DIY Must-Have Lists

Click to see more!
Click to see more!
Click to see more!
Posted on Leave a comment

Painting Fan Blades

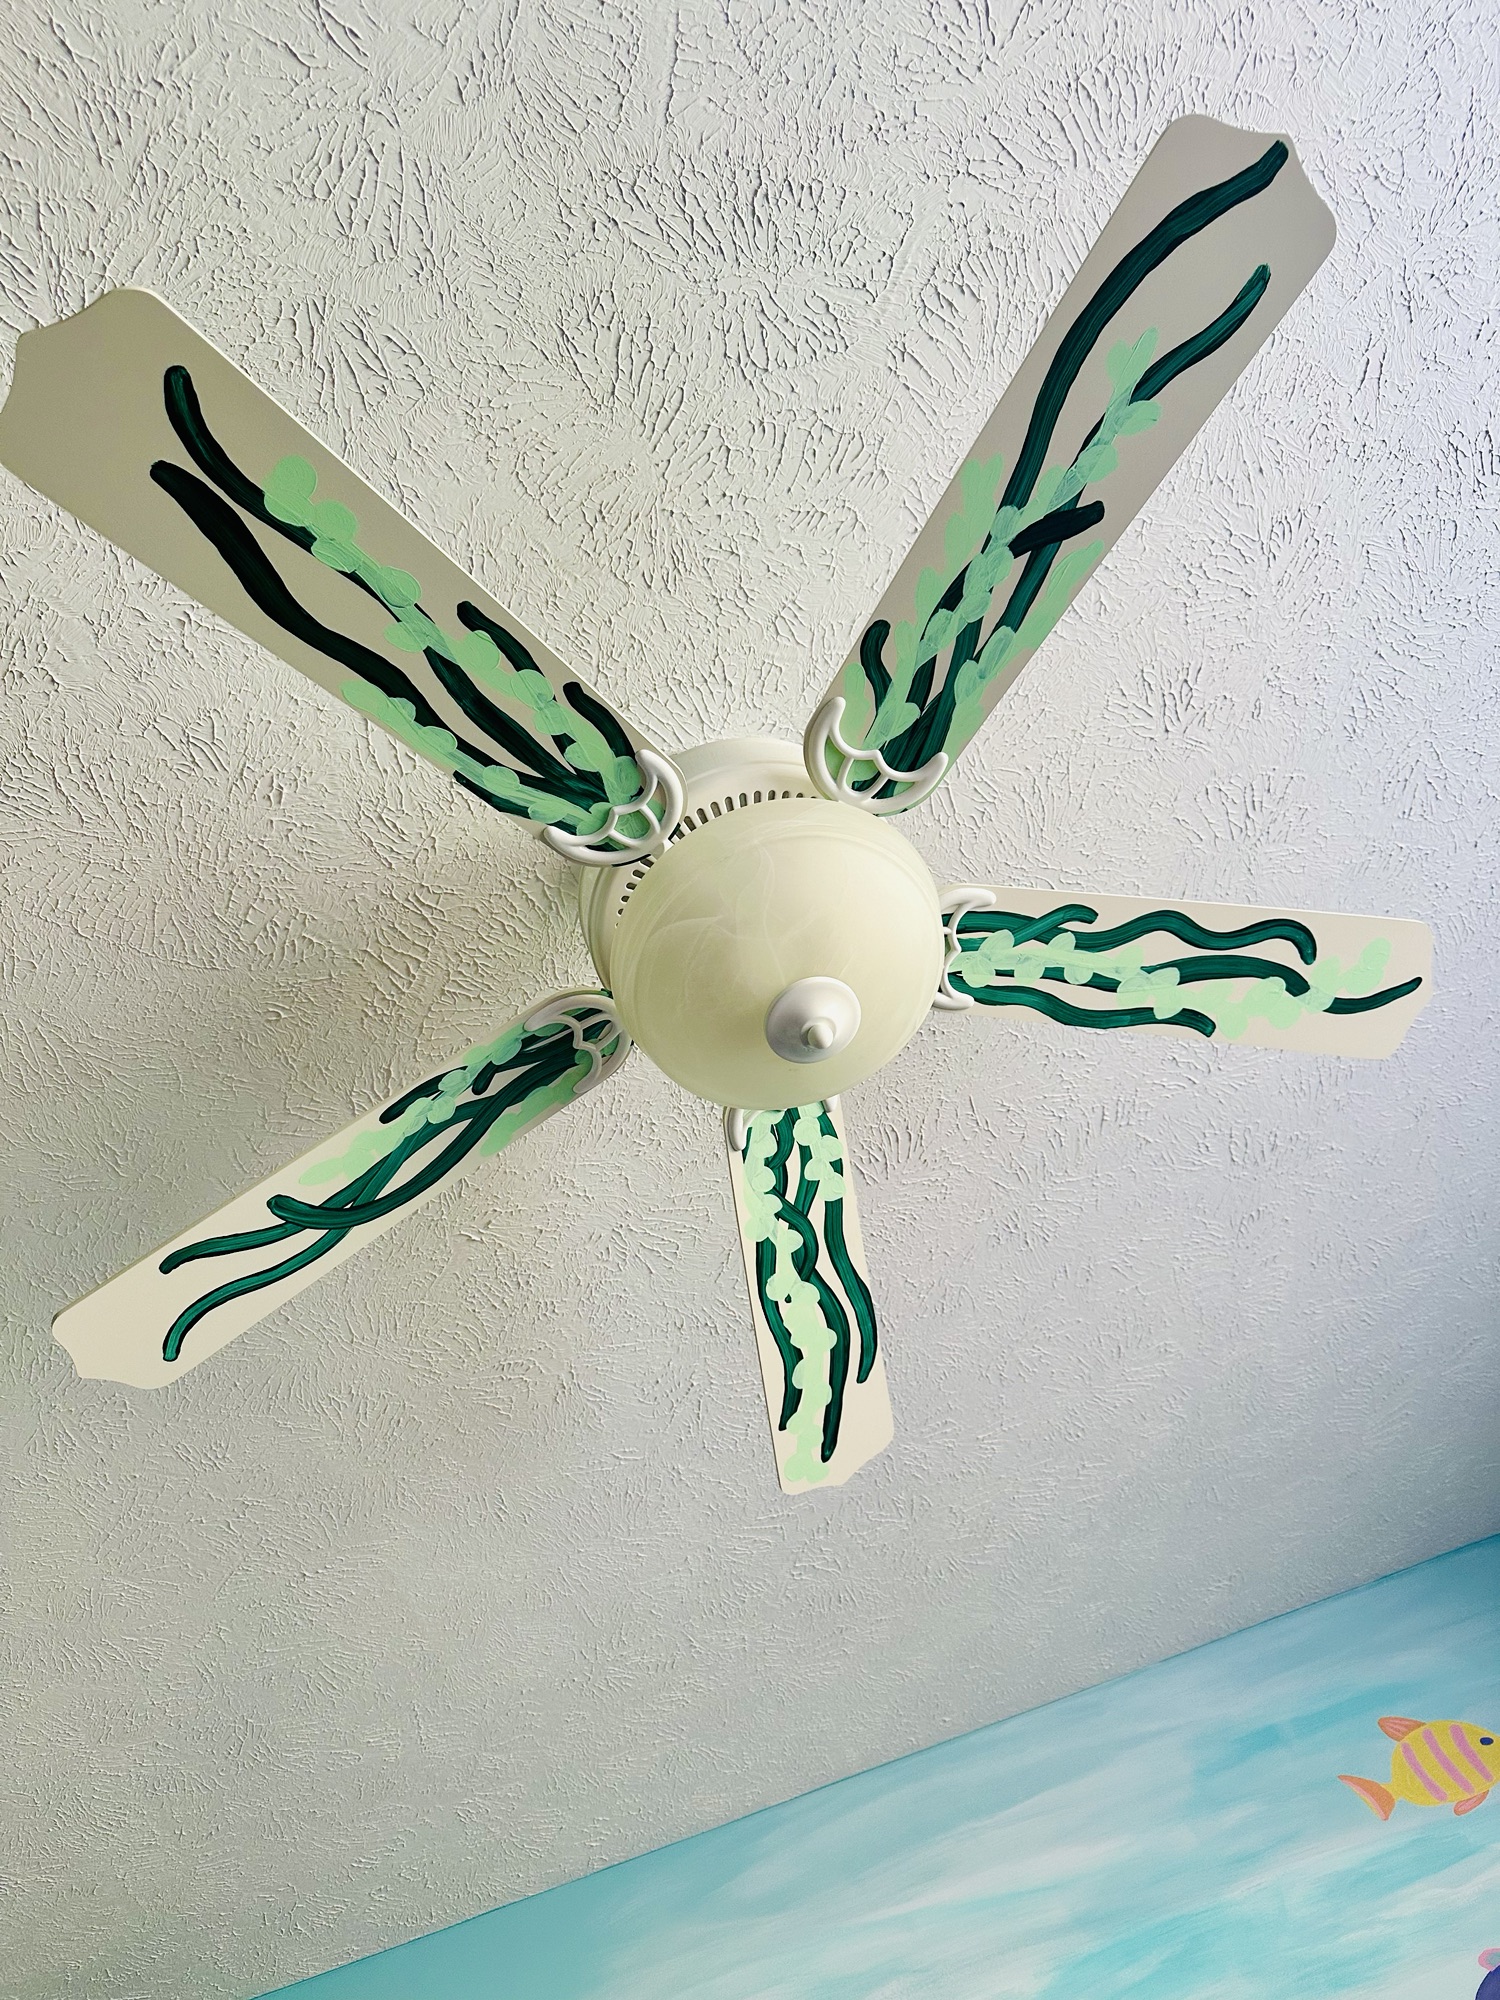
This was the last project for my 6-year-old’s room makeover! She wanted a “kelp forest” ceiling, but after creating a cave over a good chunk of her ceiling, we compromised by deciding to paint her fan blades so that they looked seaweed-y.

Painting fan blades was something I’d never tried before, and it was super easy! This might not be a new idea to anyone, but I can now personally recommend that you give it a go if you’re interested!

BEFORE: Plain white ceiling fan.

Supplies:

(As an advertising affiliate and Amazon Associate, I earn a small commission from qualifying purchases. But it doesn’t cost you anything extra and helps me keep up my site!)

  • Screwdriver
  • Paints

Step 1: Detach fan blades. I suppose I could have painted the blades while they still hung from the fan in the ceiling, but I didn’t want to risk dripping paint. Also, it seemed like my arm would get tired. Plus, by taking them down, I was able to clean them. 😜 I was also glad I’d detached them because, in the end, this meant that the painted portions went under the metal decorative parts where the blades attach to the fan, and that looked pretty cool.

My fan blades were held on by 3 screws each, so I used a screwdriver and simply unscrewed one blade at a some, carefully setting aside the washers and screws to reattach the blades later.

Removing the fan blade screws.

Step 2: Clean the blades. Mine were not real wood, and they wiped down pretty easily with a lightly damp cloth. After removing a considerable amount of dust from the top side of the fan blades, I made sure to use a clean paper towel to wipe and dry off the bottom side, which was the side I’d be painting.

Cleaned and ready.

Optional Step: My fan blades were in pretty good shape – and a nice white color – but you might want to apply a base coat of paint over each blade if they look rough. I considered painting them blue (which would make sense with our “under the sea” theme), but I did not obtain permission for that. You could start with whatever base color you choose, especially if your blades are wood and you really want to change the look.

Step 3: Paint the design. I took 2 different green colors – one dark and one light – to make my seaweed/kelp/plants. My dark green was a latex paint, and my light green was acrylic. Both adhered just fine. I started with my dark green and made long, weedy, wavy lines. Once that dried, I took my lighter green and painted more leafy-looking plants. I didn’t want to overdo it, so I stopped there…

Dark green painted.
Light green added.

You could do really pretty flower designs, abstract shapes, stripes, or really anything! I have a feeling I will end up painting my other daughter’s fan too, so let me know if you come up with any great ideas!

Step 4: Reattach the fan blades. Once the paint was dry, I took the blades one at a time and lined up the holes to screw the washers and screws back in place. I did find it was easiest to start with the screw nearest where I was standing between the blades, secure that one first, and then have everything stable to screw in the screw closest to the actual fan.

Screwing the blades back on.

That was it!

This was incredibly easy, and the painting possibilities are endless!

AFTER: Painted seaweed fan!


DIY Must-Have Lists

Click to see more!
Click to see more!
Click to see more!
Posted on 1 Comment

Custom LEGO Table

Hosting a lot of play dates this summer, I quickly realized our makeshift LEGO setup wasn’t cutting it. I also felt judged by a five-year-old boy who clearly was less than impressed with it. And since the kids always had to dig and dig and dig in the bin to find what they wanted, I knew it would make my life easier if I found a better way to sort through the LEGOs. So, I decided it was finally time to do something about our LEGO problem and make a table with storage. I wanted room for several kids to build at once, and I wanted them to have an easier time where everything was accessible.

Supplies:

(As an advertising affiliate and Amazon Associate, I earn a small commission from qualifying purchases. But it doesn’t cost you anything extra and helps me keep up my site!)

BEFORE: Scrap wood waiting to be a table.

Step 1: Decide on size and cut pieces. I wanted even small kids to be able to reach across to the other side while they build, so I decided on a 20-inch wide tabletop. And to make the table long enough to accommodate several builders, I went with 48 inches long for the tabletop.

Using my table saw, I cut down a large piece of leftover MDF to 20×48 inches. This would be my tabletop. I then took 2 wood 1x4s and cut them to 45 inches each. These would be my braces, where I’d attach the legs, and also how I’d attach my gutters/containers.

Once these pieces were cut, I sanded all the corners to round them smooth.

Step 2: Attach the brace pieces and table legs. Next, I flipped the tabletop piece upside down and positioned the two 1×4 wood pieces so that each end was 1.5 inches in from the edge. I also positioned the boards 1.5 inches from the sides. You want the braces a little under the table, but not too far, so that the attached gutters run under the table just a little bit – this hides the screws.

Positioning braces.

I marked the corners where my 1.5 inches needed to be, and then I double-checked that the boards were right before using 1.25-inch brad nails and nailing the boards onto the tabletop.

With the braces on, I next positioned the 20-inch table legs that I’d purchased. These I brought 6 inches in from the ends of the table, and it was easy to screw them onto the 1×4 braces.

Adding legs.

Step 3: Paint. I flipped the table back over and rested it on sawhorses just because I didn’t want to bend over to paint. 🤷‍♀️ You could more easily set the table on the floor, but I wanted a little elevation.

I initially had grand plans about drawing map-like scenery on the tabletop that the kids could use to play while building, but my girls requested that the table just be blue instead. That made it easier, but it’s another idea if you’re not sure how you want to paint your table! Taking my blue paint, I brushed it on the MDF tabletop and also along the sides, going a little bit under the table as well.

Once that was dry, I used a light coat of clear gloss spray just to help protect the paint a little and make the surface smooth.

Paint drying.

Step 4: Attach side gutters. If you get new gutters, or if your leftover gutters are longer than mine to begin with, you could just run a gutter the whole length of your table. I, however, had small sections of gutters to work with, and I liked how they let me make different divided sections. It’s a good idea to use vinyl gutters so the corners aren’t sharp and the material is pretty light.

Basically, I measured out my gutter sections until I got enough to make a 48-inch stretch for the length of each side, plus two 16-inch sections for the ends of the table. (These end gutters will be used later.) I needed to cut down one section a little, and this was pretty easy with a small hacksaw. I then took sandpaper and smoothed out that cut side.

Measuring gutter sections.

After cleaning the gutters, I positioned them one at a time along the length of my table so that the taller side of each gutter was against the outer side of the 1×4 brace underneath the tabletop. I marked 3 places where the gutter could screw into the brace, and then I drilled 3 little holes into the gutter where I’d marked.

Underside brace ready for gutters.

Holding the first gutter back in place along the brace, I had to use a handheld screwdriver because the gutter’s angle didn’t leave room for a powered screwdriver. This was easy enough, though. I used a simple drywall screw through each of the gutter’s drilled holes and screwed it into the side of the 1×4 brace.

I repeated this for each gutter along the sides. (They didn’t meet perfectly, but this isn’t a problem because of how I made dividers in a minute!)

Side gutters attached!
Kids were impatient 😂

At this point, I decided to hold off on attaching the end gutters. It’s easier to do the ends a little differently, so you might want to do the same.

Step 5: Cut and attach foam ends. First, I took 4 sheets of colorful foam and measured for 8 rectangular pieces that would cover the ends of the gutters. You want a little overlap around the gutter edges, but not so much that they’ll be in your kids’ way when they’re building. My rectangles ended up about 5×3 inches. I made each end of my long gutters a different color, then made each end of my – still unattached – end gutters a different color, so I had 2 rectangles from each color.

Cutting rectangles.

Next, I cut 6 round foam circles for each of my 8 colored rectangles. (I also made sure to cut 3 more circles of each color for my next step when I’d decorate the dividers.) After warming up my glue gun, I glued these circles onto the rectangles so they looked like LEGO pieces.

Attaching circles.

Once these rectangles were ready, I spread hot glue along the end edges of each gutter, one at a time. Positioning each rectangle in place, I pressed them into the glue so they stuck on the gutter ends.

I also did this for the unattached end gutters (pictured below), and I’m glad I did things this way for the ends because it would’ve been more difficult to get them on correctly if I’d waited until the end gutters were attached. You might have a little more wiggle room with your spacing, but mine were pretty close.

Ends on an unattached gutter.

Step 6: Cut and attach dividers. Using the rest of my foam sheets, I cut a strip of each color about 2 inches wide. These I used like tape by spreading hot glue along one side and then wrapping them to connect one gutter section to another, folding the strip down over the front edge of the gutters to cover the uneven edges.

I had 3 gutter sections along each side, so I used 2 strips for each side of the table.

Glueing on divider strips.

Next, I cut rectangles about as big as before, but these I trimmed and tested until they sat like dividers in the gaps between the gutter sections. Once they were the right size, I glued them in place.

Again, I had 3 gutter sections for each side, so I needed 2 dividers for each side of the table. I made sure to match each divider to the color of the strip they connected to.

Prepping my dividers.

As a finishing touch for these dividers and strips, I took those extra foam circles and glued them down along the strips. This added a nice little LEGO detail and also helped cover any uneven parts showing under the strip.

Dividers done.
Side gutters finished!

Step 7: Attach the end gutters. With all my details glued on, I could now attach the end gutters without having to worry about getting my glue gun in the smaller space at the end.

Similar to what I’d done before for the long-side gutters, I marked where each gutter could be screwed into the ends of the 1×4 braces. Then I drilled holes in the side of the gutter. Finally, I held each gutter and screwed it into place.

Done with that, all I had left to do was sort LEGOs (for over an hour 🤪) and put them in the waiting sections!

AFTER: New LEGO table!

Now my kids (and the five-year-old LEGO expert) have a table where they can all fit, get to the LEGOs easily, and reach everything with ease. I like that the gutters fit all the blocks without being so deep that the kids have to dig forever, and the little foam details look pretty cute.


DIY Must-Have Lists

Click to see more!
Click to see more!
Click to see more!
Posted on Leave a comment

Building a Raised Bed (or Sunken Ship) with Storage (or a Below-Deck Fort)

It’s become a problem that my daughters think I can make pretty much anything. And the problem doesn’t lie so much with them as with me, because almost always I think of a way to make it happen and then create a whole bunch of work for myself.

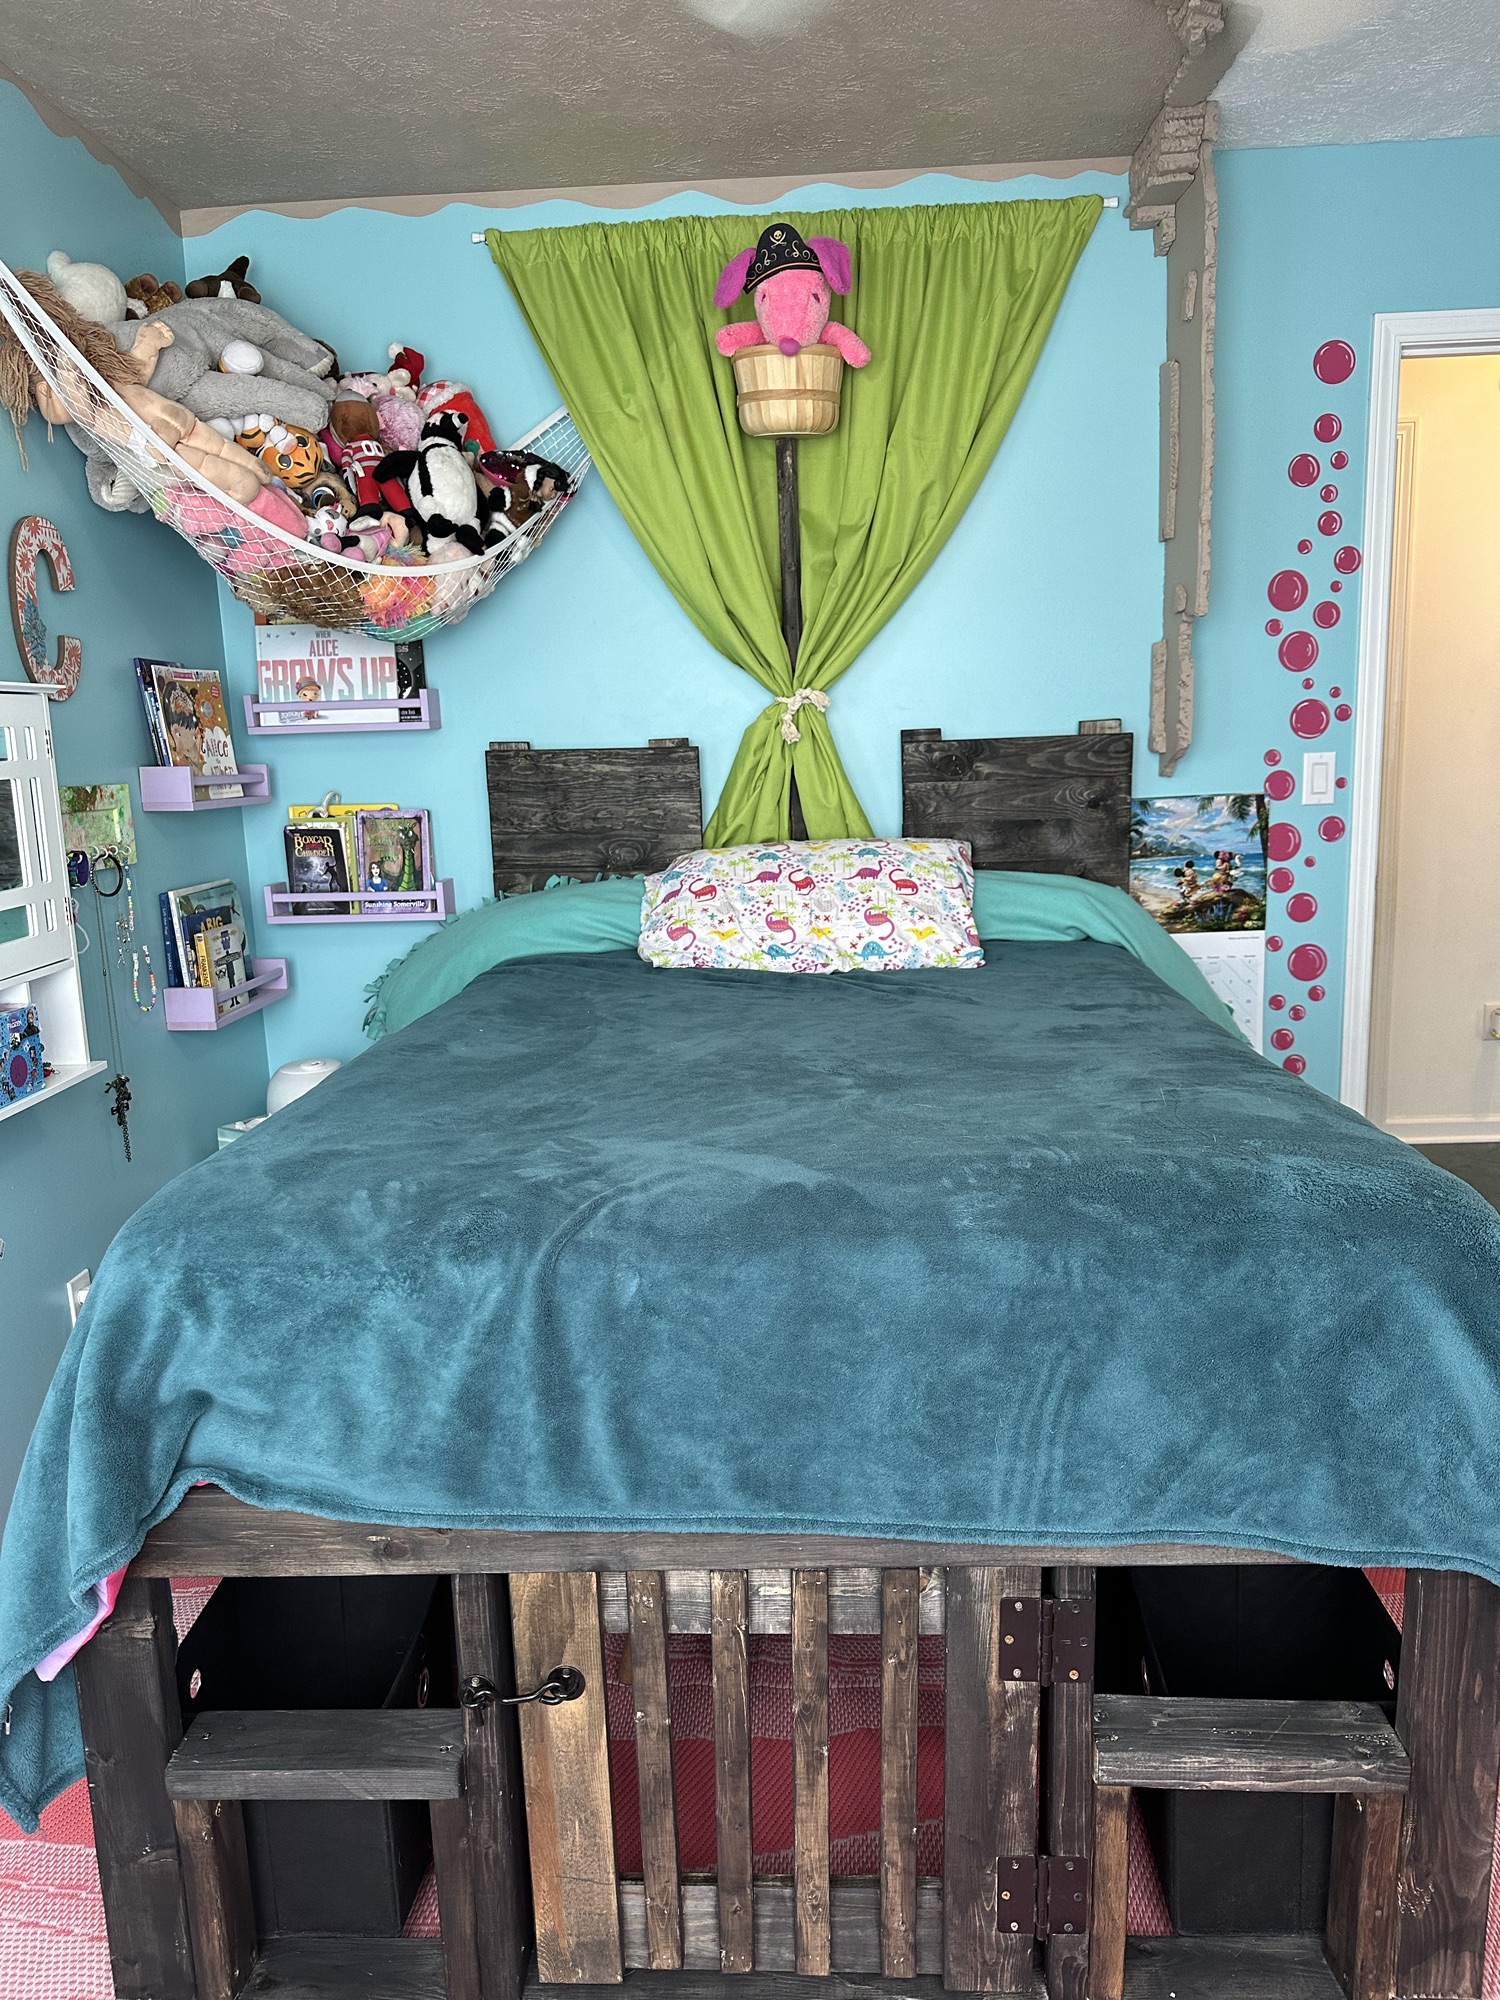
Enter: Sunken pirate ship bed.

“Oh, Alice, I don’t think I could possibly make… Ok, yeah. I’ve got an idea.” 🤦‍♀️

Honestly, I figured this one out as I went and ended up making the bed high enough to create a play space underneath. I mostly did this for cubby storage, but after throwing on a “secret door,” the space worked perfectly as a below-deck level to the ship/bed.

With a very vague plan, I ran to Lowe’s and bought a bunch of wood.

Supplies:

(As an advertising affiliate and Amazon Associate, I earn a small commission from qualifying purchases. But it doesn’t cost you anything extra and helps me keep up my site!)

  • 2x4x8 wood – 10 boards
  • 1x4x8 wood – 20 boards
  • 2x2x8 wood – 5 boards
  • 1x12x6 wood – 2 boards
  • 3-inch wood screws
  • brad gun and nails
  • Charred wood accelerator
  • old curtains
  • old basket
  • decorative rope
  • cubby boxes
  • 2 door hinges
  • 1 door catch and hook
BEFORE: Lots of wood.

Step 1: Measure what you need. Working with a full mattress, I needed my bed frame to be at least 76×54. Also, I decided that I wanted 5 cubbies on each side of the bed, so I needed to make 5 openings that were wide enough apart and high enough to fit my 12×12 cubby boxes. Other than that, I had a lot of freedom for how to build this thing.

It was also now that I decided/realized that I would have to build this bed in place, because I’d never fit it through our hall and doorway. And I really didn’t want to carry big sections up the stairs either.

Step 2: Create 2 sides. Again, my main objective was to make spaces for cubbies to slide under the bed and line each side. Wanting 5 sections on each side, I knew I needed 6 divider pieces spaced evenly between the top and bottom pieces of each side. These top and bottom pieces needed to be 76 inches long (to fit the mattress and give a little wiggle room), so I cut four 2x4s to 76 inches.

Next, I cut twelve 2×4 pieces (6 for each side) to 20 inches. I tested out my placement while I still had the boards in the garage just to get a look.

Planning my spacing.

Satisfied, I took the pieces up to the bedroom and began to screw the 12 divider pieces onto the sides’ tops and bottoms. I used a pencil to mark every 15 inches (ish) and then set the dividers in place on the floor with the top pieces and bottom pieces against the ends of the dividers.

Spacing dividers.

Using 3-inch screws, I first screwed the end dividers into the top and bottom of the first side to make big rectangles. These were easiest to line up and make sure they were square, and that helped the inner dividers to be right too.

I next took my interior dividers and centered them on the 15-inch marks I’d made. I used a kids hardcover book to make sure they were square – a very professional tool, sure, but it works. I ended up using 2 screws at each end to be really sure they were on solid.

Once both sides were assembled, I stood them up and spaced them like the sides of a bed – at 48 inches apart so that from far side to far side was 54 inches.

Sides done.

Step 3: Create 2 ends. This might’ve been over-building a bit, but I wanted to be sure the bed was sturdy and solid. Since my sides were 48 inches apart, I needed end pieces that were 48 inches long. So, I went back out to the garage and cut 4 more 2x4s for tops and bottoms, this time at 48 inches long. I also cut 4 more 20-inch divider pieces, 2 for each end.

Taking these back up to the room, I decided to bring the dividers about 12 inches in from each end. I wanted a big space in the middle because, by this point, I was getting the idea for the door leading under the bed.

While attaching the dividers, I used the kids book again to keep them square as I positioned the dividers and screwed them onto the top and bottom of each end piece.

Sitting the end pieces up, I positioned them in place and then used pocket screws to attach the tops and bottoms onto the ends of the side pieces.

Ends done.

Step 4: Create the top. First, I cut 4 long 2x2s down to 76 inches to run the length of the bed. I wanted these for supports to hold the crosspieces that the mattress would rest on. I could have put the crosspieces straight onto the 2×4 top pieces, but I knew from my daughter’s old bed that this way there would be more give to the crosspieces and make the bed more comfortable. 🤷‍♀️ I can’t really explain why, but the added bit of flexing really is nice.

Laying 2 of these support pieces on the far sides of the side 2×4 top pieces, I screwed them on at each end and once in the middle. For the 2 other supports, I spaced them evenly across the center of the bed and screwed them onto the ends.

(I ended up adding little legs under these middle supports, so you might as well do that now too. My legs needed to be about 22 inches. I used one screw for each to hold them on.)

2×2 supports.

For the crosspieces to hold the mattress, I had a bunch of 1x4s from my daughter’s prior bed frame. That bed’s specs had been a little wide for the mattress, so I cut the 1x4s down a little bit to be the right 54 inches to go across from side to side. I cut 13, purely because that looked like enough and worked for my spacing.

I positioned these 1x4s across the top supports, then screwed them on with shorter screws.

Crosspieces on.

Step 5: Cover the ends. To hide the crosspiece ends and also make a little lip that would hold the mattress, I cut 2 more 1x4s to 76 inches. These I held along the side 2x2s so that they covered the gap between each side’s 2×2 and the lower 2×4 while also sticking up just a bit above the crosspiece ends. I checked with a level to make sure they were right, and then I used my brad gun to nail these cover pieces onto the 2×2 and 2×4 along each side.

Side covers on.

I didn’t bother with covering the end against the wall, but I cut another 1×4 for the foot of the bed. I made this board 55 inches long to cover the gap exposing the ends of the 2×2 supports.

End cover on.

Step 6: (optional) Add steps and a door. If you’re building this for a little person too short to climb into the bed, it’s a good idea to add steps to give them a boost. I took scrap 2×3 pieces and cut two 10-inch braces, and I used scrap 2x4s to cut one 15-inch step.

Holding the 2×3 braces against the divider pieces of the section my daughter chose for her step, I screwed them into the 2×4 dividers. Then, I held the step in place and screwed that onto the tops of the braces. Easy.

Adding the step.

I created 2 more steps for either side of the big opening at the end of the bed. These were slightly narrower steps, but it was the same process.

End steps on.

Next came the “hidden” door over that big opening at the end of the bed. I had some spare hinges, so I screwed on 2 near the top and bottom of the divider where I’d be attaching the door. (See above picture.)

I had a lot of extra 1×4 scraps, so I cut 2 at 19 inches for the sides and 2 at 18 inches for the top and bottom.

First, I screwed on the side that attached to the hinges. I made sure to hold the board up a little bit so it wouldn’t scrape against the bottom 2×4 at the end of the bed.

Next, I took the top door piece and used my nail gun to attach it to the backside of the hinge-side piece. I thought about using a level, but since my cut was straight for the hinge-side piece, I just lined up the top of the top piece with that. I also made sure to use a little screw to secure them more than just the brad nails, since I’m sure this door will be yanked on a lot.

Securing the top piece of the door.

Once this top piece was secured, I did the same at the bottom.

For the far side piece, I made sure that the door would shut as I held the wood where I wanted it in front of the top and bottom pieces. Then I nailed this on too, and also used a single screw at the top and bottom.

Door surround done.

Once the surrounding sides of the door were done, I took some little 1x2s and cut them to about 18 inches. These I spaced across the front of the door like bars, and I nailed them on with two brad nails at either end.

Adding door bars.

Step 7: Create headboard and/or ship’s mast. I cut four 1x4s to about 53 inches and positioned them vertically against the head-end of the bed, spacing them the same as the 2×4 ends of either side and the 2 head-end dividers below. These 1x4s I screwed onto those 2x4s below so that they stuck up and would support the headboard crosspieces.

As for the mast at the headboard end, I took a long 2×2 and positioned it to be centered across the headboard. This I screwed into the top 2×4 at that end. (If you don’t want a mast, just skip this.)

Headboard supports on.

After these supports, I cut four more 1x4s to run the whole 56 inches across the head of the bed.

Adding headboard boards.

You could go all the way up like this, but for my sunken ship purposes, I wanted a gap in the middle the rest of the way up so that the mast would stand out. So, I cut six 1x4s to run only across the end sections, about 19 inches, for the remaining way up the supports.

I considered spacing these headboard crosspieces, and that would look nice too, but my daughter liked it better solid. That’s probably widest, considering stuff can fall through less gaps this way.

Step 8: Insert shelves for cubbies. I wanted the cubbies to sit flat rather than tip on the 2x4s at the bottom of the bed, so I took 2 long 1x12s and cut them to 67 inches long. Then I cut them on my table saw to be 7 inches wide. This left me with about 5-inch strips too. I took all of these 67-inch long boards up to the bedroom and slid them under the bed along each side.

With the 7-inch board sitting on top of the 5-inch board, that brought my long shelf boards up so that they were level with the bottom 2x4s. I used little brad nails to secure the 7-inch board on top of the 5-inch board. This meant no more tipping cubbies, plus I had nice, long shelves along the floor just under each side of the bed. If my daughter doesn’t want cubby boxes in all the sections, there’s a shelf to hold books or something down there.

Placing shelves in place.

Step 9: Sand and stain/paint. It made the most sense to wait until the bed was assembled before sanding my edges, since this way I’d know what would be exposed and what wouldn’t. Taking my small hand sander, I went over all the corners, ends, and edges to smooth down any sharp points.

Once that was done, I decided to use charred wood accelerator on the wood rather than normal stain or paint. Since we were going for a “sunken ship” look, I wanted to age the look of the wood and get it nice and dark. If you’ve never used this stuff before, it is SO cool. I’ll put up the video on my Instagram soon to show how it looks as it goes on, but basically you brush it on and it makes the wood…age and look charred. It also dries pretty quickly, which was good for impatient children waiting to play under the bed. 😆

Applying age-accelerator.

Step 10: Finishing sunken ship touches. I tinkered around with ideas on how to make the rest of the mast support a “sail,” and I ended up securing a tension rod to the wall high over the top of the mast. At the top of the mast, I took a little basket and screwed it onto the top for a lookout. Taking old curtains, I put them on the tension rod and slid one to each side of the mast, then used some decorative rope to tie the curtains onto the lower part of the mast. Tugging the curtains a bit, I pulled them out to “billow” a little bit, the tucked the ends behind the lower center section of the headboard.

Attaching the “sail.”

Next, I made the bed and tucked the cubby boxes into the open spaces around the sides.

The final touch? Sitting Captain Snoopy in the lookout. 😆

AFTER: Raised bed with play area!

Considering I had no real plan when I started, I’m pretty happy with how this project came together without too much trouble. There’s storage. There’s a play area. And now I’m one step closer to finishing my kid’s “Under the Sea” bedroom makeover!

Testing the door.
Setting up the play space below deck.


DIY Must-Have Lists

Click to see more!
Click to see more!
Click to see more!
Posted on Leave a comment

Bifolds – “Under the Sea” Theme

While struggling over how to make a cave (??!!) for my daughter’s “Under the Sea” themed bedroom makeover, I found another easy project to follow up the mermaid dresser I did last week. Her room needed a mirror, and I needed an excuse to take down the gazillion (approximately) pictures taped to her closet’s bifold doors. I also had a bunch of old shells that I’ve kept in a bowl for years, and I wanted to incorporate them into our design. Plus, I wanted to try a cute craft I’d done many times as a kid, and I had a feeling I’d need it for this project…

BEFORE: Chaotic bifold door.

Supplies:

(As an advertising affiliate and Amazon Associate, I earn a small commission from qualifying purchases. But it doesn’t cost you anything extra and helps me keep up my site!)

Step 1: Plan spacing of mirrors. Since 12 mirrors came in the pack that I’d purchased and I had 4 bifold door panels, that pretty clearly meant I had 3 mirrors for each door panel. Testing on a door, I held one square mirror (mine are 12×12) and moved it up and down to eyeball how the mirrors would look before committing to their placement. I decided that I wanted to cover the top portions of the bifold doors, hiding the decoratively indented portions. This would leave the bottoms of the doors with the knobs exposed and the lower sections still showing the decorative indentations.

Trying out placement.

I decided on 2-inch gaps between each mirror, running vertically. As far as centering the mirrors from the sides, I brought each mirror 1 inch in from the center/hinged side of the door panels. That meant I had a 2-inch gap again between the mirrors on each pair of door panels.

To mark where I would place the mirrors, I made lines at the 1-inch point in from the hinged side of the door. I made sure I had 2 inches between these marks, and then I held the mirrors level on these marks. Next, I traced the corners of each mirror as I held them in place.

Making marks.

Step 2: Attach the mirrors. The mirror pack I purchased came with plenty of little adhesive squares to put on each corner of each mirror. I found it worked best to put the squares directly on the door to be sure they’d be within my markings.

Because of my door’s indented sections, I cut a few of the adhesive squares a bit smaller where they wouldn’t connect with the indentations along the back of the mirror anyway. For the mirrors covering these indentations, I made sure to also place an adhesive square in the center where the mirror’s back would touch the door again.

Adhesive squares ready.

Once I had the adhesive squares on the door, I lined up each mirror with my marked corners and pressed the mirrors gently so the adhesive stuck.

Mirrors on.

Before you start decorating around the mirrors, be sure to remove any film protecting the mirrors. You don’t want that to get stuck under the decorations!

Step 3: Add shells. You could put SO MANY different decorative things around your mirrors. Fake flowers would be pretty. Decorative rope would work. Different wood molding would look very nice too. Because of our theme, I went with shells.

First, I used my hot glue gun and attached as many shells as I could fit over the doors’ exposed indented areas. These were exposed in the 2-inch gap between my middle and lowest mirror.

Shells filling the gaps.

Once I had those funky gaps filled and it looked good, I sighed in relief. Next, I did the easier, solid 2-inch gaps between the vertically spaced mirrors.

Gluing on the shells was very time-consuming, but it was kind of like a fun puzzle where I got to decide which shells looked best together.

However, I ran out of shells. 😜

Optional step: Sculpt shells. I didn’t want to buy even more shells, and I only needed enough for the tops of the mirrors, anyway. So, remembering a craft I often enjoyed as a kid, I asked my mom for the recipe she’d used whenever I wanted to sculpt little figurines or make beads.

Recipe: 1 cup cornstarch, 2 cups baking soda, and 1-1/4 cup cold water. Pouring all ingredients into a medium-sized pan, I stirred it up and cooked on medium heat until it looked like mashed potatoes. Then, I took it over to our counter and scooped it out onto some wax paper.

Glob of sculpting dough.

Once it had cooled enough to handle (it didn’t take long), my girls and I grabbed small globs at a time and sculpted our own shells. I started by rolling a clump into a little ball, next using my palm to flatted the ball. Then I squeezed together a little bit at the bottom to make the bottom of the shell. Taking a toothpick, I softly pressed it to make lines in the shell. Very easy!

Making shells!

We made a few starfish for variety, and a few of my rolled balls I flattened and used a toothpick to make sand dollars too.

When done, I carefully took our creations and placed them on a baking sheet. Heating the oven to 200 degrees, I baked the shells for a few hours until they were no longer damp to the touch. They might crack a tiny bit on the surface as they dry, but they’re still strong and hold together. You can air dry, but it takes much longer.

Keep it mind that the bigger and thicker you make your shells (or beads or flowers or whatever), the longer it takes for them to dry. We made a range of sizes, and the starfish in particular took a while to dry because they were about a half-inch thick.

Once dry and cool, the shells were ready for paint! We used a set of watercolors, and this makes pretty and soft colors on the shells – the watercolors soak in better than normal paint and look more natural without the color being overpowering.

Shells painted.

These dried quickly, and within an hour these “shells” were glued onto the door just like the real thing!

That was it!

AFTER: Bifold doors with character!

I considered putting shells all the way around the mirrors, but that might’ve been too much. I also wanted to avoid breaking any when the doors opened and closed against the doorframe on the sides, so leaving the sides empty saves me from that trouble.

Most importantly, the 5-year-old is happy! Now her doors have mirrors she can “check her makeup in,” and she can admire all her favorite shells, especially the ones she created herself. 😃


DIY Must-Have Lists

Click to see more!
Click to see more!
Click to see more!