
So, unfortunately, this crib/bed had to leave us long before planned. Even after 2 babies it was still in great shape, so I didn’t have the heart to take it apart and use the pieces for other projects. Instead, it’ll become a hopefully well-loved hand-me-down.
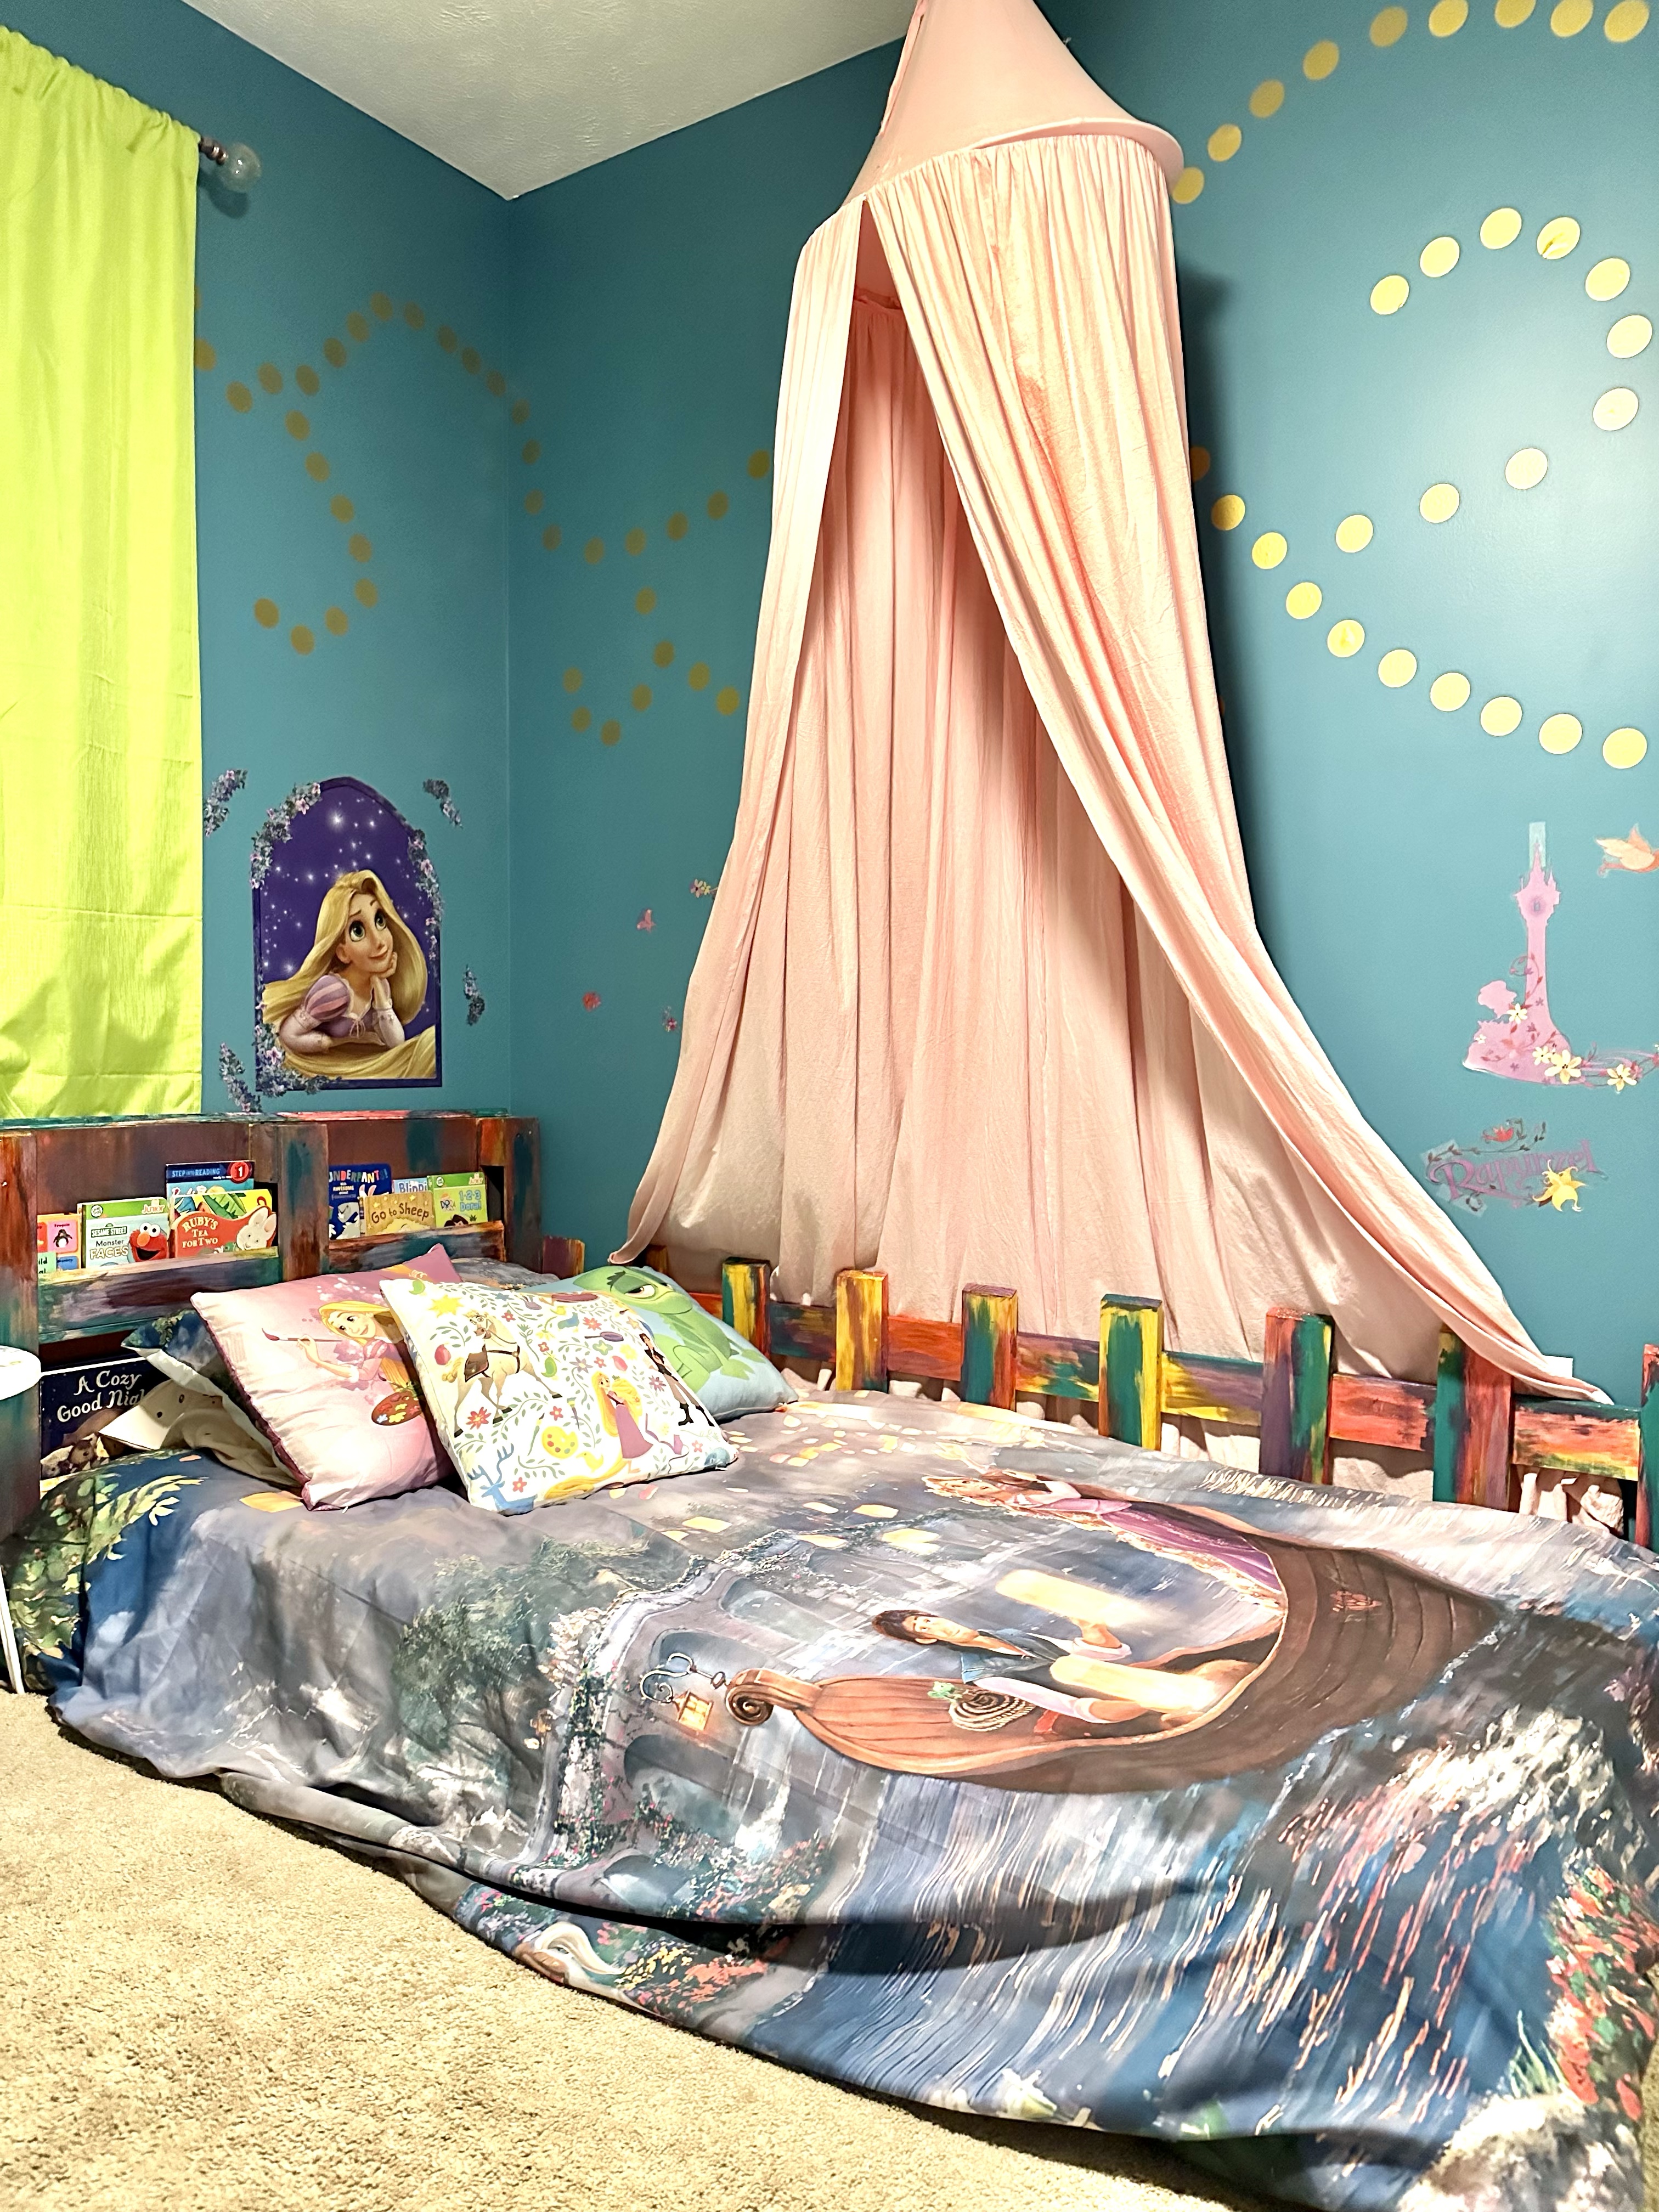
So. Kid #2 made it clear she wanted a bed more like her big sister’s, and I started planning. We did not have room for a full-sized bed in her room, so I couldn’t copy the exact construction plans of her sister’s bed. I realized that the best way to leave her with as much room as possible was to create a daybed that would run along her wall, but I’d make it be on the floor like her sister’s. (It would be great to have storage underneath, but our girls roll and slide off their beds. Not worth it just yet 🤷♀️)
I scoured Pinterest for plans, and I found one tutorial that was similar to how I’d built the base frame for my oldest’s bed, except this was for a twin-sized bed. Perfect! Almost. Once upon a time, this tutorial’s supplies had cost only $25. Now, as I ran the totals for the same supplies, it was closer to $150! Thanks, inflation. 😳 But, I also came up with an idea for using a spare pallet to make the headboard, so all total this wouldn’t be too bad.
Supplies:
(As an advertising affiliate and Amazon Associate, I earn a small commission from qualifying purchases. But it doesn’t cost you anything extra and helps me keep up my site!)
- 1x4x8 boards, 10
- 2x2x8 boards, 3
- A pallet in good shape
- 1/8 inch plywood sheet (or fabric)
- 8-foot piece of baseboard
- 8-foot piece of wood casing
- Unicorn Spit
Step 1: Measure and cut for base. The twin mattress we got was 75×39 inches, so I added a little to give some wiggle room. This meant I needed 2 of my 1x4s to be 41 inches for the ends. I needed 2 more 1x4s to be 76 inches for the sides. I also needed all 3 of my 2x2s to be 76 inches. I then needed 12 pieces of 39 1/4 inch 1x4s to run across for the mattress supports.
Step 2: Sand. Cutting all my pieces with a miter saw was simple enough, and I quickly sanded my boards so the ends were smooth. I also made sure to sand the corners down of the side board that would be stepped/crawled/jumped over to get into the daybed. I did the same with the board that would be at the foot of the bed.
Step 3: Attach the base frame pieces. I carried all the boards into my daughter’s room and assembled the bed frame in place. First, I took a 2×2 and lined up one of my long side boards against it so that they made a stubby “L” shape. Using Brad (my nail gun) I nailed in 1-inch nails so that the 2 boards were secure. I did the same with the other side board and a 2×2.

Side note: I used brad nails to connect everything. You could use screws and/or wood glue, but this did the job quite well. Since the base rests right on the floor, I don’t need to worry about the nails supporting any of the weight.
Next, I took an end board and used it to know how far to place my “L” side pieces apart on the floor. Make sure the sides’ 2x2s are resting on the floor on the inside of the base frame.

After positioning the boards to make corners, I held them in place and nailed the end board onto the 2×2 of the side piece as well as into the 1×4 of the side piece.

I then did this for the other end of the end board, then repeated this at the other end of the base frame. Now I had a complete rectangle.
Next, I rested the final 2×2 on the floor in the center of the base frame. This I simply nailed onto the end pieces with 1 nail through either end.

Finally, I took all 12 of the 1×4 supports and laid them across the interior of the base’s rectangle. They should rest flat across all the 2x2s. I spaced them out just by eyeballing it, making sure to push the flat 1x4s tight against either end board – this will keep a lot of “treasures” and junk from falling underneath the mattress at the head and foot of the bed as my daughter plays with toys. I again used Brad and nailed the support boards onto the 2x2s at either end and also down the middle.

Base done! This took a little less than an hour.
Step 4: Cut and attach the back pieces. I now turned to making the back of the bed that would run along the wall. For this, all I did was use the scrap pieces from my other cuts, plus 1 more 1×4 running at 77 1/2 inches – the full length of my bed. For all the shorter boards, I made sure they were even at about 17 1/2 inches and then used my miter saw to cut the tops at a 30-degree angle. You don’t have to do this at all, but I wanted slightly “fancy” boards rather than bluntly cut tops.

After quickly sanding these boards, I piled them by the base frame and set about spacing them. I again eyeballed this spacing, and then I used a very professional tool – the book “Goodnight Moon.” 😜 I first nailed on one board standing up at the far end of the back side board, then placed the book right against that board, took the next board and held it against the book, nailed that board on, and repeated all the way to the other end. If you don’t have a copy of “Goodnight Moon” at the ready, I suppose you could use a tape measure or something. Do be sure that if you make 30-degree cuts to the tops that they’re facing all the same way.

For the rest of the back, I took that long 77 1/2 inch 1×4 and moved it up and down until I liked the spacing. It made a kind of “picket fence” design that was cute. To hold this long board in place while I nailed it into the backs of the shorter boards, I again used a professional spacing tool – this time “Goodnight Groot.” I nailed the board onto one of the middle short boards, then used the book to keep the board at the same level to nail on either end. After the board was secure, I set aside the book and nailed many more securing nails into the long board and also the shorter boards where they connected to the base’s 1×4 at the floor.

This took me about 15 minutes.
Step 5: Find a good pallet and measure. I had a pallet that was in pretty good condition and was a perfect 42 inches long. I didn’t need to make any cuts for this one to work as I needed, but if your pallet is too big you can cut them down and re-attach the pieces to make them the size you need. Or, you could also buy wood and make a “pallet” of your own. Fortunately, all mine needed was a good sanding!

First I needed to measure the space between the inside supports that would become my shelves. I had 2 such spaces to work with, and they were 42 x 2 1/4 inches. I also measured for what would become the backsides of my shelving unit/headboard. I had 2 of these areas, each about 30×17.
Step 6: Cut and attach plywood sheets for the back panels. I used 1/8 inch plywood sheets simply because that’s what I had lying around, but you could also use a nice fabric. If you do, you’d just have to be sure it was attached in a way that would be taut enough to hold books from falling through any gaps in the wood at the back of the pallet. Personally, I’m more comfortable working with wood, but fabric would be cute!
Anyway, I cut 2 pieces of plywood at 30×17 each, then quickly sanded the rough edges. I fit these in place against the pallet and used short brad nails to secure them on as the backs of my shelves.

Step 7: Cut and attach shelf boards. I again used scrap for this, but I like how it worked. I found 2 pieces of wood trim that had been molding around some doors. Because one side is higher than the other, I could use this to help books tip back rather than risk them falling out of the shelves as easily.

I cut these to my 42 inches and then laid them across the supports to make shelf bottoms. I made sure to place the higher side at the front, again so books would tilt back. I only had to put a few nails at either end to hold them secure.

Next, I took scrap baseboard wood and cut 2 more 42-inch pieces. These I slid in place on top of my shelves’ bottom pieces, and I held these shelf fronts tightly in place while nailing them from below onto the bottom pieces. I also nailed through the pallet supports to hold these shelf fronts in place.

Side note: I also nailed on a piece of corner molding along the very top of the pallet to cover some uneven spots along the back, but this was just for looks and not at all necessary.

Step 8: Paint. Oh, boy. LOL. My girls were begging to help, so I let them paint the headboard/bookshelves. I was smart enough to put a drop cloth under us, but things got a little out of control once the 2-year-old started finger painting when I wasn’t looking. In case you’re wondering, Unicorn Spit REALLY stains your hands. 🤦♀️ But they had fun and were proud of their work, even if their zealousness turned everything basically purple from over-mixing the colors.

While that dried, I snuck upstairs and used the same Unicorn Spit colors to paint the tall back of the bed frame. I tried to match the “style” implemented by my apprentices earlier, and it ended up looking colorful and rather like a 2-year-old had helped. So… 👍 I guess. You could paint however you like.

Step 9: Attach the headboard shelves. This was surprisingly easy because the pallet fit right down between the wall and the bed frame and stayed put nicely. I did secure it by screwing 3 screws through the head’s 1×4 into the pallet’s bottom wood supports. I thought about also attaching the headboard to the tall back of the bed to make a corner, but it was so stable that I ended up leaving it.

So that was it! This took very little time (granted, painting took way longer than it needed to), and by that night my kiddo was happily grabbing books and chilling on her “Rapunzel rainbow” bed.


DIY Must-Have Lists


[…] in my last post, I shared how we replaced my youngest’s toddler bed with a twin daybed, using both nice wood and an old pallet. Well… I had more than one extra pallet, plus I had an […]