It’s become a problem that my daughters think I can make pretty much anything. And the problem doesn’t lie so much with them as with me, because almost always I think of a way to make it happen and then create a whole bunch of work for myself.
Enter: Sunken pirate ship bed.
“Oh, Alice, I don’t think I could possibly make… Ok, yeah. I’ve got an idea.” 🤦♀️
Honestly, I figured this one out as I went and ended up making the bed high enough to create a play space underneath. I mostly did this for cubby storage, but after throwing on a “secret door,” the space worked perfectly as a below-deck level to the ship/bed.
With a very vague plan, I ran to Lowe’s and bought a bunch of wood.
Supplies:
(As an advertising affiliate and Amazon Associate, I earn a small commission from qualifying purchases. But it doesn’t cost you anything extra and helps me keep up my site!)
- 2x4x8 wood – 10 boards
- 1x4x8 wood – 20 boards
- 2x2x8 wood – 5 boards
- 1x12x6 wood – 2 boards
- 3-inch wood screws
- brad gun and nails
- Charred wood accelerator
- old curtains
- old basket
- decorative rope
- cubby boxes
- 2 door hinges
- 1 door catch and hook

Step 1: Measure what you need. Working with a full mattress, I needed my bed frame to be at least 76×54. Also, I decided that I wanted 5 cubbies on each side of the bed, so I needed to make 5 openings that were wide enough apart and high enough to fit my 12×12 cubby boxes. Other than that, I had a lot of freedom for how to build this thing.
It was also now that I decided/realized that I would have to build this bed in place, because I’d never fit it through our hall and doorway. And I really didn’t want to carry big sections up the stairs either.
Step 2: Create 2 sides. Again, my main objective was to make spaces for cubbies to slide under the bed and line each side. Wanting 5 sections on each side, I knew I needed 6 divider pieces spaced evenly between the top and bottom pieces of each side. These top and bottom pieces needed to be 76 inches long (to fit the mattress and give a little wiggle room), so I cut four 2x4s to 76 inches.
Next, I cut twelve 2×4 pieces (6 for each side) to 20 inches. I tested out my placement while I still had the boards in the garage just to get a look.

Satisfied, I took the pieces up to the bedroom and began to screw the 12 divider pieces onto the sides’ tops and bottoms. I used a pencil to mark every 15 inches (ish) and then set the dividers in place on the floor with the top pieces and bottom pieces against the ends of the dividers.

Using 3-inch screws, I first screwed the end dividers into the top and bottom of the first side to make big rectangles. These were easiest to line up and make sure they were square, and that helped the inner dividers to be right too.
I next took my interior dividers and centered them on the 15-inch marks I’d made. I used a kids hardcover book to make sure they were square – a very professional tool, sure, but it works. I ended up using 2 screws at each end to be really sure they were on solid.
Once both sides were assembled, I stood them up and spaced them like the sides of a bed – at 48 inches apart so that from far side to far side was 54 inches.

Step 3: Create 2 ends. This might’ve been over-building a bit, but I wanted to be sure the bed was sturdy and solid. Since my sides were 48 inches apart, I needed end pieces that were 48 inches long. So, I went back out to the garage and cut 4 more 2x4s for tops and bottoms, this time at 48 inches long. I also cut 4 more 20-inch divider pieces, 2 for each end.
Taking these back up to the room, I decided to bring the dividers about 12 inches in from each end. I wanted a big space in the middle because, by this point, I was getting the idea for the door leading under the bed.
While attaching the dividers, I used the kids book again to keep them square as I positioned the dividers and screwed them onto the top and bottom of each end piece.
Sitting the end pieces up, I positioned them in place and then used pocket screws to attach the tops and bottoms onto the ends of the side pieces.

Step 4: Create the top. First, I cut 4 long 2x2s down to 76 inches to run the length of the bed. I wanted these for supports to hold the crosspieces that the mattress would rest on. I could have put the crosspieces straight onto the 2×4 top pieces, but I knew from my daughter’s old bed that this way there would be more give to the crosspieces and make the bed more comfortable. 🤷♀️ I can’t really explain why, but the added bit of flexing really is nice.
Laying 2 of these support pieces on the far sides of the side 2×4 top pieces, I screwed them on at each end and once in the middle. For the 2 other supports, I spaced them evenly across the center of the bed and screwed them onto the ends.
(I ended up adding little legs under these middle supports, so you might as well do that now too. My legs needed to be about 22 inches. I used one screw for each to hold them on.)

For the crosspieces to hold the mattress, I had a bunch of 1x4s from my daughter’s prior bed frame. That bed’s specs had been a little wide for the mattress, so I cut the 1x4s down a little bit to be the right 54 inches to go across from side to side. I cut 13, purely because that looked like enough and worked for my spacing.
I positioned these 1x4s across the top supports, then screwed them on with shorter screws.

Step 5: Cover the ends. To hide the crosspiece ends and also make a little lip that would hold the mattress, I cut 2 more 1x4s to 76 inches. These I held along the side 2x2s so that they covered the gap between each side’s 2×2 and the lower 2×4 while also sticking up just a bit above the crosspiece ends. I checked with a level to make sure they were right, and then I used my brad gun to nail these cover pieces onto the 2×2 and 2×4 along each side.

I didn’t bother with covering the end against the wall, but I cut another 1×4 for the foot of the bed. I made this board 55 inches long to cover the gap exposing the ends of the 2×2 supports.

Step 6: (optional) Add steps and a door. If you’re building this for a little person too short to climb into the bed, it’s a good idea to add steps to give them a boost. I took scrap 2×3 pieces and cut two 10-inch braces, and I used scrap 2x4s to cut one 15-inch step.
Holding the 2×3 braces against the divider pieces of the section my daughter chose for her step, I screwed them into the 2×4 dividers. Then, I held the step in place and screwed that onto the tops of the braces. Easy.

I created 2 more steps for either side of the big opening at the end of the bed. These were slightly narrower steps, but it was the same process.

Next came the “hidden” door over that big opening at the end of the bed. I had some spare hinges, so I screwed on 2 near the top and bottom of the divider where I’d be attaching the door. (See above picture.)
I had a lot of extra 1×4 scraps, so I cut 2 at 19 inches for the sides and 2 at 18 inches for the top and bottom.
First, I screwed on the side that attached to the hinges. I made sure to hold the board up a little bit so it wouldn’t scrape against the bottom 2×4 at the end of the bed.
Next, I took the top door piece and used my nail gun to attach it to the backside of the hinge-side piece. I thought about using a level, but since my cut was straight for the hinge-side piece, I just lined up the top of the top piece with that. I also made sure to use a little screw to secure them more than just the brad nails, since I’m sure this door will be yanked on a lot.

Once this top piece was secured, I did the same at the bottom.
For the far side piece, I made sure that the door would shut as I held the wood where I wanted it in front of the top and bottom pieces. Then I nailed this on too, and also used a single screw at the top and bottom.

Once the surrounding sides of the door were done, I took some little 1x2s and cut them to about 18 inches. These I spaced across the front of the door like bars, and I nailed them on with two brad nails at either end.

Step 7: Create headboard and/or ship’s mast. I cut four 1x4s to about 53 inches and positioned them vertically against the head-end of the bed, spacing them the same as the 2×4 ends of either side and the 2 head-end dividers below. These 1x4s I screwed onto those 2x4s below so that they stuck up and would support the headboard crosspieces.
As for the mast at the headboard end, I took a long 2×2 and positioned it to be centered across the headboard. This I screwed into the top 2×4 at that end. (If you don’t want a mast, just skip this.)

After these supports, I cut four more 1x4s to run the whole 56 inches across the head of the bed.

You could go all the way up like this, but for my sunken ship purposes, I wanted a gap in the middle the rest of the way up so that the mast would stand out. So, I cut six 1x4s to run only across the end sections, about 19 inches, for the remaining way up the supports.
I considered spacing these headboard crosspieces, and that would look nice too, but my daughter liked it better solid. That’s probably widest, considering stuff can fall through less gaps this way.
Step 8: Insert shelves for cubbies. I wanted the cubbies to sit flat rather than tip on the 2x4s at the bottom of the bed, so I took 2 long 1x12s and cut them to 67 inches long. Then I cut them on my table saw to be 7 inches wide. This left me with about 5-inch strips too. I took all of these 67-inch long boards up to the bedroom and slid them under the bed along each side.
With the 7-inch board sitting on top of the 5-inch board, that brought my long shelf boards up so that they were level with the bottom 2x4s. I used little brad nails to secure the 7-inch board on top of the 5-inch board. This meant no more tipping cubbies, plus I had nice, long shelves along the floor just under each side of the bed. If my daughter doesn’t want cubby boxes in all the sections, there’s a shelf to hold books or something down there.

Step 9: Sand and stain/paint. It made the most sense to wait until the bed was assembled before sanding my edges, since this way I’d know what would be exposed and what wouldn’t. Taking my small hand sander, I went over all the corners, ends, and edges to smooth down any sharp points.
Once that was done, I decided to use charred wood accelerator on the wood rather than normal stain or paint. Since we were going for a “sunken ship” look, I wanted to age the look of the wood and get it nice and dark. If you’ve never used this stuff before, it is SO cool. I’ll put up the video on my Instagram soon to show how it looks as it goes on, but basically you brush it on and it makes the wood…age and look charred. It also dries pretty quickly, which was good for impatient children waiting to play under the bed. 😆

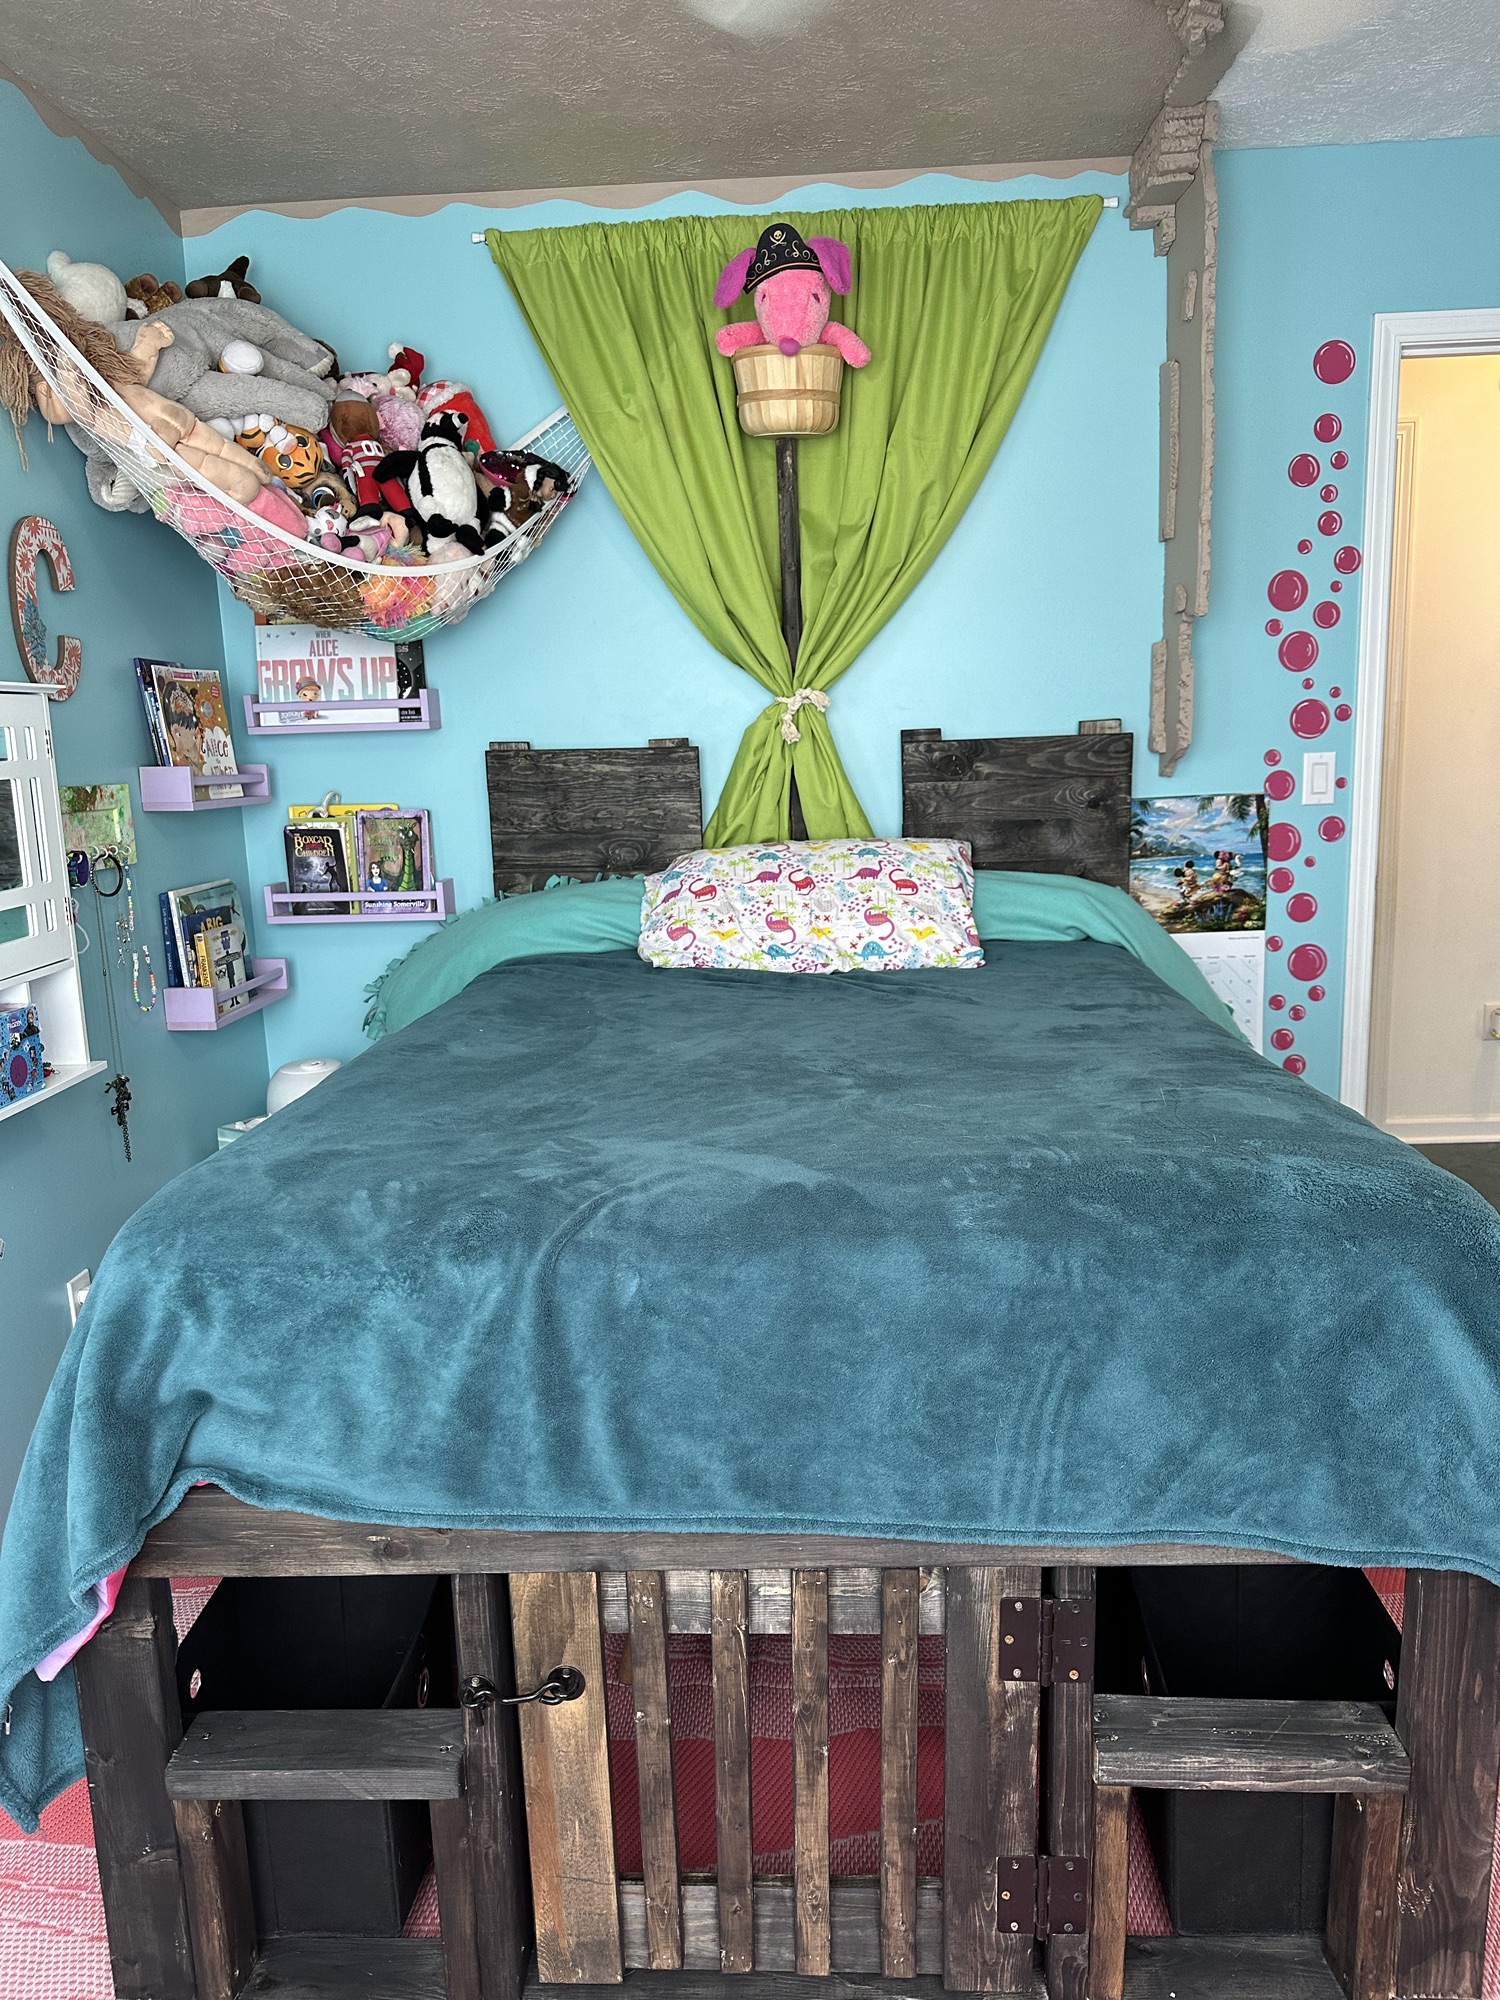
Step 10: Finishing sunken ship touches. I tinkered around with ideas on how to make the rest of the mast support a “sail,” and I ended up securing a tension rod to the wall high over the top of the mast. At the top of the mast, I took a little basket and screwed it onto the top for a lookout. Taking old curtains, I put them on the tension rod and slid one to each side of the mast, then used some decorative rope to tie the curtains onto the lower part of the mast. Tugging the curtains a bit, I pulled them out to “billow” a little bit, the tucked the ends behind the lower center section of the headboard.

Next, I made the bed and tucked the cubby boxes into the open spaces around the sides.
The final touch? Sitting Captain Snoopy in the lookout. 😆


Considering I had no real plan when I started, I’m pretty happy with how this project came together without too much trouble. There’s storage. There’s a play area. And now I’m one step closer to finishing my kid’s “Under the Sea” bedroom makeover!


DIY Must-Have Lists


