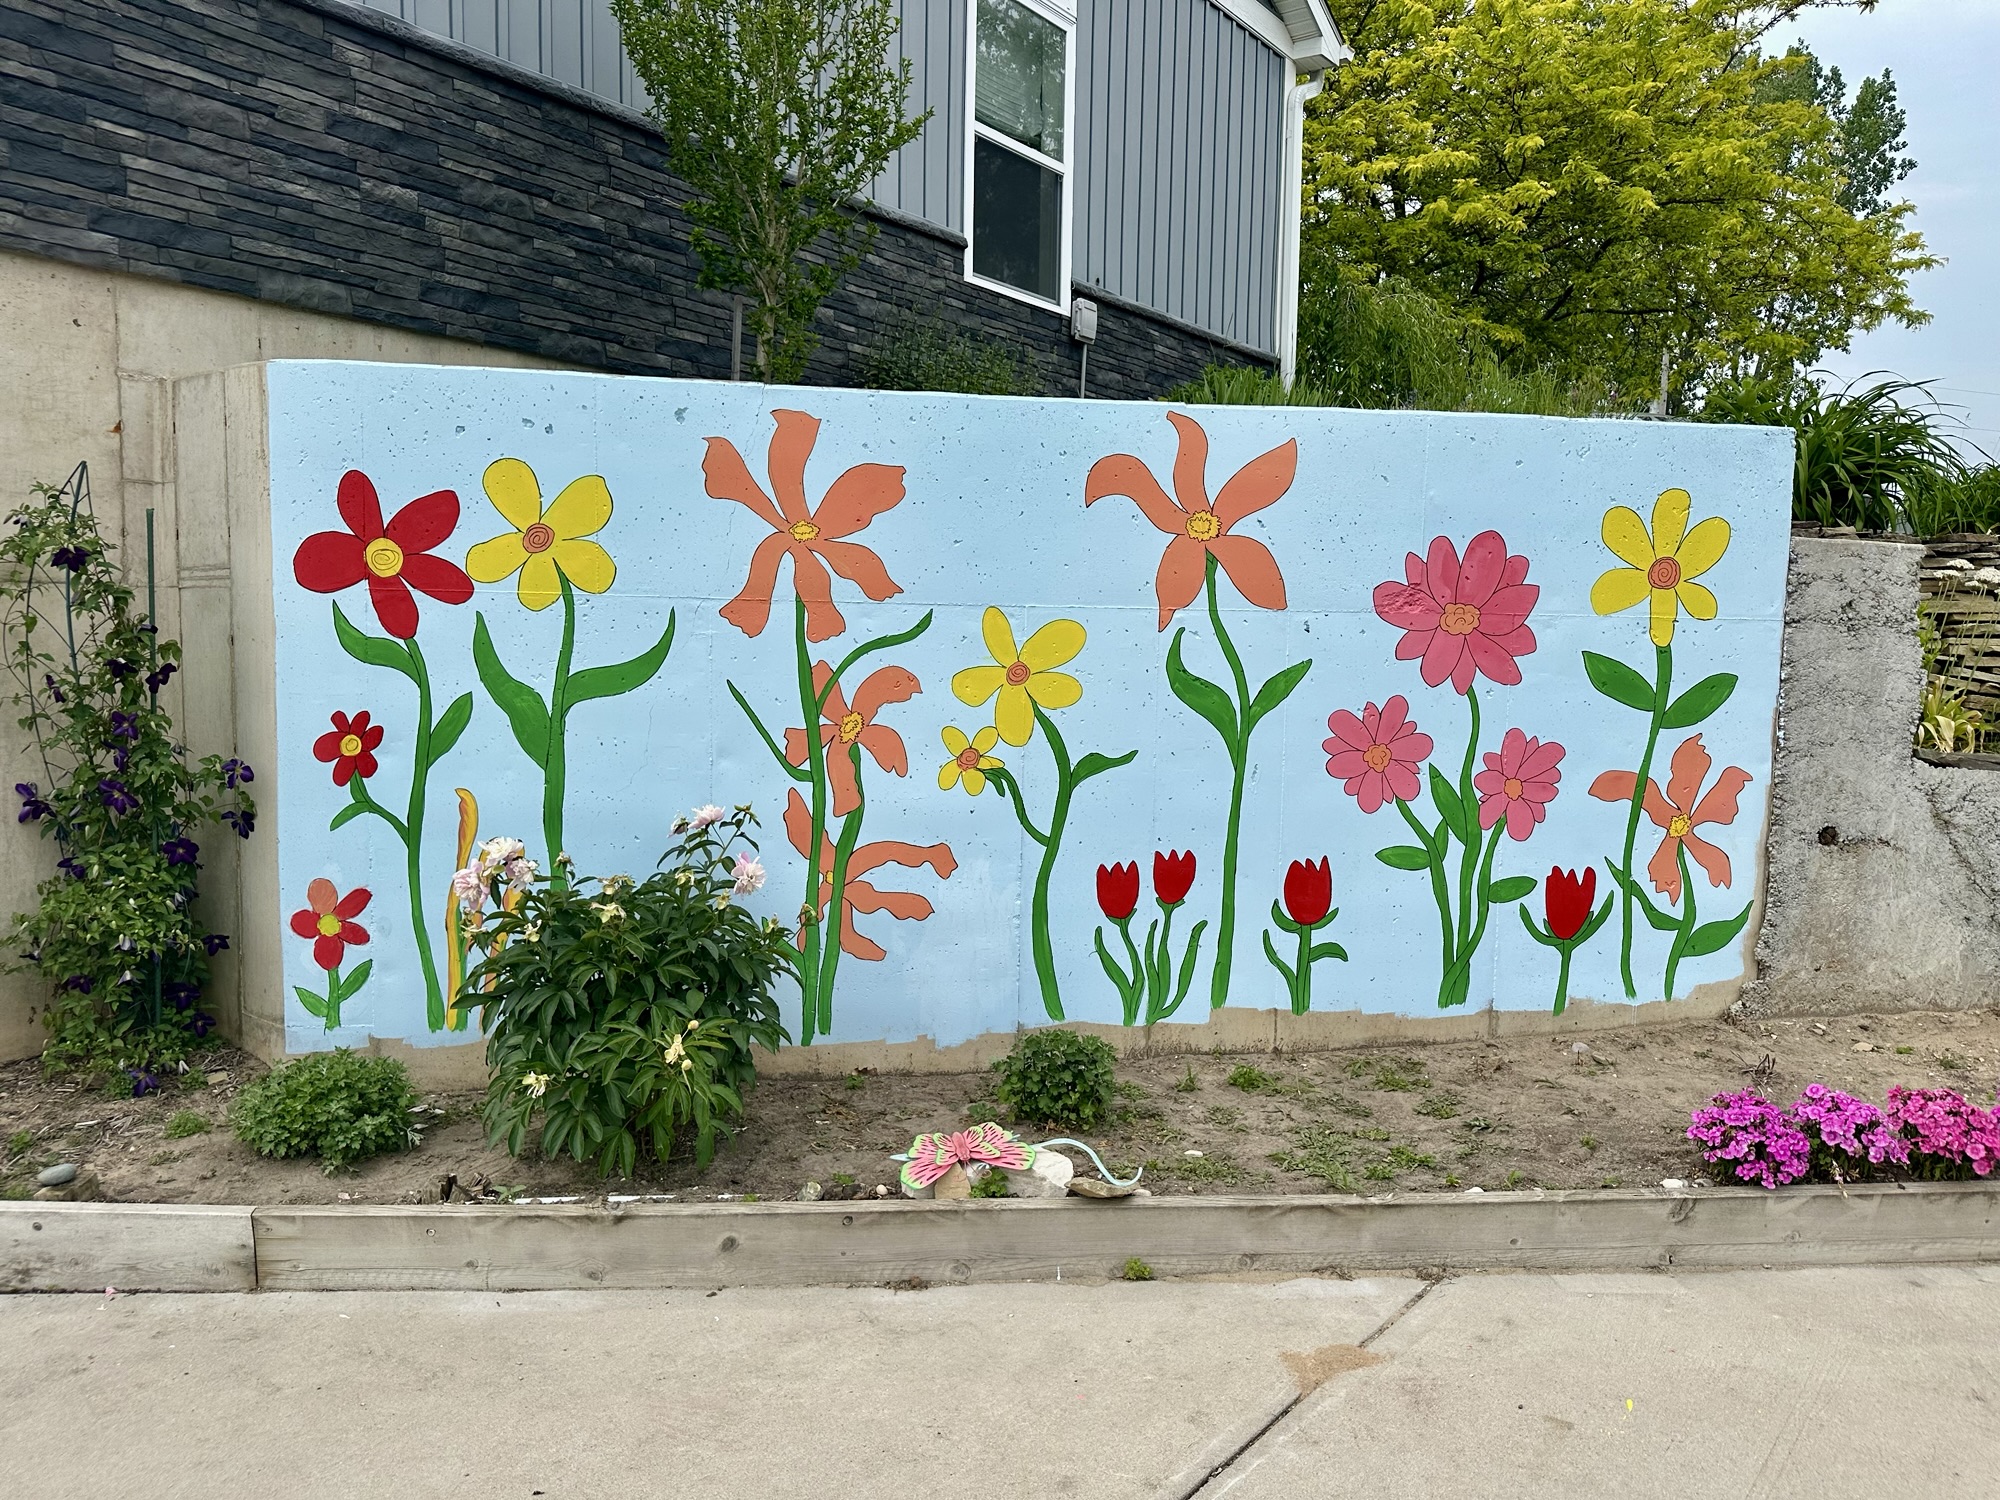
My mom had a very specific request for her Mother’s Day present this year. She wanted me to paint flowers on a cement retaining wall in her back yard. This wall stands behind a small flower garden, and the large, grey cement backdrop was definitely asking for some love.
If you have a cement retaining wall similar to this, or if you have cement exposed along the side of your house on a hill, this is a fun way to add some colorful artwork – especially if you have kids or grandkids who play in the area.

Supplies:
(As an advertising affiliate and Amazon Associate, I earn a small commission from qualifying purchases. But it doesn’t cost you anything extra and helps me keep up my site!)
- Concrete paint for base/background color (we used Dutch Boy Porch & Floor Paint in blue)
- Concrete paint for artwork (we used Dutch Boy Max Bond Plus in white, red, yellow, and green)
- Permanent marker
- Clear concrete sealer
Tools:
- Paint roller
- paint brushes (craft brushes work great)
Step 1: Clean the cement. You could hose down the wall and wait for it to dry, if there’s mud or other gunk stuck on the cement. My mom did this part on her own (yay, group effort on this project!) and just wiped the wall down to get off dirt and cobwebs.
Step 2: Background paint. I’d definitely recommend using outdoor cement paint that will be durable and also adhere properly to the wall. We used the Dutch Boy Porch and Floor paint because I’d used it before on other projects and trusted it to work.

This comes in a variety of color options, and my mom picked a light sky blue for the background. She again did this step herself, and it dried very quickly so that she was able to do 2 coats within an hour. Honestly, a quart probably would have been plenty rather than a whole gallon, if you don’t want to spend quite as much.

Keep in mind that the cement doesn’t have to be in great shape for this to work. Our cement wall was pitted with uneven chunks all over, but you’ll be covering this “character,” and it’s easy to work around the bad parts. My mom did use a smaller brush to really get the background paint into the holes and cracks all over the wall, but for the most part she used a roller. You might notice that she did not go all the way to the ground, and this was because she wanted to add a bit more dirt to the flowerbed, plus plants will be growing along the bottom to cover that up. If you want a nice, straight line along the ground, you could either paint right down to the dirt or roll a straight line across the bottom.

Step 3: Outline flowers/design. This is when I came in. Using a permanent marker, I drew outlines of flowers, stems, and leaves all along the cement wall. I did this fairly quickly because we were just going for a cartoon-y flowerbed design. If you want to do something nicer and more detailed, I’d still use a marker to get your planned outlines, but it will take longer, of course.

Step 4: Paint the art! Rather than painting one flower at a time, I did one color at a time. I liked doing one color at a time because it helped me get a feel for where I wanted how much of each color, and it also meant I didn’t have to go back and forth cleaning my brushes between colors.
First, I used green to get the stems and leaves filled in.

Again, you can get this paint in whatever colors you want, and my mom bought a quart each of green, white, yellow, and red as well as the gallon of the base blue color. This was WAY more paint than I needed, even with a wall this big. The small 8 ounce sizes of your individual colors might be plenty, so keep that in mind when buying paint.
Anyway, I used a few different brushes, but small craft brushes worked just fine. I did like having straight-edged brushes when doing the parts that went right against my outlines. Straight little brushes definitely worked best for the long stems, too.
It’s worth noting that this kind of paint wipes off easily if you slob a bit – which happens when you paint vertical surfaces, if you’re like me. I just used my finger or a paper towel. Just be sure to wipe off the mistakes before the paint dries, since it dries pretty quickly!
Also worth noting: The paint often went over the black marker of my outlines, but not really enough to cover it completely, so keep that in mind if you make a mistake with the marker. Before you paint, you may want to use your base/background paint to cover over any outline mistakes.
After the green, I used red to paint red flowers. Then I mixed in a little white to make a pink color.

Next I mixed a little yellow into that to make a pretty orange/coral color. I did a few flowers with this color, and I also used it to do the centers of some of the other flowers.

Only then did I clean my brush, and I used yellow to finish the last flowers. I also used my yellow to make the centers of the rest of the flowers.

You could mix your colors to do MANY different colors and shades of flowers, but we were happy with this much. (You might’ve noticed where I missed a green leaf. I did fix that once I was done with my other colors. 😜 We also let my daughter paint a flower…once I had the majority of this done and looking how I wanted.)
Step 5: Outline. Because I wanted a cartoon-y feel, I went back over my outlines with the permanent marker to outline the flowers, leaves, and stems. If you’re painting a lot more detail or going for a more realistic look, you could skip re-outlining everything. This really did help make our flowers pop, though.


Step 6: Apply a clear sealer. This sealer should also be made specifically for cement. This is definitely an important step to help protect your painting from sun, rain, scratches, etc. it’ll also add a nice shine over the painting.
That’s it! This certainly adds some cute artwork and color where there was bland and unattractive cement before. I also laughed a little bit as I was finishing up because bees started checking out the bright flowers. Guess we’re not the only ones who like it! 😂

DIY Must-Have Lists


