Posted on — Leave a comment

Pea Gravel Dog Kennel Fix

I let this go for way too long, but this July I finally got around to making our little dog area look decent. I also wanted to get on top of this before another rainy/snowy season when the ground becomes all muddy. Wet and muddy dog prints – not so cute across my kitchen.

Aerial view of a garden area with sparse vegetation and patches of dirt, bordered by a wooden deck and fencing.
BEFORE: Messy dog kennel.

The best fix I came up with was to make a pea gravel bottom instead of dirt, and I used landscape cloth to help deter future weed growth. To help hold gravel in place on the “human used” side of our gravel patio, I’d used some very handy ground cover paver forms (see picture at the very bottom), but I didn’t want to spend that much on the dog side. Long story less long, I should have spent the extra $$ and bought more of the heavy-duty paver forms, but I’d decided to try a less expensive option. You could use the less expensive forms like I did, because at the end I figured out a way to make them work almost as well. But honestly, I really like how the more expensive ones work way better and take less gravel.


Supplies:

(As an advertising affiliate and Amazon Associate, I earn a small commission from qualifying purchases. But it doesn’t cost you anything extra and helps me keep up my site!)

Tools:

  • Scissors
  • Rake and shovel

Step 1: Clear area and level the base. I cut back a lot of plants and pulled a bunch of weeds. Our oldest dog is a digger, so I had holes and lumps all over the ground to deal with. Taking a metal rake and a shovel, I scraped along the ground and shoveled dirt around until the area was fairly level. I was careful to keep the side along our house a little higher than the rest to help with drainage.

Cleared area before laying gravel, showcasing a leveled dirt space adjacent to wooden planter boxes and surrounding greenery.
Weeded and leveled.

Step 2: Enclose the space. The fencing that I used for the kennel area is fantastic. It can run straight or turn at angles where each section of gate connects. It doesn’t look bad if you have to fudge it a little bit by overlapping to make it fit, either. You can buy sections at a time if you’re not sure how much you’ll need, but it was pretty easy to figure out that I needed 10 ft along one side and 13 feet along the other. (The back side was just the house wall, and the last side of the dog area was already enclosed under our deck.)

Starting right against the house, I shoved in a pole/stake to hold that end of the gate in place, then connected the next section of gate with a pole running between the first and second sections. It was easy to do this in a straight line, adding sections of gate and poles until I reached my planter box at the other end. This was my 13-ft side. Here, I took another section of gate to make the corner. Then I ran more fencing along the planter box, overlapping a section in the middle to get the right overall length of about 10 feet. I had a very narrow gap at my planter box’s corner, but I just used a leftover pole/stake and shoved that into the box’s dirt to block off any escape attempts.

Installing this fencing took me literally 10 minutes.

Very easy + Looks nice + Sturdy and secure against my 65-pound mutt = 👍

Step 3: Lay the landscape fabric. I had quite a bit of this leftover from another yard project, but I had to buy a roll to finish. This is pretty easy once your ground is level, because all I had to do was roll it out from the house to the fencing on the far end. Scissors cut the fabric well, and then I took the roll and started again to cover the next strip of ground. I overlapped each strip a little bit to help cover everything, and it helped to use my rakes to hold one end down while I rolled out each strip.

It’s worth noting that I had a sprinkler head right smack in the middle of the space. When I rolled the fabric over this spot, I cut a hole and made sure the sprinkler head had plenty of room to stick through. (More on that later, as I had to take this into consideration with each following step.)

A fenced dog area with landscape fabric and gravel laid down, surrounded by greenery and a house wall.
Fencing and fabric done.

Step 4: Lay out the paver forms. Again, I wish I’d bought these paver forms, but I used these more flexible forms and eventually found a way to make them work by adding these anchoring spikes. The flexible forms do NOT come with enough spikes to secure the forms if you’ve got a dog (or kids) that are rough on the space. I found after laying them and after filling everything with gravel that they too easily pulled up in the middle where there were no anchor spikes, and the forms being loose ruined the whole point. 🤦‍♀️ BUT, if secured with more spikes through the little holes here and there, the forms stayed quite well.

So, learn from my mistake and make sure you secure these forms down really, really well.

Package of anchoring spikes for landscaping, featuring details about their durability and suitability for no-dig edging.
Use these for extra securing!

Anyway…I stretched out and unfolded the flexible forms and spread this wide mesh across the space, securing it at one end, then the other. (I now know I should have secured it everywhere I could with extra spikes, so do that now.) I do like that they come with little fasteners to attach one side of one strip to another side of another strip, and it’s pretty easy to make one, big form this way to fill the space. The material also cuts pretty easily with scissors, so you can adjust the size and shape more easily than you can with the more heavy-duty forms.

Close-up of flexible paver forms resting on landscape fabric, showing their design and holes for anchoring.
Fasteners to join sides.

Cutting here and securing there, I eventually covered my space with the forms. I made sure that a big opening allowed my sprinkler head to have space. I also made sure to add extra anchor spikes all along the exposed side to hold that down where the dogs would be running a lot.

A dog area featuring a textured black ground cover laid out in a patterned formation, enclosed by fencing and greenery in the background, with a wooden structure overhead.
Forms done.

Step 5: Fill with gravel. After hauling 10 bags home from Lowe’s in my Jeep, I got smart and ordered 35 more bags to be delivered so I didn’t cause a smelly mess in my Jeep. When figuring out how much you’ll need, take your square footage and look at what the bag says about coverage. I needed 130ish square feet, and it needed to be about 3 inches deep. I ended up needing about 50 bags total.

It was heavy, dirty work, but it was satisfying to dump each bag and then spread the gravel into the forms. I made sure not to fill the circular form I’d made around the sprinkler head, and it kind of looks like a little drain in the middle.

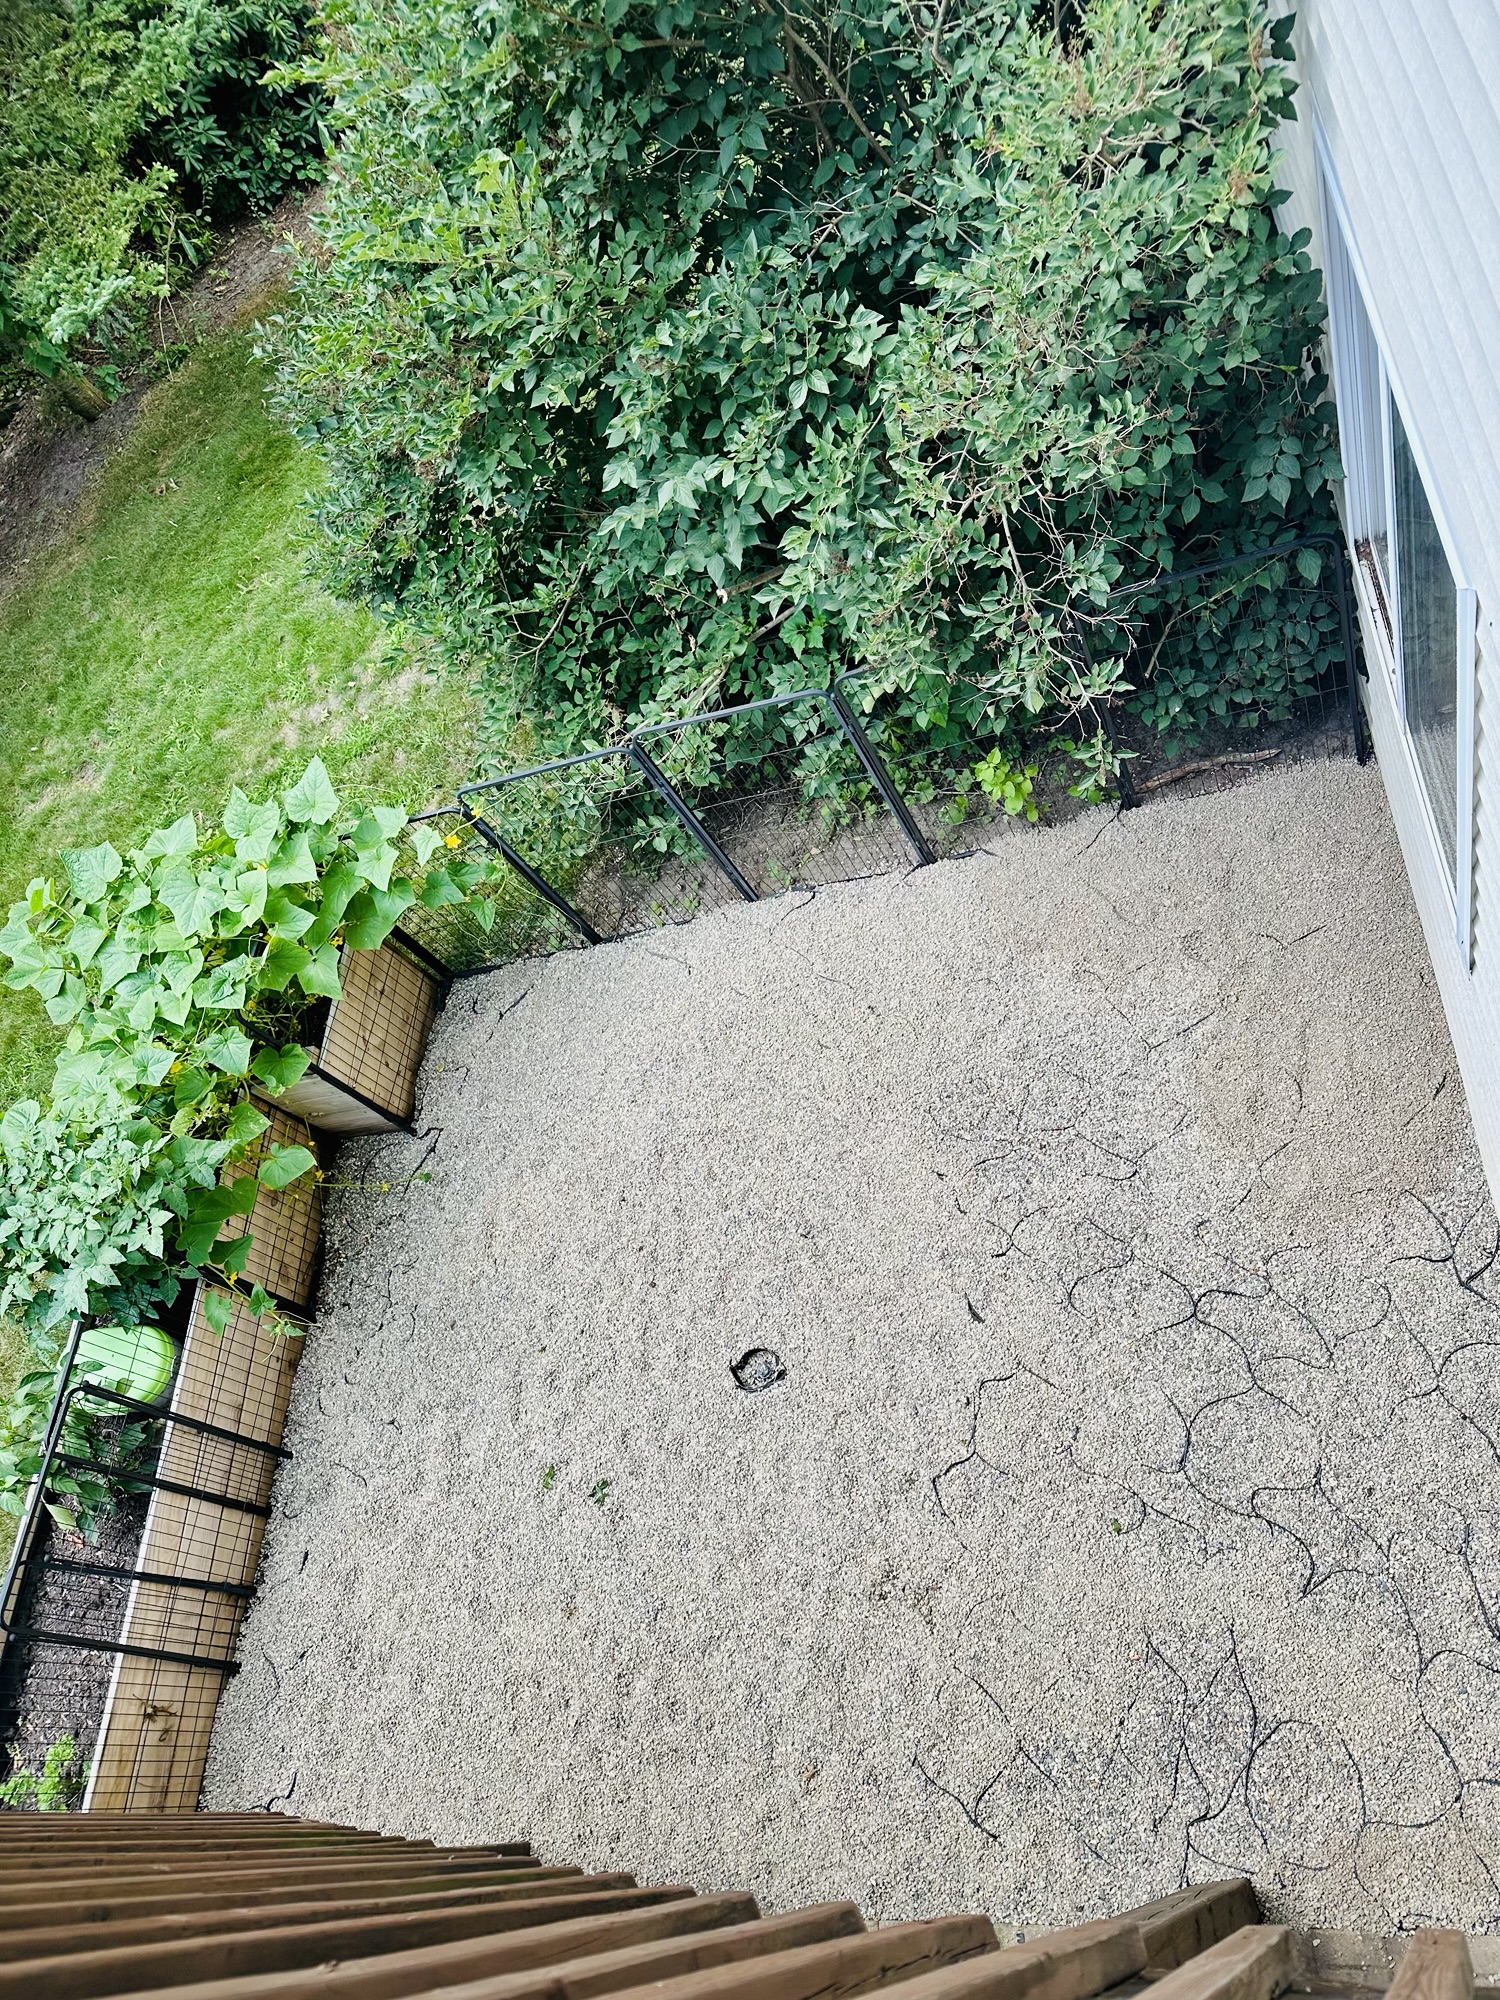
Done! I had some hiccups with this project, but once I got those extra anchor spikes in, these forms worked pretty well. Our older dog can’t dig as easily with the forms in place, and the gravel certainly looks better than the dirt mess that was there before. The below picture was taken about a week after I finished, so you can see how I might want another bag of gravel to cover the forms now that the gravel has settled, but I don’t mind seeing the pattern of the forms a little bit. The important thing is that our dogs can’t move them anymore!

Aerial view of a newly created dog area featuring pea gravel, bordered by plants and a fence against a backdrop of green bushes and grass.
AFTER: Pea gravel dog kennel.

And in case you’re wondering, this is what the end result looks like with the more heavy-duty forms, which I used under our deck and on the side of the patio that we humans use. 🙂

An outdoor gravel patio area beside a house, featuring a textured stone surface and a section covered with pea gravel, surrounded by landscaping and furniture in the background.


DIY Must-Have Lists

Click to see more!
Click to see more!
Click to see more!
Posted on — Leave a comment

DIY Bulkhead for a Small Basement Space

What a week (plus a day)! My family drove down to Ohio to build a basement guest suite for my husband’s cousin. Was it worth it? Yes, absolutely, because we’ll get to stay there when we visit. 😆

BUT, my biggest challenge was figuring out how to hide a bunch of pipes and wires that hung at an angle across the part of the space that we were making the bedroom. Ordinarily, making a bulkhead might not have been that difficult, but these pipes angled down towards the door so that there was only 3/4 inch between the top of the door and the lowest pipe. And they angled weird across the room, so I didn’t want to just paint them like we did in a section of the bathroom.

BEFORE: Mess of angled pipes and wires.

So. If you’ve got a tight space, here’s how we made our bulkhead!

Supplies:

  • 2x4s (length depends on your space, we used 8 at 8 feet long)
  • 1x3s (we used 4)
  • Construction screws
  • 4×8 drywall sheets, 1/2 inch wide (we used 2)
  • Drywall screws
  • Joint compound
  • Paint

Tools:

  • Drill
  • Tape measure
  • Level
  • T-square
  • Mud spreader
  • Paint rollers/supplies
  • Utility knife

Step 1: Measure. We had to get this exactly right, and I checked measurements constantly. But to start, I decided to judge everything off of the position of the beams. Going from the floor didn’t make any sense, since everything would have to connect from the beams anyway. First, I found that the lowest point where I could possibly go was 13 inches down. That would leave me room for our 1/2 inches drywall – always remember to keep in mind the added width of the drywall!

Tight space!

I then figured out how far from the wall the bulkhead would have to go to cover all the pipes and wires. The farthest out wire was at 42 inches. Taking a T-square and marker, I measured and marked the beams where this outermost point had to be.

Outermost point marked.

For the length of this whole bulkhead, I went from that pesky doorframe to the far wall we created for the bathroom. This wall had to stop at the height of the pipes at that point. This end was helpful because I could just stick all the boards going across on top of the wall and screw them to attach to the top of that, since they’d be hidden inside when it was done. The space between was 9 ft.

Those were the main measurements I had to work with. Time to cut wood!

Step 2: Create the front. Since I had to come down 13 inches, I wanted to attach 2x4s to hang down from each beam and create the front of the bulkhead. I decided to go up 5 inches to screw each 2×4 into each beam securely. So, I cut seven 2x4s to 18 inches each. I also took two 1x3s that would run across the fronts of these 2x4s at the top and bottom to help the future drywall attach and give a sturdy bottom edge.

Taking my 7 pieces, I marked them at the 5-inch point and also predrilled screws above that line to make it easier when screwing them into the beams.

Taking a small level, I found the mark on the beams I’d made before and marked a line 5 inches up. I did this on each beam across my space and marked on the left side of each, just to be consistent. Then, I took one piece at a time and held them against that line to keep them level as I screwed them into position.

Front pieces.

I waited on the 1x3s…because I forgot about them. But you could put these on now too. For the top, run the 1×3 right along the ceiling. Along the bottom, screw one end on so that the bottom of the 1×3 sits flush with the bottom of the 2×4 – you don’t want it sticking lower or it will be too low! Using a level, make sure the 1×3 covers all the bottoms of the 2x4s on the beams, then secure once level. I used drywall screws for these.

1x3s on front.

Front ready!

Step 3: Add a connector along the back wall. First I had to make a whole frame for that back wall, using 2x4s. If you already have a back wall, just find and mark your studs. I had the added wonkiness of the pipes going into that back wall, so my connector had to stop and start around those pipes to get all the way to that end.

Basically, I measured 13 inches down from the ceiling beams, just like with the front side. Along the back studs, I marked at 13 inches. (I also marked 1/2 inch down from this to know where the drywall should end…and this line completely screwed me up so that I put the connector on the wrong line and now the door doesn’t open all the way. 😖 Don’t do that.) I used a level and double-checked, and the line for my connector was level all the way across.

Connector line on back studs.

From there, it was easy to screw a 2×4 onto the back wall studs, making sure to keep the bottom on the marks I’d made at 13 inches down. (We’ll pretend I did that right, anyway.)

For the space on the back wall between the pipes, I took a shorter piece of 2×4 and also screwed that into the studs at 13 inches down.

Step 4: Create a middle beam. If your bulkhead doesn’t need to be that wide, you might be able to skip this middle support. But 42 inches wide is too far for drywall without a middle support.

This was a little tricky because I had to find a place at the door-end of the bulkhead where a 2×4 could fit and run all the way to the other end. I had to put mine up a ways, but I found a place to secure it to a stud on the wall over the door. I also used a little block of 2×4 to set it on as I screwed it in place.

Placing end of beam.

I purposefully had this board be 10 feet long to reach all the way to the wall at the other end, and it stuck over enough to sit on top of the wall there. Taking a level, I made sure the 2×4 was level from the door-end to the wall-end, and I propped the wall-end up on blocks that I screwed together. When I was sure it was level, I screwed the “beam” into the blocks.

Wall-end of beam.

For what came next, I really could have used a third arm…or asked for help. Taking a long level, I held it against the bottom of a front 2×4 and held it at level with one hand. With my other hand, I took a tape measure and measured from the top of my beam to where it met the level. This was 9 inches – after several tries to keep the level level.

So, like I’d done with the front, I needed little 2×4 pieces that hung down from that new beam. BUT, I needed to subtract the 3/4 inch that a 1×3 would run across the bottoms of the pieces. That meant my pieces needed to be 8.25 inches instead of 9.

I cut these little 2x4s, predrilled holes above the 3.5 point (the part where they’d connect to the 2×4 beam), and held them so that the top of each was flush with the top of my beam. The placement of these along the beam just depended on where I had space to fit my drill. I did make sure to keep them as evenly spaced as I could.

With those on, I was able to take another 1×3 and run it the length of this beam, screwing it into the bottoms of each little 2×4 hanging from the beam.

1×3 along bottom of beam.

Worth noting – I couldn’t get anything near the door-end for this beam. There just wasn’t a way to connect anything in the middle because of how the pipes curves. But because that was at the end – and I had the back connector there – I figured this would be good enough.

Step 5: Put up drywall. Start with the underside/ceiling of the bulkhead. For this part, I was finally smart and asked for help. 😆 First, measure to be sure of the size. We had 4×8 sheets of half-inch drywall, so we had to add a bit at the door-end, which I was fine with since that part was troublesome anyway. For width, we measured and cut the drywall with a utility knife to 42.75 inches, which allowed us to run the drywall all the way from the back wall to just cover that front 1×3.

Drywalling.

Using the brute strength of my two assistants, they lifted the drywall into place, making sure the back end was tight against my back wall connector while also tight against the wall-end. I was ready with the drill and drywall screws, and I started along the back wall connector, screwing up into the underside of that 2×4. At the other side, I screwed into the bottom of each 2×4 hanging from the front beam. For the middle, we could see where that 1×3 ran because of the gap where we hadn’t drywalled yet, so my taller husband quickly used my T-square and drew a line down the center of the drywall where the board would be. Then I screwed a few screws along that line to secure the middle of the drywall.

Once that first piece was on, we measured the remaining gap at the end and again lifted it into position – closing the door to make this easier – so I could screw it into the back connector and front boards. There was a little bit of the middle connector that still ran this far, so I screwed into that too.

(It was at this point that I realized my mistake with that back line, because the door wouldn’t open all the way. 🤦‍♀️ Do as I say, not as I do.)

For the front piece of drywall, this was obviously a much smaller piece. We again had to add a separate piece at the end where there was a gap, but our first piece was 8 feet long and 13.5 inches wide. This extra 1/2 inch ran down to cover the drywall of the underside, making a nice smooth look from the front.

The helpful thing to remember here is to use an uncut side of drywall at the bottom. This makes the bottom edge perfectly straight and clean, and you don’t need to add any kind of corner piece to make a nice corner.

Step 6: Cover screw holes and seams with drywall mud (joint compound). Make sure all your screws are sunk into the drywall just enough that they don’t stick up. If your seams are rough…hypothetically…you might need drywall tape and/or mesh to make them smooth(er).

Taking a little spreader tool, I applied mud over everything that needed it. I also added a bit (translation: a lot) to the underside part of the corner so that the bottom was a nice corner where it met the front drywall that was a nice, perfect edge.

That took a long time to dry because my mud had to be so thick, but giving it overnight usually is enough. (It depends on your joint compound directions too, of course.) Once it is dry, sand the mud smooth.

Drywall mud on and sanded.

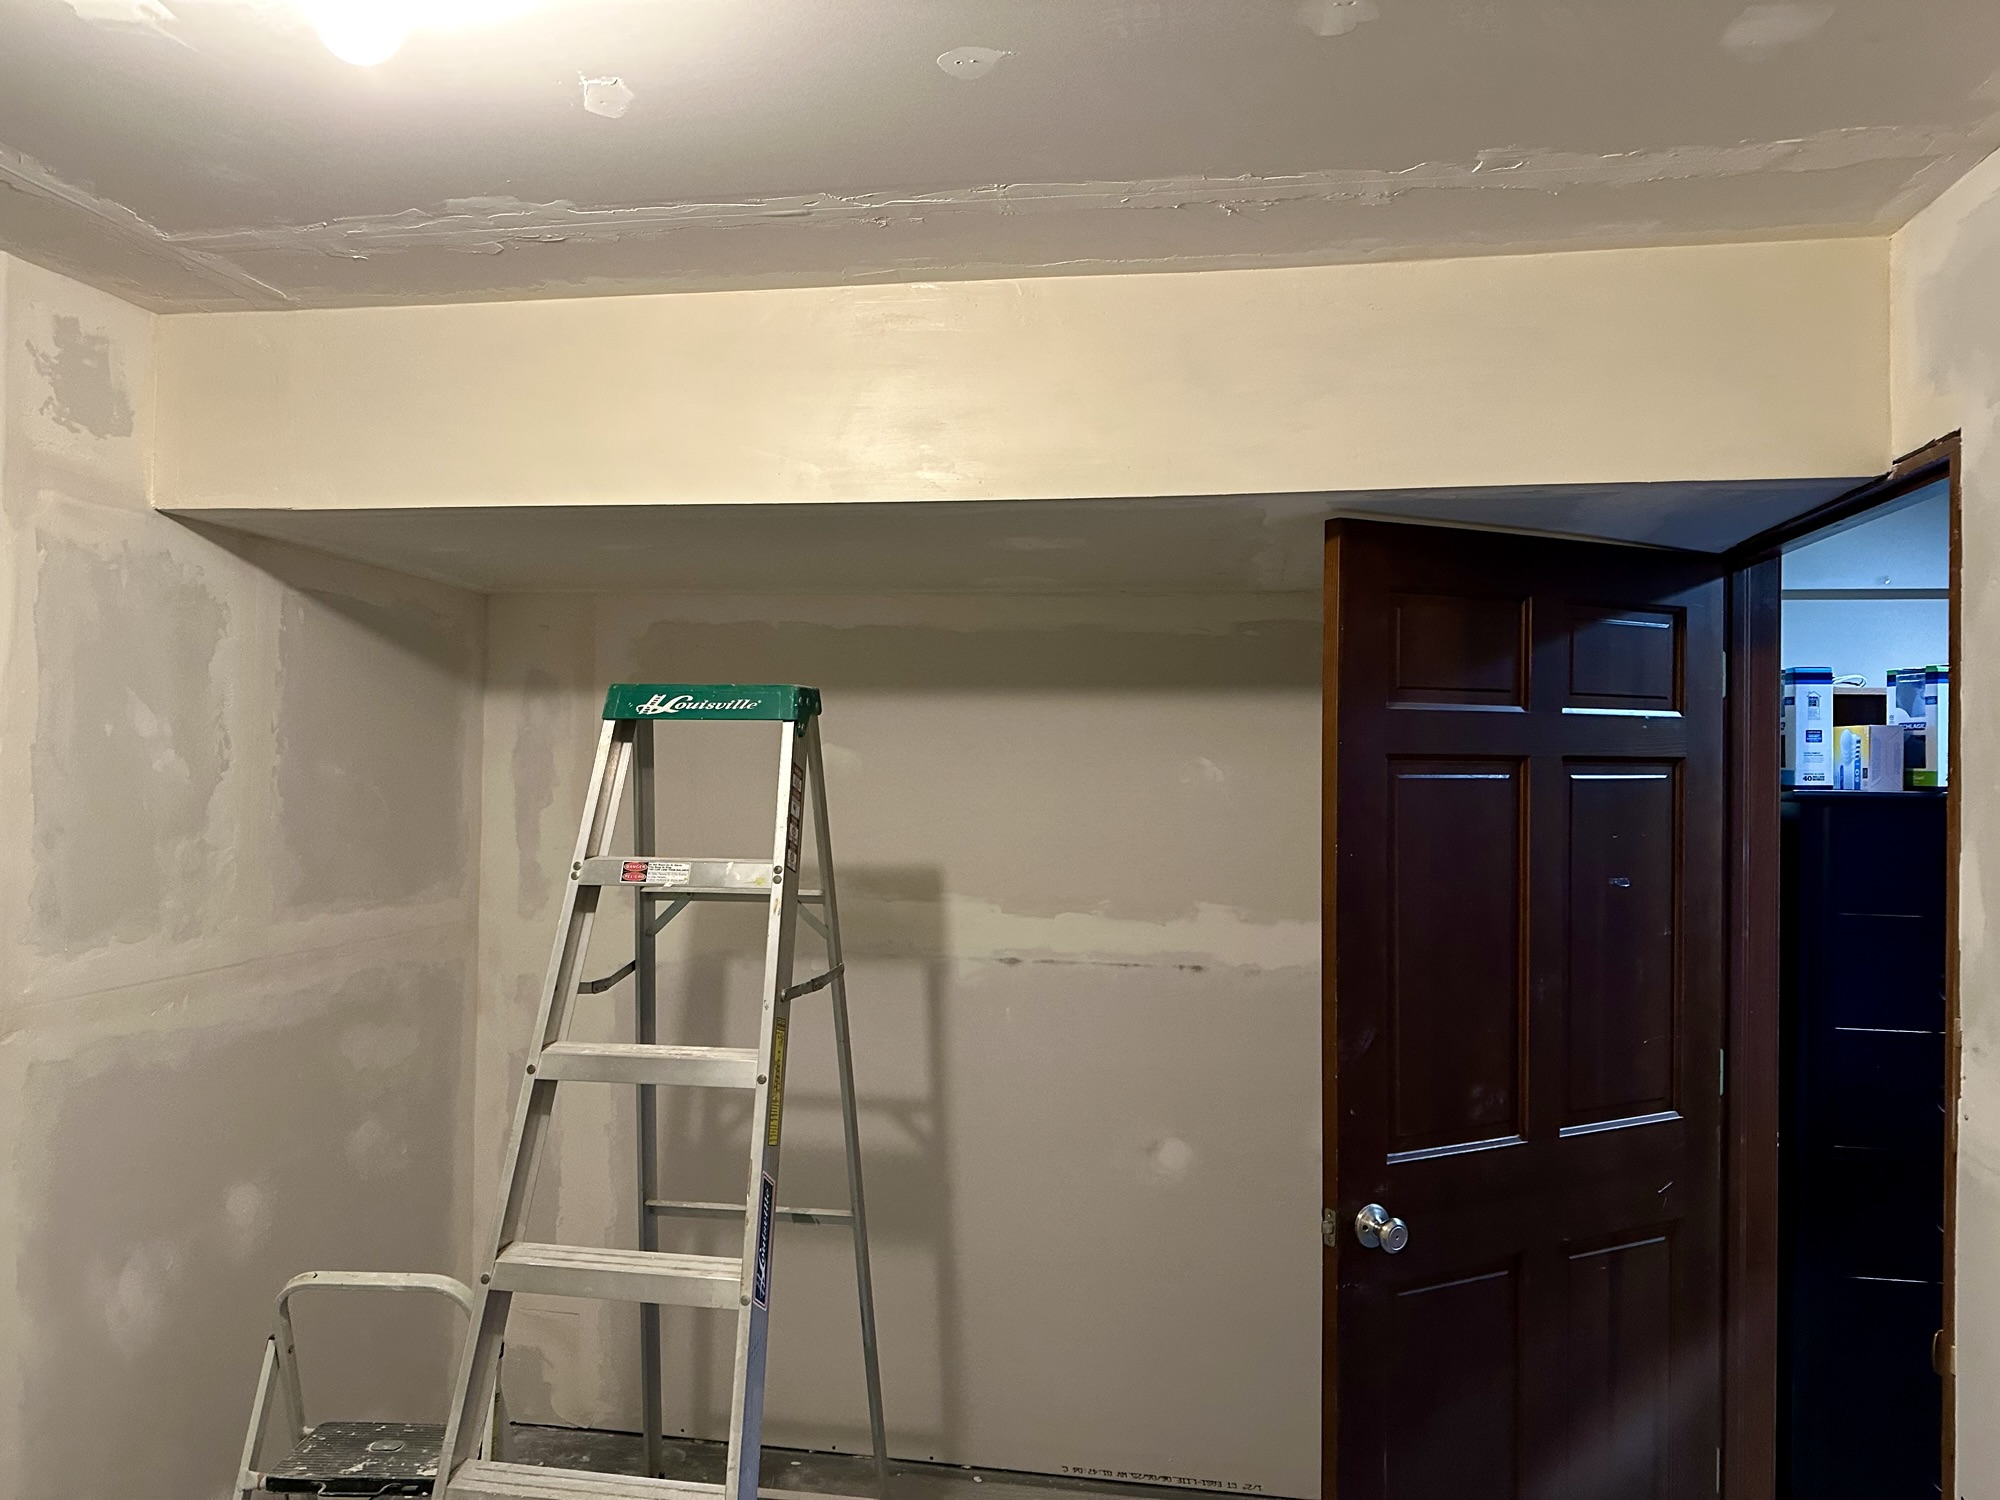
Step 7: Paint. With the bulkhead ready for this final step, all you have to do is pick your color and paint! I painted the bulkhead and was happy with how it turned out – it was certainly less of an eye sore that those angled pipes had been! – so I left the rest of the room for my husband’s cousins to finish.

AFTER: Bulkhead hiding it all!

You could paint the bulkhead a completely different color from the rest of the room if you want it to stand out, but I think they’re going to leave it the same color as the room since it’s a smaller room and this light color brightens things up.

…In hindsight, this wasn’t all that difficult, but it sure seemed like it while we were doing all the other work at the same time! (And before anyone asks, the door opens wider than pictured above.) 😆

Posted on — Leave a comment

Making a Cement Wall Pretty

My mom had a very specific request for her Mother’s Day present this year. She wanted me to paint flowers on a cement retaining wall in her back yard. This wall stands behind a small flower garden, and the large, grey cement backdrop was definitely asking for some love.

If you have a cement retaining wall similar to this, or if you have cement exposed along the side of your house on a hill, this is a fun way to add some colorful artwork – especially if you have kids or grandkids who play in the area.

A cement retaining wall in a backyard, partially covered by a small flower garden with green plants and blooming flowers. Supplies for painting the wall, including a paint roller, paint tray, and concrete paint, are set on the ground.
BEFORE: Plain cement wall.

Supplies:

(As an advertising affiliate and Amazon Associate, I earn a small commission from qualifying purchases. But it doesn’t cost you anything extra and helps me keep up my site!)

Tools:

  • Paint roller
  • paint brushes (craft brushes work great)

Step 1: Clean the cement. You could hose down the wall and wait for it to dry, if there’s mud or other gunk stuck on the cement. My mom did this part on her own (yay, group effort on this project!) and just wiped the wall down to get off dirt and cobwebs.

Step 2: Background paint. I’d definitely recommend using outdoor cement paint that will be durable and also adhere properly to the wall. We used the Dutch Boy Porch and Floor paint because I’d used it before on other projects and trusted it to work.

Containers of Dutch Boy paint for a DIY flower mural project, featuring various colors including red, green, blue, and white.
Paint.

This comes in a variety of color options, and my mom picked a light sky blue for the background. She again did this step herself, and it dried very quickly so that she was able to do 2 coats within an hour. Honestly, a quart probably would have been plenty rather than a whole gallon, if you don’t want to spend quite as much.

A cement retaining wall painted light blue, surrounded by colorful flower beds and greenery in a backyard setting.
Base/background paint on.

Keep in mind that the cement doesn’t have to be in great shape for this to work. Our cement wall was pitted with uneven chunks all over, but you’ll be covering this “character,” and it’s easy to work around the bad parts. My mom did use a smaller brush to really get the background paint into the holes and cracks all over the wall, but for the most part she used a roller. You might notice that she did not go all the way to the ground, and this was because she wanted to add a bit more dirt to the flowerbed, plus plants will be growing along the bottom to cover that up. If you want a nice, straight line along the ground, you could either paint right down to the dirt or roll a straight line across the bottom.

Close-up of a light blue cement retaining wall, showing pitted texture and imperfections.
Close-up of imperfect wall.

Step 3: Outline flowers/design. This is when I came in. Using a permanent marker, I drew outlines of flowers, stems, and leaves all along the cement wall. I did this fairly quickly because we were just going for a cartoon-y flowerbed design. If you want to do something nicer and more detailed, I’d still use a marker to get your planned outlines, but it will take longer, of course.

A cement retaining wall painted light blue with outlines of various flowers drawn on it, situated behind a small flower garden.
Outline in marker.

Step 4: Paint the art! Rather than painting one flower at a time, I did one color at a time. I liked doing one color at a time because it helped me get a feel for where I wanted how much of each color, and it also meant I didn’t have to go back and forth cleaning my brushes between colors.

First, I used green to get the stems and leaves filled in.

A cement retaining wall painted light blue with outlined flowers and green stems in a backyard garden, surrounded by blooming flowers.
Green first.

Again, you can get this paint in whatever colors you want, and my mom bought a quart each of green, white, yellow, and red as well as the gallon of the base blue color. This was WAY more paint than I needed, even with a wall this big. The small 8 ounce sizes of your individual colors might be plenty, so keep that in mind when buying paint.

Anyway, I used a few different brushes, but small craft brushes worked just fine. I did like having straight-edged brushes when doing the parts that went right against my outlines. Straight little brushes definitely worked best for the long stems, too.

It’s worth noting that this kind of paint wipes off easily if you slob a bit – which happens when you paint vertical surfaces, if you’re like me. I just used my finger or a paper towel. Just be sure to wipe off the mistakes before the paint dries, since it dries pretty quickly!

Also worth noting: The paint often went over the black marker of my outlines, but not really enough to cover it completely, so keep that in mind if you make a mistake with the marker. Before you paint, you may want to use your base/background paint to cover over any outline mistakes.

After the green, I used red to paint red flowers. Then I mixed in a little white to make a pink color.

A colorful mural of flowers painted on a cement retaining wall, with a light blue background and various flower designs outlined in black marker. The wall is situated in a backyard with green plants and pink flowers visible in the foreground.
Red and pink painted.

Next I mixed a little yellow into that to make a pretty orange/coral color. I did a few flowers with this color, and I also used it to do the centers of some of the other flowers.

Coral color added.

Only then did I clean my brush, and I used yellow to finish the last flowers. I also used my yellow to make the centers of the rest of the flowers.

Colorful painted flowers on a blue cement retaining wall, surrounded by a flower garden and grass.
Yellow painted.

You could mix your colors to do MANY different colors and shades of flowers, but we were happy with this much. (You might’ve noticed where I missed a green leaf. I did fix that once I was done with my other colors. 😜 We also let my daughter paint a flower…once I had the majority of this done and looking how I wanted.)

Step 5: Outline. Because I wanted a cartoon-y feel, I went back over my outlines with the permanent marker to outline the flowers, leaves, and stems. If you’re painting a lot more detail or going for a more realistic look, you could skip re-outlining everything. This really did help make our flowers pop, though.

A large, cartoon-style flower design painted on a light blue cement wall, featuring orange petals with a yellow center and green stem.
Outline.
Outline.
Colorful flowers painted on a cement wall, featuring red and yellow flowers with green stems against a light blue background.
Outline.

Step 6: Apply a clear sealer. This sealer should also be made specifically for cement. This is definitely an important step to help protect your painting from sun, rain, scratches, etc. it’ll also add a nice shine over the painting.

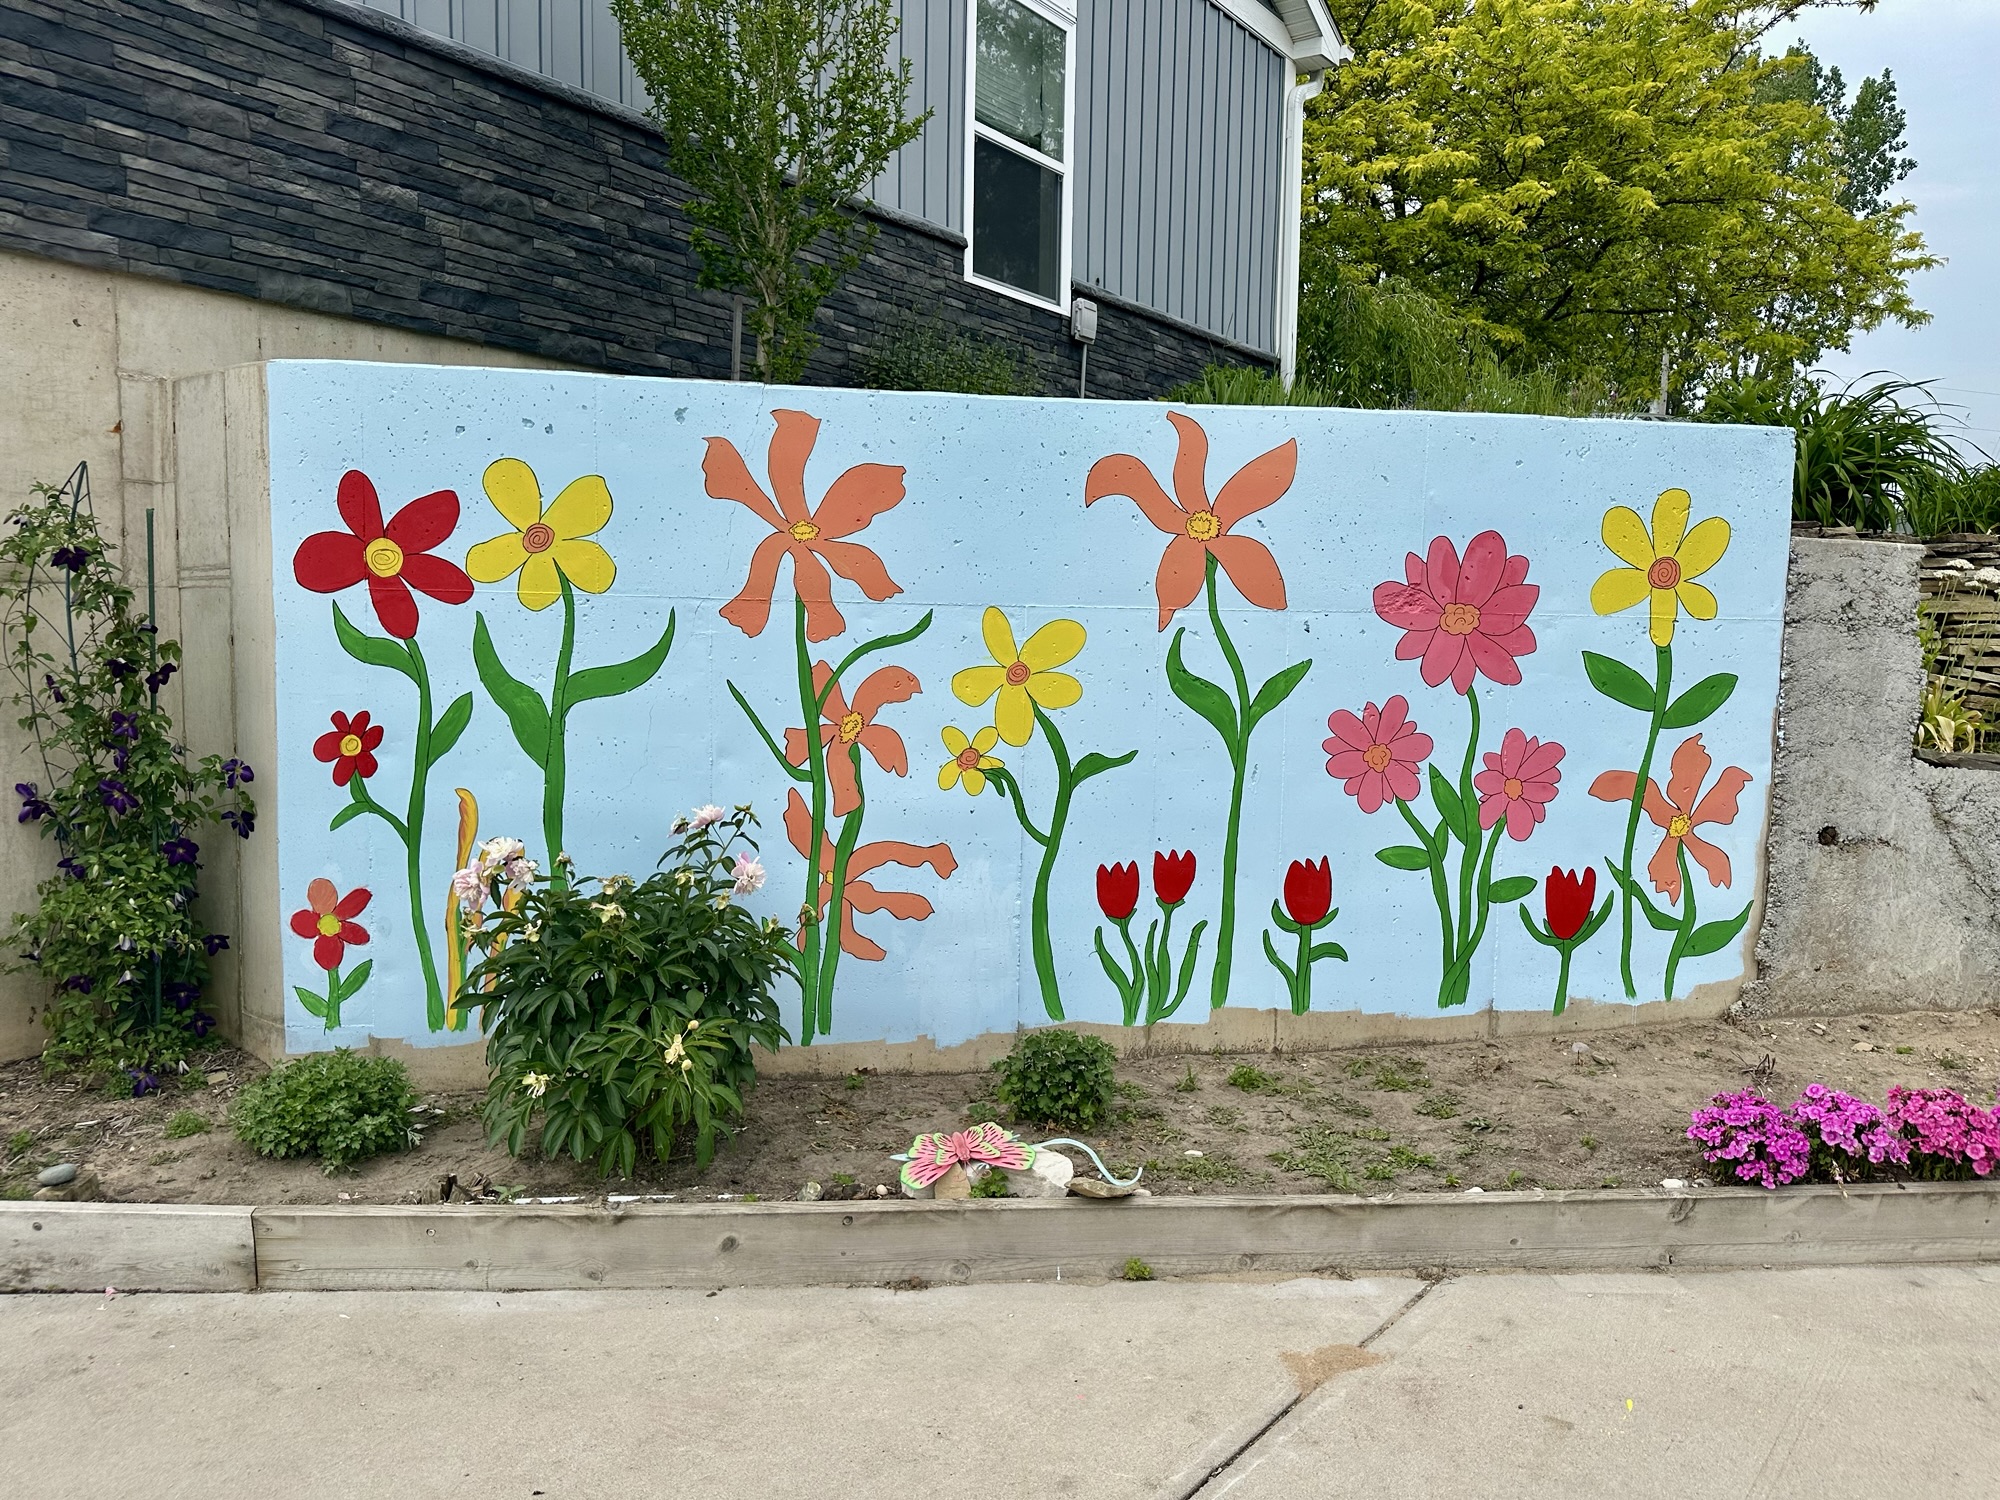
That’s it! This certainly adds some cute artwork and color where there was bland and unattractive cement before. I also laughed a little bit as I was finishing up because bees started checking out the bright flowers. Guess we’re not the only ones who like it! 😂

Colorful mural of various flowers painted on a cement retaining wall in a backyard, with a light blue background.
AFTER: Pretty painted wall!


DIY Must-Have Lists

Click to see more!
Click to see more!
Click to see more!
Posted on — Leave a comment

Garage Storage for Kid Stuff

Chalk. Chalk everywhere.

I can have all the totes and buckets and containers in the world, and still my kids will end up piling their chalk and bubbles right inside our door for easy access when playing outside. And since we actually have neighbor kids to play with now (yay!), many little feet run in and out to access the pile of chaos on our dining room floor.

A cluttered floor covered with various children’s toys and art supplies, including chalk, bubbles, and packaging.
BEFORE: Pile of outdoor play supplies.

Combine this problem with my anxiousness over an upcoming book release, and you get me cleaning the entire garage this week in order to restore some of my sanity. 🤪

This project pretty much could be called “how I put up 2 shelves,” but we made a cute little addition that other people might find useful too.


Supplies:

(As an advertising affiliate and Amazon Associate, I earn a small commission from qualifying purchases. But it doesn’t cost you anything extra and helps me keep up my site!)

Tools:

  • Drill or screwdriver
  • Wire cutters

Step 1: Hang shelves. I wanted 2 shelves with one low enough to be reached by the smallest kids. I had some metal wire shelves in my craft room that I didn’t use much, so I used those. If you have some like the kind I linked in my Supplies List, those come with their own braces/hardware and are easy to install.

Taking the braces, I found studs in our garage and screwed the braces into the studs. I did use a level to make sure the shelves would be level. It doesn’t really matter how far apart you place the braces, just as long as they’ll support the length of your shelf and attach from the underside, if you have that kind.

A close-up view of a metal shelf bracket attached to a wall, with a skateboard partially visible above it.
Braces screwed into studs.

Once the braces were on, I lay the metal shelves on top.

Two metal wire shelves mounted on a garage wall, ready for storage.
Shelves on.

I did use one of the little things that you nail on to secure the shelf against the wall. I imagine these shelves are going to be jostled quite a bit, so that seemed like a good idea. We wouldn’t want the shelves falling on kids.

A person's hand pointing to a metal wire shelf against a wall.
Attached to wall for security.

Step 2: Clean and decorate hanging flower baskets. Here’s the fun part. I had 2 spare hanging baskets, one for each of my girls. You could do several baskets in different sizes if you have more kids or a LOT of stuff to store. Basically, the idea was that the hanging baskets would let each girl have a way to load up what they wanted from the shelves to then take outside, and they could bring the baskets back inside and hang them up when done. It also gives them a way to claim those “special” things they don’t want to share.

Two hanging flower baskets on a countertop, one with a white plastic hook and the other with a metal hook, both intended for storage or decoration.
Baskets to clean.

After cleaning the baskets, I let the girls go nuts with my paint markers. I thought stickers would be a fun way to decorate, but for some reason they weren’t really into that. 🤷‍♀️ You could also write your kids’ names on the baskets or write what they’re supposed to hold. For us…we went for lots of color.

A decorated bucket with colorful drawings and a gumball machine sticker, hanging in a garage.
They humored me with one sticker 😆

Step 3: Make spaces for baskets to hang. My metal shelves had very narrow spaces, so I needed to make wider spaces for the basket hooks to hang from. Plus, I wanted the girls to know exactly where they should hang. So, I took wire cutters and easily enough snapped off one wire for each basket. These were on the front side of the shelf, not the main top.

Sidenote: Your shelves might have more spaces between the wires, but I still like making the space extra wide so the kids know to hang them in the same place. This keeps the baskets from hitting anything stored under the bottom shelf.

A person holding wire cutters near a metal wire shelf in a garage, with a toy scooter visible in the background.
Snipping wire to make space.

Step 4: Hang and fill! When the marker paint was dry, I hung the baskets in place. Then my girls helped me carry all their stuff to the garage, and we arranged their chalk and bubbles stuff on the lower shelf. Some bubbles specifically belonged to my 5-year-old, I was told, so those went straight in her basket. My 6-year-old’s rock collection went in hers. 😬

On the top shelf, I put some of our sports equipment and games. These are used less often right now, and since I usually play with these things with the girls, I’ll be there to get them down anyway. You could put the 2 shelves at the same level, but we had space under our kayak, so this worked. (Also, this top shelf could be placed even higher and used as a “husband shelf” with his own basket for golf balls or whatever…hypothetically…if your husband also needs help with organization. LOL)

A cluttered garage showing metal wire shelves filled with colorful toys, containers, and sports equipment, alongside two hanging flower baskets attached to the shelves. A scooter is positioned between the baskets, and various items are stored beneath.
AFTER: Shelves and baskets for outside toys.

Can’t wait for the neighbor kids to visit and try this out! After I get more smaller baskets, I might even make one for each kid, since there’s room to hang more.

And before you ask – yes, someday we will paint the garage. 😂


DIY Must-Have Lists

Click to see more!
Click to see more!
Click to see more!
Posted on — 2 Comments

DIY Doggie Door Insert

In. Out. In. Out.

Opening our sliding door for the dogs was starting to take up approximately 82% of our day, and my kids and I were sick of it. But those sliding door inserts with doggie doors in them are NOT cheap, so today I figured out how to make one myself. I had scrap wood, paint, and window screen, but all total this project would only have cost me $85 – certainly cheaper than the $175+ doors I’d shopped for!


Supplies:

(As an advertising affiliate and Amazon Associate, I earn a small commission from qualifying purchases. But it doesn’t cost you anything extra and helps me keep up my site!)

  • Doggie Door (ours was the XL, comes with screws)
  • Three 2x2s
  • Screen (cheapest to get a replacement kit like this one)
  • Paint
  • Staples
  • Scrap wood

Tools:

  • Tape measurer
  • Drill
  • Staple Gun
  • Miter saw (or something to cut the 2x2s)
BEFORE: Having to open the sliding door for our dogs.

Step 1: Measure for the doggie door insert. Since this doggie door was only about $56, I opted to buy this part rather than try to figure out how to make one from scratch. It worked perfectly, so I’m glad I saved myself the headache.

First, I measured for 2x2s that would attach across the top and bottom of the doggie door. I wanted my long side pieces to also attach tightly, so I pulled the wood in a bit to allow room for the side pieces to go all the way down. Starting at the bottom, I measured from the bottom corner screw hole to the other bottom screw hole. This was 14 inches. The same was true for the top – 14 inches.

Measuring for the top and bottom pieces.

I wanted a third piece at the very top of the whole insert, so I planned for another 14-inch piece there too.

As for how tall the insert would be, I noticed that my sliding door’s frame would perfectly fit the 2x2s inside the track at the top as well as along the side where the door would normally close. I had about an inch of depth inside the tracks, so I made the tall sides of my door insert a half inch shorter than the whole height from the bottom of the door to the top inside the track. This would let me install the whole insert by pushing the top piece up inside the track, then lower the bottom piece in place so the whole thing would sit on the bottom track but also stay in place at the top, just inside the tracks. As for the side, I could just slide it over into that track space where the slider normally closed. By doing this, the insert would be held in place at the top and along one whole side, and that would make it easy for the sliding door itself to gently hold the other side in place.

So, this height for the 2 sides needed to be 76.5 inches.

Step 2: Cut the wood. I cut three pieces of 2×2 down to 14 inches. Then I cut two more to 76.5 inches each. That was it!

Step 3: Paint. In all honesty, I didn’t paint the wood pieces until I had the whole thing assembled and the screen on, BUT it would be much easier to do now, before you have to worry about slobbing paint on the screen. 🤦‍♀️ I’ll save you that trouble by telling you to paint your wood pieces at this point rather than later.

Step 4: Place wood pieces around the doggie door and secure. This was SO much easier than I’d feared, and I did it all on my living room floor in about 15 minutes.

(Note: If you buy a doggie door like the one I used, be sure to remove the solid insert that normally would be used to “close” the opening. You might not be able to get it out once the whole doggie door frame is assembled. I completely discarded mine, since I’ll just take my constructed doggie door out of the doorway entirely when I don’t want the dogs to use it.)

Anyway, by pulling the two sides of the doggie door slightly apart, I could set the bottom piece, top piece, and side pieces in place evenly (where normally the doggie door would fit inside a normal door). My 2x2s wouldn’t fit all the way inside like a normal door because the screw hole things get in the way. But the 2x2s set inside enough to hold in place so that I could screw the two sides of the doggie door back together and the whole thing held tightly.

First, I held one hand pushing on the doggie door’s frame to be sure it held the bottom 14-inch 2×2 pinned in place, and then I screwed the bottom section of the doggie door together by using the screws provided.

Once the bottom was secured, I did the same along one side, again holding the frame tight to be sure the long 2×2 stayed in place. Most importantly, you want to be sure the corners at the bottom line up nicely. (See picture below.)

Screwing parts together with wood in place.

Once the bottom and one side were done, I took my second 14 inch piece and fit it along the top part of the doggie door. Pushing the frame down to hold this 2×2 in place, I pushed the last side piece in place as well, again making sure the bottom corners of the 2x2s were even. Then I screwed the doggie door’s top together, and that other side.

Doggie door with surrounding pieces on.

Lastly, I put the very top 14-inch piece in place and made sure the corners lined up with the ends of my long side pieces. Then I used my drill to screw in 1 screw at each end.

Insert frame assembled!

Top piece attached.

Step 5: Add a screen. We had a scrap screen door lying around that had never fit right over the door to our garage, so I cut off a section of that screen. If you need to buy screen, it’s fairly inexpensive to get a repair kit for a screen like the one I linked in my supplies list. You want to make sure your section of screen is a little bigger than the actual opening, so I measured for 53×16 inches and cut the screen down to that size.

With my frame lying back-side up (the side that will go outside), I positioned the screen over the open space of my frame. Then I used a staple gun to staple the screen edges into the wood frame. Pretty easy!

Screen stapled on.

After the screen was on, I took a few scrap pieces of wood and set them around the edges, over the staples, to really hold the screen in place and keep it secure. These wood pieces I nailed on with a few little nails. (You could also use wood glue, but I’m not that patient.) Just be sure not to place the wood too far to the outer edges, where they’d be in the way of the 2x2s fitting inside your door’s tracks. You could skip this step altogether, but I wanted to help my screen stay as secure as possible.

Back wood pieces covering screen staples.

Once my whole doggie door insert was assembled, I carried it to my open sliding door and lifted the top so it slid up a little into the top track, then I moved the insert to sit on the bottom of the doorframe, and finally I pushed it over to fit inside the track along the wall where the door would normally close. It stood in place pretty well like that all on its own, but with the sliding door closed against it, it was really secure.

My 5-year-old gave it a test run, and she reported that it worked great! 😂

Trial run.

That was it (after I painted 🤦‍♀️)! With the sliding door closed tight against the insert, it looks pretty even – like it belongs. And I’m really glad the insert stays put in the door’s track system even when we open the sliding door wider, because now we can still open the slider if we humans want to get outside too. I only remove the insert at night or when it’s raining and the dogs don’t want outside anyway.

AFTER: Doggie door insert – always ready!

I’m happy to report that the dog in the picture figured it out pretty quickly. Our younger mutt is less sure about this thing, but hopefully she’ll get the hang of it. 🤞


DIY Must-Have Lists

Click to see more!
Click to see more!
Click to see more!