All that to say, I ended up making a cool, modern barn door with wood pieces that continue on either side of the doorway to create an accent wall which our door blends into. AND, while I was on a roll, I painted our whole bedroom a moody “Royal Navy” that looks sharp with the red mahogany stain of the wood. …But this wall still needed something.

I’ve never been a huge fan of how our TV sticks out as the dominant feature in our bedroom, but now the darker walls and wood accent feature wall helped by making the rest more interesting. Still, I wanted something to further make the TV look like it belonged. That’s when I remembered something I’d pinned on Pinterest forever ago – a cool wooden frame that had a planter on the bottom. Plus, my husband had seen a mantle with a secret drawer for storage. BAM! These 2 inspirations gave me my next project.
There are a few things I would do differently were I to repeat this project, so I’ll give you those as I go. But basically, this was a relatively inexpensive and easy way to create a neat piece for my wall. (I already had all the materials except for the grass, so it cost me very little!) This faux-mantle planter ties in with my accent wall and door, but I’m sure it would look great under any TV on any wall.
Supplies:
(As an advertising affiliate and Amazon Associate, I earn a small commission from qualifying purchases. But it doesn’t cost you anything extra and helps me keep up my site!)
- Two boards of 8 ft, 1×6 wood
- 2 door hinges
- 4 L-brackets
- 1 Magnetic catch
- Stain (I used red mahogany)
- Fake grass (or any plants/flowers)
Step 1: Plan the size and cut wood. Our TV is 44 inches, so I decided to make my mantle 48 inches long. I had a 6-inch board already (which in wood terms is actually 5.5 inches), so I went with 5.5 inches tall and 5.5 deep to make things easier.
The main thought was to have the front piece be the only thing showing from the front, so this piece was the full 48 inches long.
For the side pieces, I needed them to be square to make it easier to fit all my 5.5 inch parts together, so I cut 2 little 5.5 inch x 5.5 inch squares.
For the bottom piece, I again used a board 5.5 inches wide, but this I cut slightly shorter than my front piece so that the side pieces would fit behind the front board. With my side pieces each 0.75 inch wide, this meant I cut my bottom board 46.5 inches long.
The top piece also needed to be 46.5 inches long, but this board I also cut to be only 5 inches wide. This would allow me to position the board forward so there was space in the back to run cords down from the TV into the storage space.
Sidenote: Were I to do this again, I would leave this top piece 5.5 inches and position it even farther forward to help hide the gap between the front board and the top board. More on that later.

Step 2: Stain. The weather was fortunately unseasonably warm during this time, so my stain dried quickly in my garage. I applied only one coat because it was plenty dark, and that’s all I did for my wall’s accent pieces anyway. (I wasn’t sure how much was going to show and so finished staining the insides of my mantle once my pieces were assembled, but you might as well do all parts of your boards at the same time now.)

Step 3: Assemble all except the front piece. I used my trusty brad gun and 1.5 inch nails. If you’re going to be storing heavier things in your mantle, you may want to use screws.
Side note: You’ll see in the pictures that I used plywood for the top and bottom boards. This was because I had a lot of plywood laying around and figured these edges wouldn’t be seen much anyway. But to make the whole thing look nicer, I would use the same 1×6 wood if I was doing it again. The real wood board looks nicer!
First I put down the bottom board on scrap wood pieces to hold it a bit off the floor and level. Then I took one end piece and lined it up, making sure it was square. Holding it in place, I quickly nailed the side onto the bottom. Then I repeated this on the other end.

Next, I turned the whole thing on it’s side and figured out how far down I wanted the top piece. You can do this however you like, but my goal was to lower the top piece so that it would sit behind the front board and lower than the side pieces to look like the positioning of “dirt” in a planter. I ended up going about an inch down – that was enough to achieve my desired look and also left enough room inside my storage area for the power strip and cords I needed to fit. To hold this in place, I discovered that my level plus a spare board worked great as a spacer. 🤷♀️ Then I held the top board and nailed it in place.
Keep in mind that you want a gap between the back wall and this top board so that cords from the TV can hang down into it where you’ll have a power strip. And, I wish I’d positioned the board a bit forward, about 0.75 inches, so that it would fill the gap I’d create later when attaching my front piece. To do all that, I could have placed a spare 1×6 board on the floor under the top piece, which would have held the top board up, making it stick out on the front side. Not a huge deal, but something to consider. If you use a 5-inch board like I did, you’ll still get that gap for the cords in the back that you need.

Step 4: Make holes for cords and fake plants. With this all together, I found center and cut out a decently sized hole in the back of the bottom board so that my power strip’s cord would be able to fit through. (I literally used my power strip’s plug and tested how big of a hole to cut.)
Next I counted out my fake grass pieces and spaced them evenly along my board. I decided on making the 12 plants 3.5 inches apart, so I marked every 3.5 inches on the top board. Then I took my 0.5 inch drill bit and drilled holes at each mark. It will make a mess, as you can see. But I wanted to drill these holes with the whole thing assembled to be sure of my positioning. This is also when I finished staining my pieces, but at the very least you want to stain these holes now too.

Now is also when you want to measure how tall this will all be with the plants in place. I wanted the tops of the grass to barely meet the TV. My whole height was about 10 inches. This meant I needed to be sure my mantle was attached 10 inches down from the bottom of my TV.

Step 5: Attach to the wall. My whole creation was pretty light, so I used 2.5 inch L-brackets screwed into studs to hang my mantle. (If yours is bigger or heavier, use bigger L-brackets.) I first used my level and drew a line 48 inches long, centered under the TV, 10 inches down from the TV. I used a stud finder and marked my studs along this line, making sure they were in good position to support my mantle as evenly as possible. Then I simply screwed the brackets into the studs. I used my level across the brackets to double-check, and it was 👍.

Holding the mantle in place over my line, I grabbed the remaining screws and secured the mantle’s underside to the brackets.

That might have been good enough, but I had another pair of L-brackets and so screwed them sideways into the mantle’s interior sides and the back wall. This felt more secure to me, giving some added support. Again, I used small L-brackets. If yours are bigger, you might not need these on the inside.
Step 6: Attach the front piece by hinges. I’ve seen people use cabinet door hinges to achieve this, but I didn’t want to router holes, plus I had spare, regular door hinges from other door upgrades. I placed a hinge on either end of the bottom board, made sure they were positioned to swing open and shut without problems, and screwed them in. (It would’ve been great to have matching screws, but I couldn’t find any. I’ll replace them at some point… Don’t judge me. 🤣)
On the backside of my front piece, I would need to attach 2 small, scrap pieces of my 1×6 to act as shims where the hinges would attach. These are needed so that the front piece can swing open in the correct position to cover the bottom board.

To make this easier, I first screwed these scrap pieces onto the hinges to make certain they would be in the right spot. Then I held the front piece in place under these hinges, making certain the board was equally spaced at each end and ALSO went about a half inch under the bottom board. Holding the front piece up with my knee, I quickly screwed one hinge and shim down into the back of the front piece. Then I could hold the board more easily and make sure of my positioning before screwing on the hinge and shim at the other end.

Step 7: Attach fillers. Because of how the hinge spacing works, there will be a bit of a gap between the side pieces and the front board as well as the side pieces and the top board (unless you positioned the top board more forward as described above). You need this gap at the bottom so the front piece can swing down. But if the gap bothers you along the sides, you can nail on some narrow 1×6 pieces on the side pieces. I also shoved a small 1×6 piece into the center of my mantle’s interior to act as a middle support, so the 2 pieces at the ends and the one in the middle actually end up looking like they belong when it’s all open. I like that it looks more “framed” this way too. Just be sure your end filler pieces don’t get in the way of the hinges’ shim pieces when the front closes. (And if your top board sticks out, simply put these filler pieces lower, under the top piece.)

Step 8: Install the magnetic catch. I initially thought I would have to use 2 of these – 1 at each end – but it turned out that only 1 was needed because it’s strong enough to hold the weight of the door/front piece. I placed the main part of the catch along the side of one of my end fillers, made sure the door still closed all the way, lowered the door back down, and then screwed the metal catch in place. With the metal strip in place on the catch, I used a pencil and marked where its holes should go on the door/front piece. Then I lowered the door back down and screwed on the metal strip. (Again, if your top piece is forward, just install the magnetic catch lower.

That’s it for building the mantle!
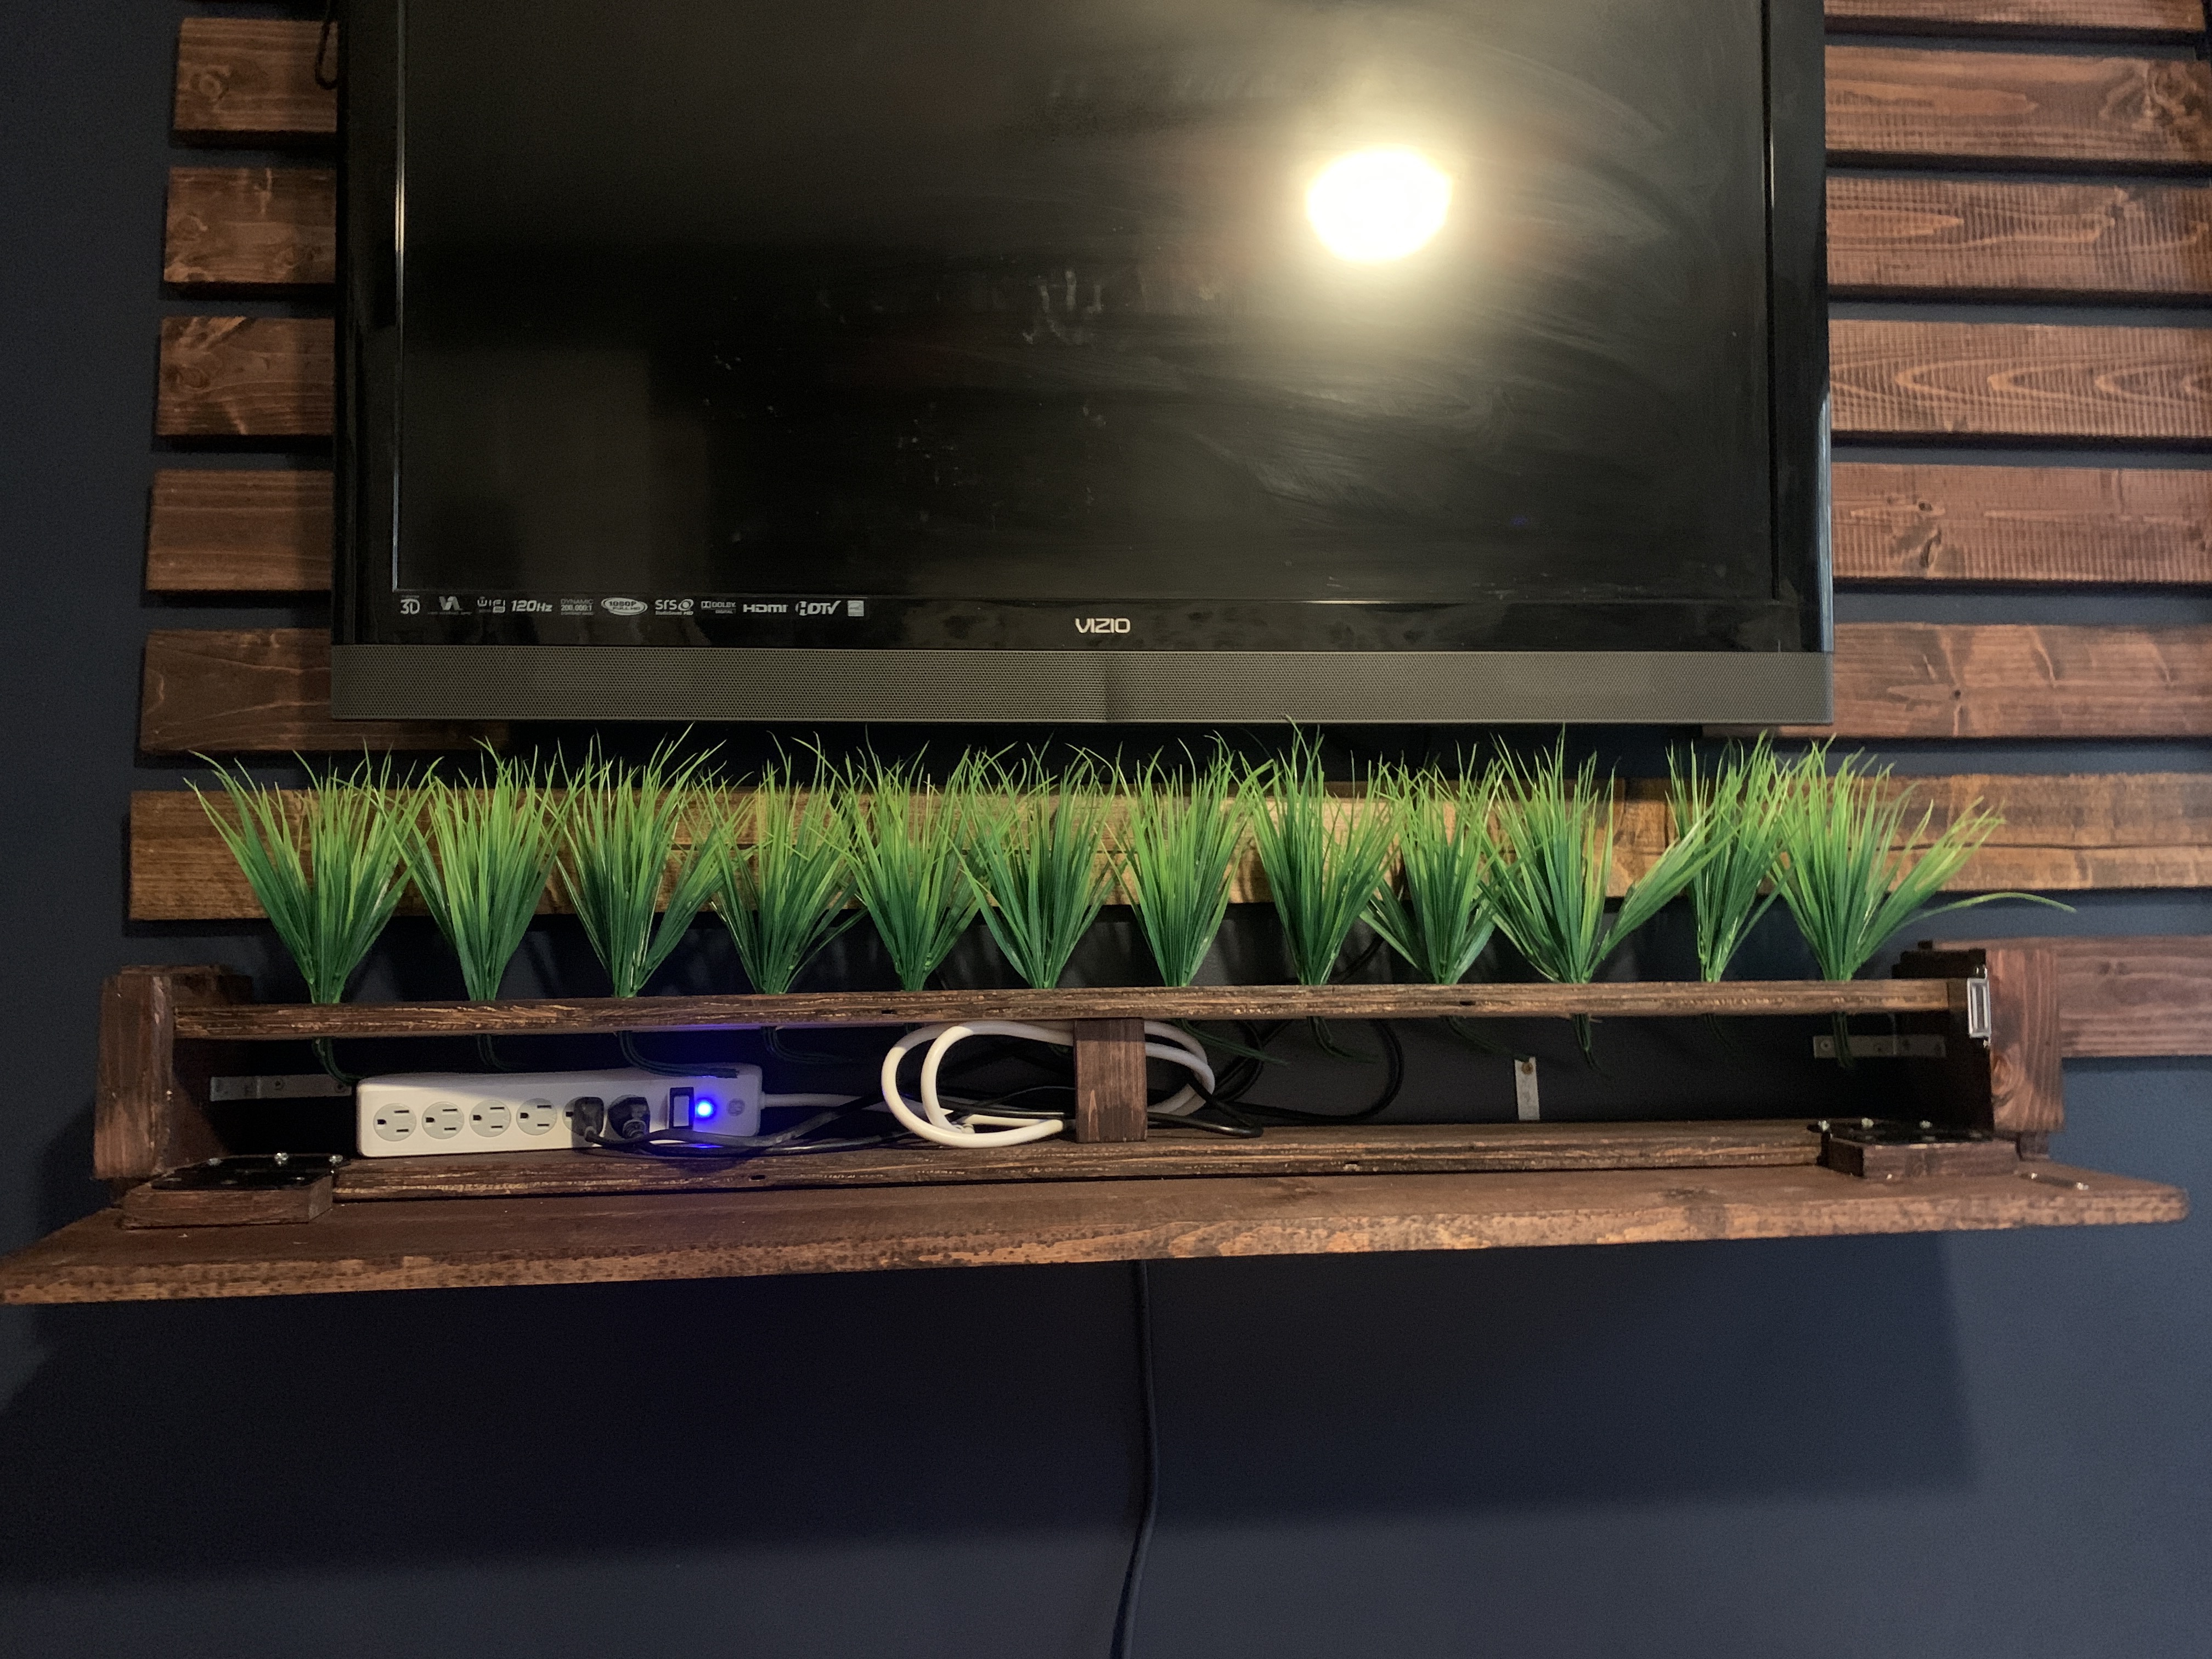
Step 9: Add the cords and plants! I put my power strip in place inside the mantle and fed its cord down through the hole I’d cut in the bottom board to plug into the wall. Then I took the TV cords and lowered them down into the mantle through the top board’s space behind the plants. Plugging the cords in, I wound up the extra slack and tucked it behind my little center support. It all stayed very nicely, and there’s still plenty of room for remotes or other electronics in there.
Finally, in went the greenery. I cut my stems down a bit to fit, plus I bent what was left of the stems to help them stay put. Then I simply stuck them into the holes I’d drilled, shoving them down so they wouldn’t wobble around and so I could fluff out the grass a bit.

All done! I really like how this turned out. (I might’ve done a few things differently, but now you know how to do it better. LOL) It doesn’t stick out too far from the wall but draws attention away from the TV, it adds a nice “organic” touch to a dark wall, and it’s a great way to hide our TV cords. Plus, who knows what else I can hide in there?!

DIY Must-Have Lists


Love this idea! Nice design and execution! Thanks for the inspiration.
Thanks 😊