Posted on Leave a comment

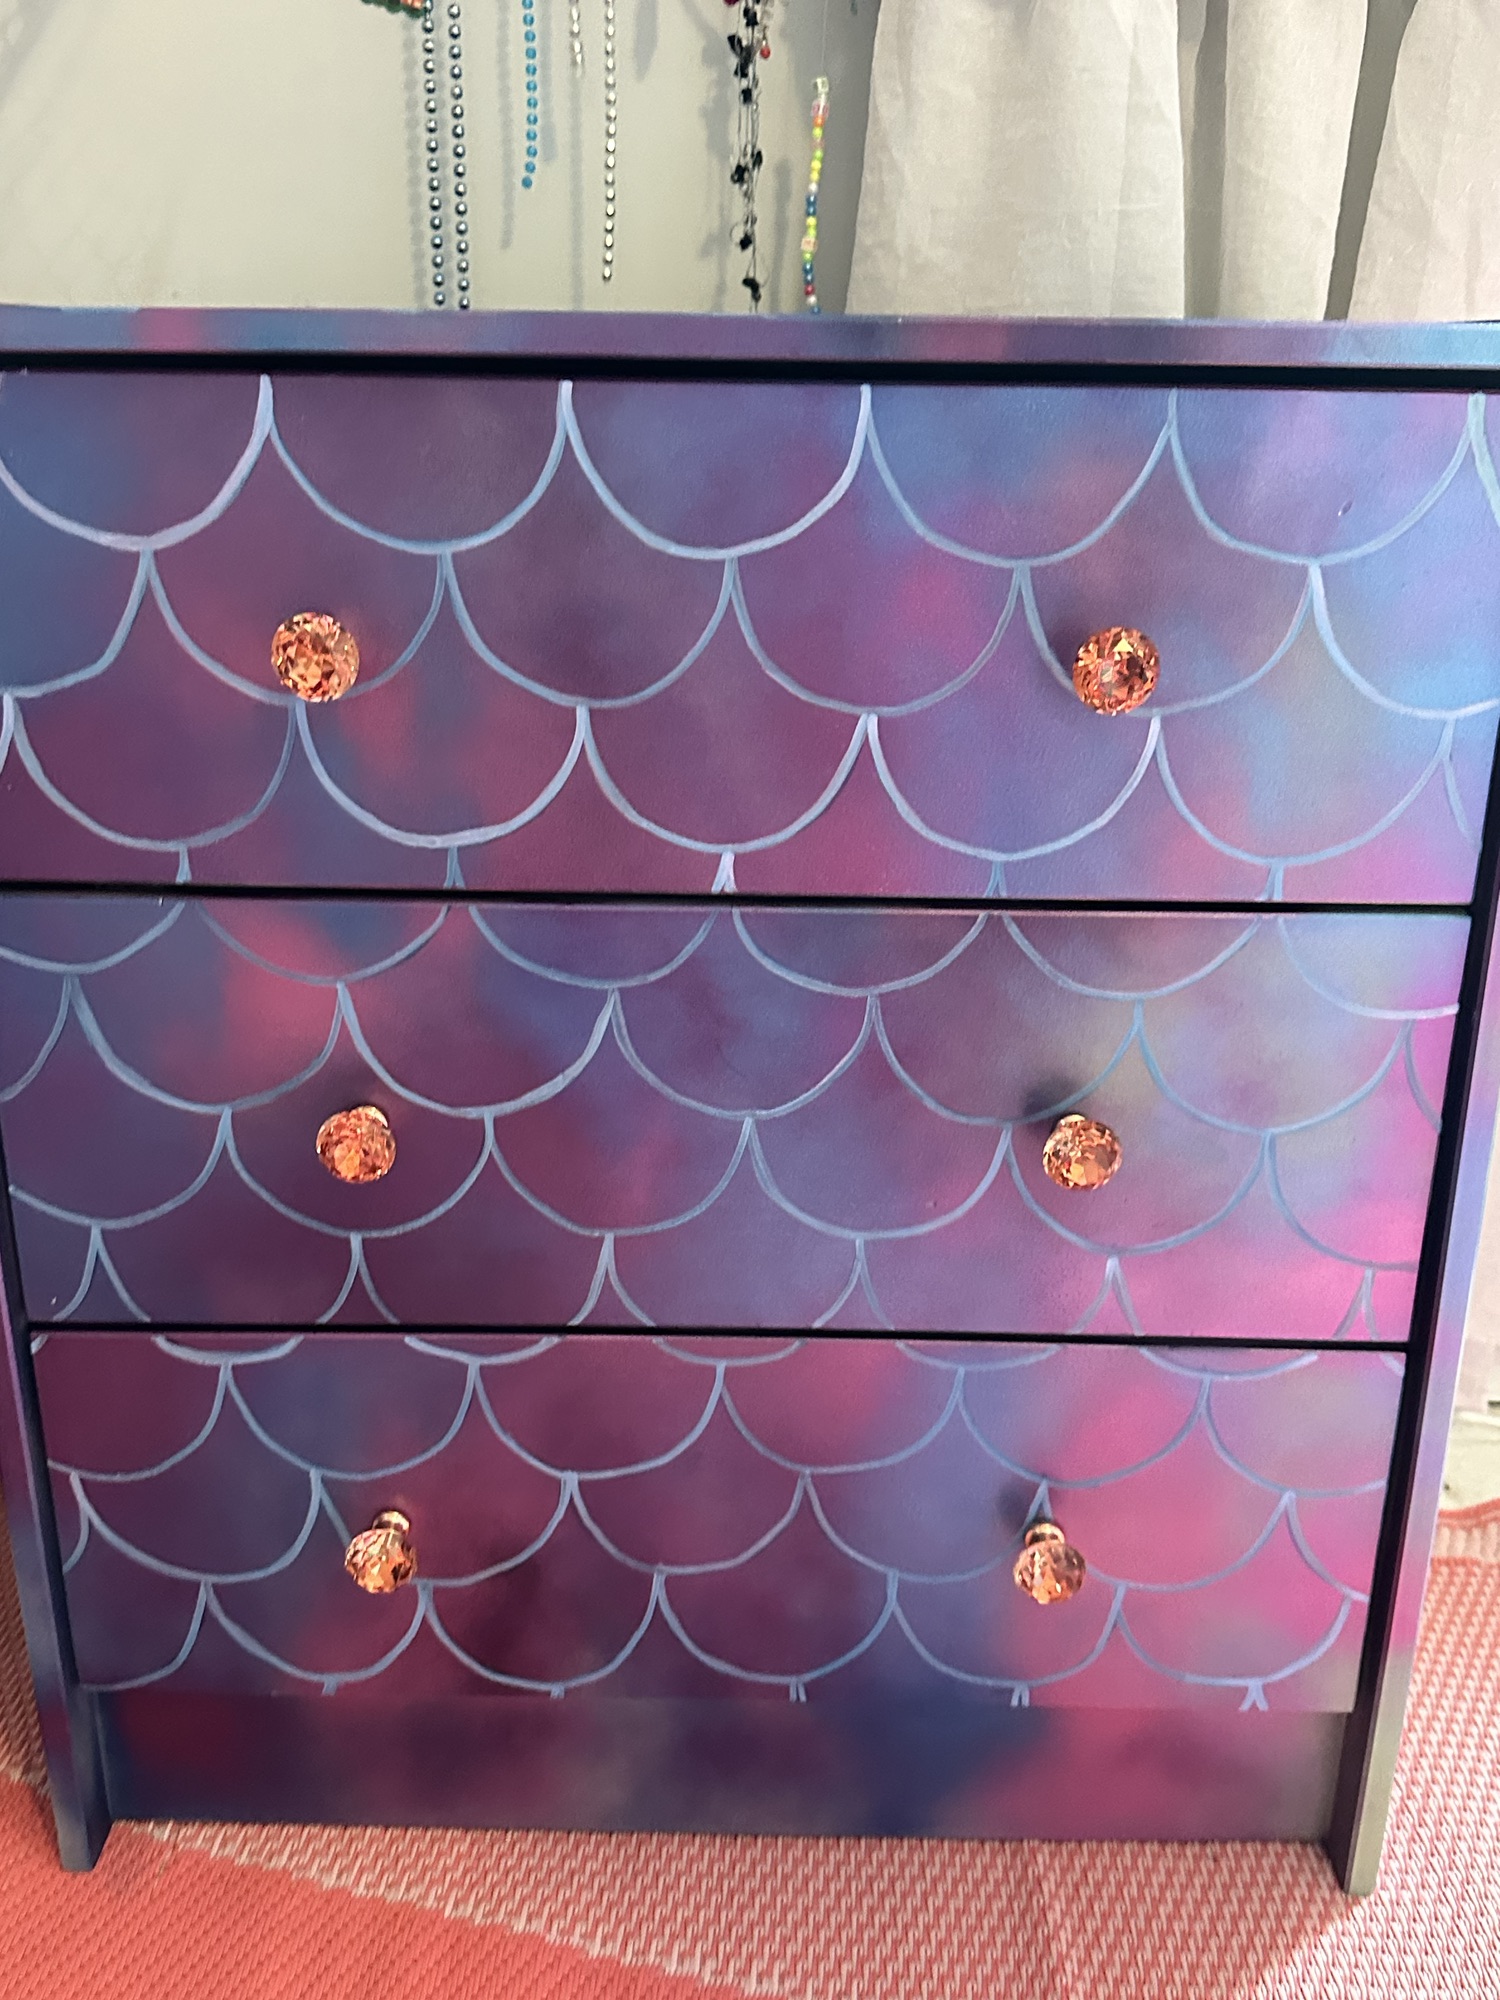
Mermaid Dresser

Much to my surprise, my five-year-old held up her part of our deal to clean up after herself for over a month, and now she’s earned a room makeover. Her theme? “Under the Sea.” We have spent a good deal of time looking up very elaborate options, but my first project was easy enough to tackle before really diving in deep.

When she was a baby, we bought a few dressers from IKEA and stained them… By that, I mean my husband and father-in-law stained them without supervision, and now they are grey instead of white. Now, finally it was time to fix them up so they’re more little girl-friendly!

BEFORE: Plain dresser.

Supplies:

(As an advertising affiliate and Amazon Associate, I earn a small commission from qualifying purchases. But it doesn’t cost you anything extra and helps me keep up my site!)

  • Old dresser
  • Spray paints (I used 2 metallic spray paints and 2 flat spray paints)
  • something round for tracing
  • paint pens

Step 1: Clean and prep. I thought I might have to sand the dressers, but they still felt like they’d take paint just fine despite the stain. I did wipe them down pretty well just to make sure I wouldn’t be painting over any dust/gunk. Depending on the finish of your dresser, you may need to sand and/or remove old paint.

Step 2: Spray paint. I wanted the mermaid scales to look a bit iridescent, so I made sure my dark blue and dark purple were metallic spray paints for a sparkly finish. I also used a pink paint and a light green paint for undertones.

I wanted the colors to flow and look right as one “painting” over the whole dresser, so I left the drawers in the dresser as I spray painted.

Starting with the undertones, I sprayed on the green paint first, making sections here and there that I could blend with the other colors.

Starting with the green undertone.

Then I did the pink over other sections.

Adding pink.

For the dark blue, I again sprayed it on its own sections, but I also lightly went over the green to blend the two colors.

Adding blue.

I did the same with the purple, going over the sections that remained and then also lightly going over the pink.

Adding purple.

I did this for the top and sides of the dresser as well as the drawer fronts. I also then pulled the drawers out a little bit to spray a little color on the drawer edges.

That done, I let the paint dry. While staring at this dresser, I decided that I wanted the other, larger dresser to kind of match this one without being too matchy-matchy. So, I hauled out the drawers and spray painted the fronts of the drawers the same way I’d done the whole other dresser.

Spray painting done.

Step 3: Trace mermaid scales. After carrying the dresser and the drawers back to my daughter’s room, I tried to decide how big I wanted the scales to be. I settled on a coaster for my template, but you could use anything round that you can trace.

Starting at the top of the top drawer, I found the middle and held the coaster so that about half of it made the rounded bottom of my first scale. First, I marked on the coaster where each side started my tracing – this helped me be sure from then on that I was making the same size scales. I then traced this bottom portion of the coaster with a blue marker – which ended up being a lucky choice that gave me a cool end result. I went all along the top of that first drawer and made evenly placed “scales” for the first row.

Marking my coaster to trace.

Moving to beneath this first row, I lined up my coaster’s lines on the sides so that this next scale was centered under where the above two scales met. (Basically, stagger the scales.) Again, I traced scales all along this second row.

I repeated this all down my dresser drawers, continuing the scales on the bottom of one drawer onto the top of the lower drawer so it all flowed together.

Making scales.

I then did the top because my daughter wanted “scales all over!” Next came the sides of the dresser.

Scales all traced on.

Step 4: Paint over the traced lines. Honestly, just the traced marker lines looked pretty cool, though they were a little too subtle for my daughter’s taste. So, I took a paint pen and traced over all my lines.

(I let the girls do the top of the dresser, although I was twitching and grimacing the whole time. 😬)

Little helpers.

I used a pinkish-purple paint pen, and the blue marker lines bled into the paint to give it a really cool, shifting hue as I went. This was totally by accident, but it ended up looking pretty.

Painting over the lines.

The nice thing about the paint pen I used was that I could wipe it away if I messed up, though I had to be quick before it dried. For the top that the girls worked on…Well, they’ll always be able to see where they helped. 😆

Scales on!

Step 5: Finishing touches. You could alternate painting the lines in different colors to give a more varied look, but I liked how mine turned out. I worried that I would need to put a clear coat of polyurethane over the dresser to protect the scales from scratching off, but I’d been right that the paint adhered to the stained (or semi-stained, let’s be honest) finish on the wood. IF you need a clear coat, now’s the time.

Deciding I was done, my daughter and I put on the shiny little drawer pulls, and that was it!

AFTER: Dresser with mermaid scales!

For the big dresser with the painted drawer fronts, we added these same drawer pulls as well. I agreed with her that putting scales on these drawers would have been too much, but the two dressers tie together nicely without being overwhelmingly mermaid-y.

Bigger dresser painted without scales.

Now I just have to figure out what “Under the Sea” mural to paint on one wall. And how to build an underwater cave. And how to make a sunken pirate ship bed. Wish me luck! 😜


DIY Must-Have Lists

Click to see more!
Click to see more!
Click to see more!
Posted on 1 Comment

Vase Makeover

Since people enjoyed the last DIY glass vase makeover I did, here’s another way to change the look of a vase! My aunt gave me this whopper of a vase, and I immediately knew what I wanted to do with it. I’ve used this same method on smaller vases and pots before, so I can say pretty safely this works on a number of different shapes, materials, and sizes if you have a container that you want to revamp.

The best part – it’s so easy and costs under $20!

Before: Vase in need of a revamp.

Supplies:

(As an advertising affiliate and Amazon Associate, I earn a small commission from qualifying purchases. But it doesn’t cost you anything extra and helps me keep up my site!)

  • Old vase or pot or any container
  • Drywall joint compound/spackling
  • Paint

Step 1: Smear on spackling. I used quick-drying spackling, the kind that is pink and dries white. I like the texture of that kind because it’s not too wet or runny. You can use your bare hands or gloved hands or, like I did just for the sake of trying it, a baggie over the hand that you use to smear on the spackling.

Applying spackling.

It doesn’t matter whether you start at the top, bottom, side – wherever you want is fine. I took a handful at a time and just smeared it on and around the vase, leaving texture rather than making it too smooth. This gives a kind of pottery look and feel to the vase. You don’t even have to cover every inch of the vase if you want to make swirls, lines, or whatever look you come up with! I also considered running the spackling vertically along the bottom sections while keeping it smeared around the top, just to add some visual interest. This stuff is pretty easy to manipulate, so you could do lots of different designs.

I gave my spackling overnight to dry just to be sure, especially since it was very humid outside at the time.

Spackling drying.

Step 2: Paint. If you like the color and the look of leaving the spackling as it is once it’s dry, that’s cool too, and I’ve done that before as well. But, if you don’t use a paint or some kind of sealer, the spackling can flake off easier and is really vulnerable if it gets wet at all. If you have a container that is never going to be touched, though, the look of the naturally dried spackling is pretty.

Since my vase would be set on the floor (and because we have dogs and children), I chose to paint over my textured, covered base. This helped seal the spackling so it wasn’t as chalky feeling, and it helped me cover some areas where I’d applied the spackling too thin. I used some leftover paint that’s the same color as the top part of my dining room walls, but I’m pretty sure any paint would work fine. I’ve used those cheap little acrylic paints on this spackling before, and that works great too.

I had a helper for this painting step, but it didn’t take us too long. We only needed one snack break.😆

Painting with my helper.

I used a small craft brush to really get the paint in between the grooves I’d created when wiping the spackling on with my baggie-covered fingers. The spackling really soaks in the paint and gives a kind of natural matte finish unless you paint a second coat to get more shine from your paint. The spackling also soaks in the paint so that it dries really quickly, which was nice so I could set it in place almost right away.

Painted and drying.

That was it! So easy, and the end result looks really cool.

AFTER: Vase makeover complete!

Options: You could also paint the vase in several different colors, like an ombré effect or stripes or abstract shapes – anything goes! I wanted my vase to be simple, bright, and fairly minimalistic in color so that the texture really popped, so I went with a very light blue that’s almost white (the same color as the top part of my dining room walls).

Another thing I thought of was the option to add on beads during the process of applying the spackling. Again, I wanted to keep my base pretty simple, but it would look really cool to press a string of beads into thicker sections of spackling, then paint over the whole thing to give it more detail, similar to what I did on my bathroom walls (which I love, and I know it would look cool on a vase too.)

What other options can you think of? I’m sure I’ll do more vases like this in the future, and I’m curious to see how different options could turn out!


DIY Must-Have Lists

Click to see more!
Click to see more!
Click to see more!
Posted on Leave a comment

Faux Stained Glass Vase

For our wedding, I purposefully bought tall glass vases as centerpieces, planning to later use them for decorating our home(s) for years to come. Fast forward, and now I’m looking around at them and wondering how to change up the look they’ve had ever since. Several have homemade candles in them and so I want them to remain clear, but for a few I wanted to find a way to add some color and/or texture.

Since this one was sitting in our dining room beside a stained glass lamp, I figured I’d give it a go and make the vase look like stained glass. I’d done this before to the glass cabinet doors in our pantry, and I hoped it would work on a vase. Spoiler – it works great! You could do this on any glass vase, no matter the shape, too, so I’m sure there are many, many cool looks you could create using this method.

BEFORE: Plain glass vase.

Supplies:

(As an advertising affiliate and Amazon Associate, I earn a small commission from qualifying purchases. But it doesn’t cost you anything extra and helps me keep up my site!)

Step 1: Clean the glass. My vase was very dusty and had smudges from little fingers, so I first cleaned the inside and outside of the vase really well. The last thing you want is gunk stuck on as you’re painting!

Cleaned and ready!

Step 2: Paint the colors. I had absolutely zero plan for what I was painting, and I ended up going pretty abstract but also making flowery shapes. You could copy a pattern and colors you like, or you could plan out shapes first. There are all kinds of cool stained glass pictures you can find online to replicate!

I used a normal crafting brush, a little lid for squirting out the paint, and the glass paint itself. If you want the colors to be really strong, you might want to let it dry and do another coat, or do it pretty thick as you go. I only painted on one quick coat, and I let it be stronger in some places and more transparent in others.

Painting the colors.

Don’t worry if you think your painting doesn’t look too great at first. Once you put the liquid leading on, it really pops! I also didn’t worry too much about having straight or smooth edges, since I would be going over everything with outlines.

I let this dry a few hours just to be safe (and because I got busy doing other things), but it dries pretty quickly.

Paint on.

Step 3: Apply liquid leading as outlines. If you’ve never worked with this stuff, it’s a bit like puffy paint that ends up looking like the lead on stained glass. It has a sticky consistency that dries pretty quickly, and it leaves a painting with a cool 3D effect.

I was worried at first that this would run down the vase or drip as I went, so at first I turned my vase on its side and applied it that way. But once I had to do the other side, I stood the vase up again and had no problem applying it that way. It does take a second to get used to how much you squeeze out as you go, but it’s pretty easy.

After a while, the spout may get clogged and make it harder to get any out smoothly, so just take a second and clear the tip from time to time.

Outlining with liquid lead.

I outlined between my different colors and also added some lines between the shapes where I could see different brushstrokes.

The liquid leading does look a bit grey as it comes out, but it dries nice and dark – black like lead.

Liquid lead drying.

See how beautiful that is with light coming through?!

That is it! I set the vase in place and let it dry. I’m really happy with how this turned out, and of course now I’m eyeing the rest of the vases and wondering how many more I should do. 😉

AFTER: Stained glass vase!


DIY Must-Have Lists

Click to see more!
Click to see more!
Click to see more!
Posted on Leave a comment

Hydro Dipped Easter Eggs

This week, I felt like I’d been a bad mom lately and so decided to spend time with my girls coloring Easter eggs. We started the good-old way with baking soda, food coloring, and vinegar. But after poking and draining about six eggs to color the shells, I’d kind of had enough of that and tried to think of a way to decorate the bagful of plastic eggs we had lying around.

Fun way, but…too much 😆

I’ve wanted to hydro-dip…something (anything really) for a while, and it seemed like painting Easter eggs this way might be kinda cool. So, after a quick trip to Michael’s yesterday, we had all the spray paint colors we could think of and were ready to go.

Is this a particularly kid-friendly art project? Not really. LOL. But my girls were surprisingly helpful and did a great job – the key to my success lies entirely in the plastic gloves I made them wear.

BEFORE: Normal plastic Easter eggs.

Step 1: Spray on a base layer. In order for hydro dipping to really work, I’m told you need a base layer of paint for the spray paint to stick to. So, I took my bag of plastic eggs and popped them apart so they’d sit flat. Then I took a plain white spray paint and sprayed all over the eggs to get a good coat on. I went with white because I figured that would help them look the most “realistic” as eggs when finished.

Supplies:

(As an advertising affiliate and Amazon Associate, I earn a small commission from qualifying purchases. But it doesn’t cost you anything extra and helps me keep up my site!)

  • Plastic easter eggs
  • Spray paints
  • Gloves
  • Cup or other container
Base coat on.

Step 2: Prep for painting. Once the base coat was dry (I gave mine about 4 hours), I snapped all the eggs back together and took them in a basket out to my deck. This seemed like the best place to do this at the time simply because I wanted good ventilation while working with the girls.

Eggs ready to go!

It’s important to have everything ready to go because the paint will dry pretty quickly in the water, so you want your eggs right there when you start. I made sure to shake up all of my spray paint cans really well too. Because I wanted to dry the eggs inside (it was a windy day), I lay a silicone baking sheet and a few paper towels on the kitchen counter to be ready. And perhaps most importantly, we made sure we had gloves in place.

Cup and gloves ready!

Step 3: Hydro dip! I used a solo cup because I figured the eggs didn’t need a lot of room to dunk them, but you could use a spare Tupperware container or an old whipped cream container or something else entirely. Really, it just has to be a container that’s deep enough to submerge the egg.

I filled my cup a little over 3/4 full of water, then took it to the deck. My girls stood ready with an egg each, and then I began spraying the paint into the cup. I made sure to spray in the center of the cup each time, and I held the can about 6 inches above the cup as I sprayed so it didn’t shoot everywhere. It only took little bursts at a time to get enough paint into the cup to cover the surface.

We found that we really liked the metallic spray paints, and the blue and purple covered the surface really well. I alternated my combinations of colors, and really there was no bad way to go.

Paint ready.

Each time, when I had enough paint to cover the surface, the girls would slowly lower a plastic egg down through the paint. Sometimes we’d have to turn the egg over and do the other side again, but this was no problem because the paint on the egg adheres REALLY fast, so it doesn’t drip or anything. For a few eggs, we also found that setting them to float on the surface and then just rolling them also pulled the paint to cover the eggs, though this took a little longer.

Dipping an egg.

We did about 30 eggs in 45 minutes, so it went pretty quickly. I never had to refill the water, and I never bothered cleaning the cup because the paint you don’t use moves to the edges anyway. The girls had a lot of fun dunking the eggs, shaking off the water, and then running them inside to sit and dry. Our gloves got messy, and I was worried about the paint pulling off the eggs as we set them down, but that turned out to not be an issue because of how fast the paint sets.

I will say that my eggs had little holes at the tops and bottoms, so that helped to drain any water that got inside. Once they were all on the paper towel to dry, I did give them a few hours before using them to decorate.

Eggs drying.

Now we have cool eggs that I can use again next year too! And they were so easy, I’m sure we’ll make more again. 🙂

AFTER: Awesome Easter eggs!


DIY Must-Have Lists

Click to see more!
Click to see more!
Click to see more!
Posted on 1 Comment

The Easiest Poster Frame You’ll Ever Make

Today in my workshop/craft room, I found 2 posters rolled in a tube that I’d completely forgotten about! Did I have any frames lying around? No. 😜 But since I’m in a Spring mood and want to change up our decor a bit, I decided I wanted to hang one of these on the blank wall of our basement stairwell. But what to do for a frame?

BEFORE: Blank wall…

I did not want anything heavy. Certain little people like to jump down the stairs to the top landing, and the wall regularly gets slammed. A heavy frame (lord forbid with glass) would be an accident waiting to happen. Really, I didn’t even want anything that would hang normally because the inevitable body slams would most likely knock anything loose. Plus, I’m pretty sure there’s an air duct behind that wall, so nails wouldn’t even really support a hanging frame.

I really, really didn’t want one of those plastic poster frames that works great in a college apartment and/or bachelor pad.

I also wanted to spend $0.

Since I had a bunch of “ugly” scrap 1x2s that were 8-ft long and at least straight, I figured I could make a rustic wooden frame and hang the poster using command strips, then use command strips for the frame over that.

BEFORE: Scruffy 1x2s.

I’ve done something kind of similar in the past where I attached a wallpaper mural directly onto the wall and then nailed decorative 1x2s onto the wall to act as a frame. I LOVE how that works, but this time I wanted something a little more flexible where I could change the poster easily if I wanted without dismantling the frame. My new way would also mean zero damage to the wall.

Supplies:

(As an advertising affiliate and Amazon Associate, I earn a small commission from qualifying purchases. But it doesn’t cost you anything extra and helps me keep up my site!)

Step 1: Measure and cut wood frame pieces. My posters were 24×36. I decided to measure so that the posters would fit about halfway under the frame, like the frames would overlap the sides a bit to cover the edges.

I took my scruffy wood and cut one end at a 45-degree angle on my miter saw. Then I measured from the short side of that angled cut and measured out 35 inches. At this mark, I again cut a 45-degree angle – MAKING SURE the shorter side of that cut was at the 35 inch mark, and also making sure the short sides were on the same side of the wood piece. (These will be inside corners.)

First piece cut at 45 degrees.

Once I had this one long piece cut, I didn’t bother measuring the other long piece but simply held this cut piece over the one I needed to cut, then cut my second piece that exact same size, with the exact same angles.

For the shorter pieces, I measured to 23 inches for the inside, shorter sides of my 45-degree cuts. I again cut one piece of wood to this size, then held it over my second piece of wood and cut the second piece without bothering to measure.

Once these were all cut, I made sure my corners were square by laying the pieces arranged like a frame on the floor. I happened to have 2 T-squares, so that made it easy. If you have anything square, you can just set these in the corners to check that everything lines up.

Testing square corners.

Side note: If you don’t have a miter saw, you can use a little hand saw to cut your angles. The 1x2s are nice, soft wood (pine, I think) and easy to cut by hand if you have to.

Step 2: Rough up and sand (optional). To make my wood extra rustic, I took my multitool and cut off chunks from the front of the wood pieces. You could use a little handsaw too, or a chisel.

Cutting off rough chunks.

Once I had rough parts all over the wood pieces, I took my sander and smoothed down all the jagged spots.

Side note: You don’t have to add these rough touches, but it worked for the rustic look I wanted. You could just stain like normal or paint nice, smooth frames too.

Step 3: Stain. I first used a really dark walnut stain and wiped it over the really rough parts that I’d cut out of the wood pieces. This helped to make these spots look extra rustic and aged, almost like “live edge” pieces.

Adding aged, rustic touches.

Once those dark spots were stained, I took a slightly lighter stain and brushed that all over the wood pieces. I didn’t bother with the backsides that would be against the wall anyway.

Stain on.

Step 4: Assemble the frame. When all the stain was dry (I gave it 4 hours), I lightly wiped it with a cloth just to make sure none of it came off. Then, I set all my pieces in position on my work table. I made sure all my corners were square and that all my 45-degree ends lined up nice and flush against each other.

I considered using wood glue for about 30 seconds before just grabbing Brad (my nail gun). You could use wood glue if you can clamp your corners together well enough while the glue dries, but I’d be more comfortable nailing in a few little nails through the corners too. Or, you could use little L-brackets and screw them into the backsides to connect the corners.

Prepping to assemble.

Using my nail gun, I put 2 nail in each corner to hold the 2 pieces together. I worked my way around the frame, making sure to keep everything square.

That was it for building the frame!

Step 5: Hang the poster, then the frame. It drives me crazy when I don’t hang something level, so I grabbed a level and quickly drew a line along the wall where I wanted the top of my poster to go.

Taking a few command strips, I cut them in half and used the smaller pieces on each of the 4 corners to hang the poster. (Using the full strips seemed like overkill for a light poster.) I made sure to hold the top of the poster along my level line, then pressed the command strips onto the wall to hang the poster.

Poster stuck on.

That done, I put a full-sized command strip at the very top of the two top corners of the frame. Then I held the frame up and made sure it covered each edge of the poster before pressing the command strips in place. (You could also nail this in place if you want added security.)

Done!

AFTER: Easy rustic poster frame!

This was such an easy project that I wasn’t sure whether to even post about it, but a few people have asked how to do an easy picture frame, and this is certainly that! You could make these in any custom size you need if you’ve got an abnormal poster size. And you could use any stain or paint you like, of course. I really like the rustic look I achieved (see how the shadows are cool?), and I think it’ll tie in nicely to wood I plan to use elsewhere later!


DIY Must-Have Lists

Click to see more!
Click to see more!
Click to see more!