Posted on Leave a comment

On-The-Wall Headboard

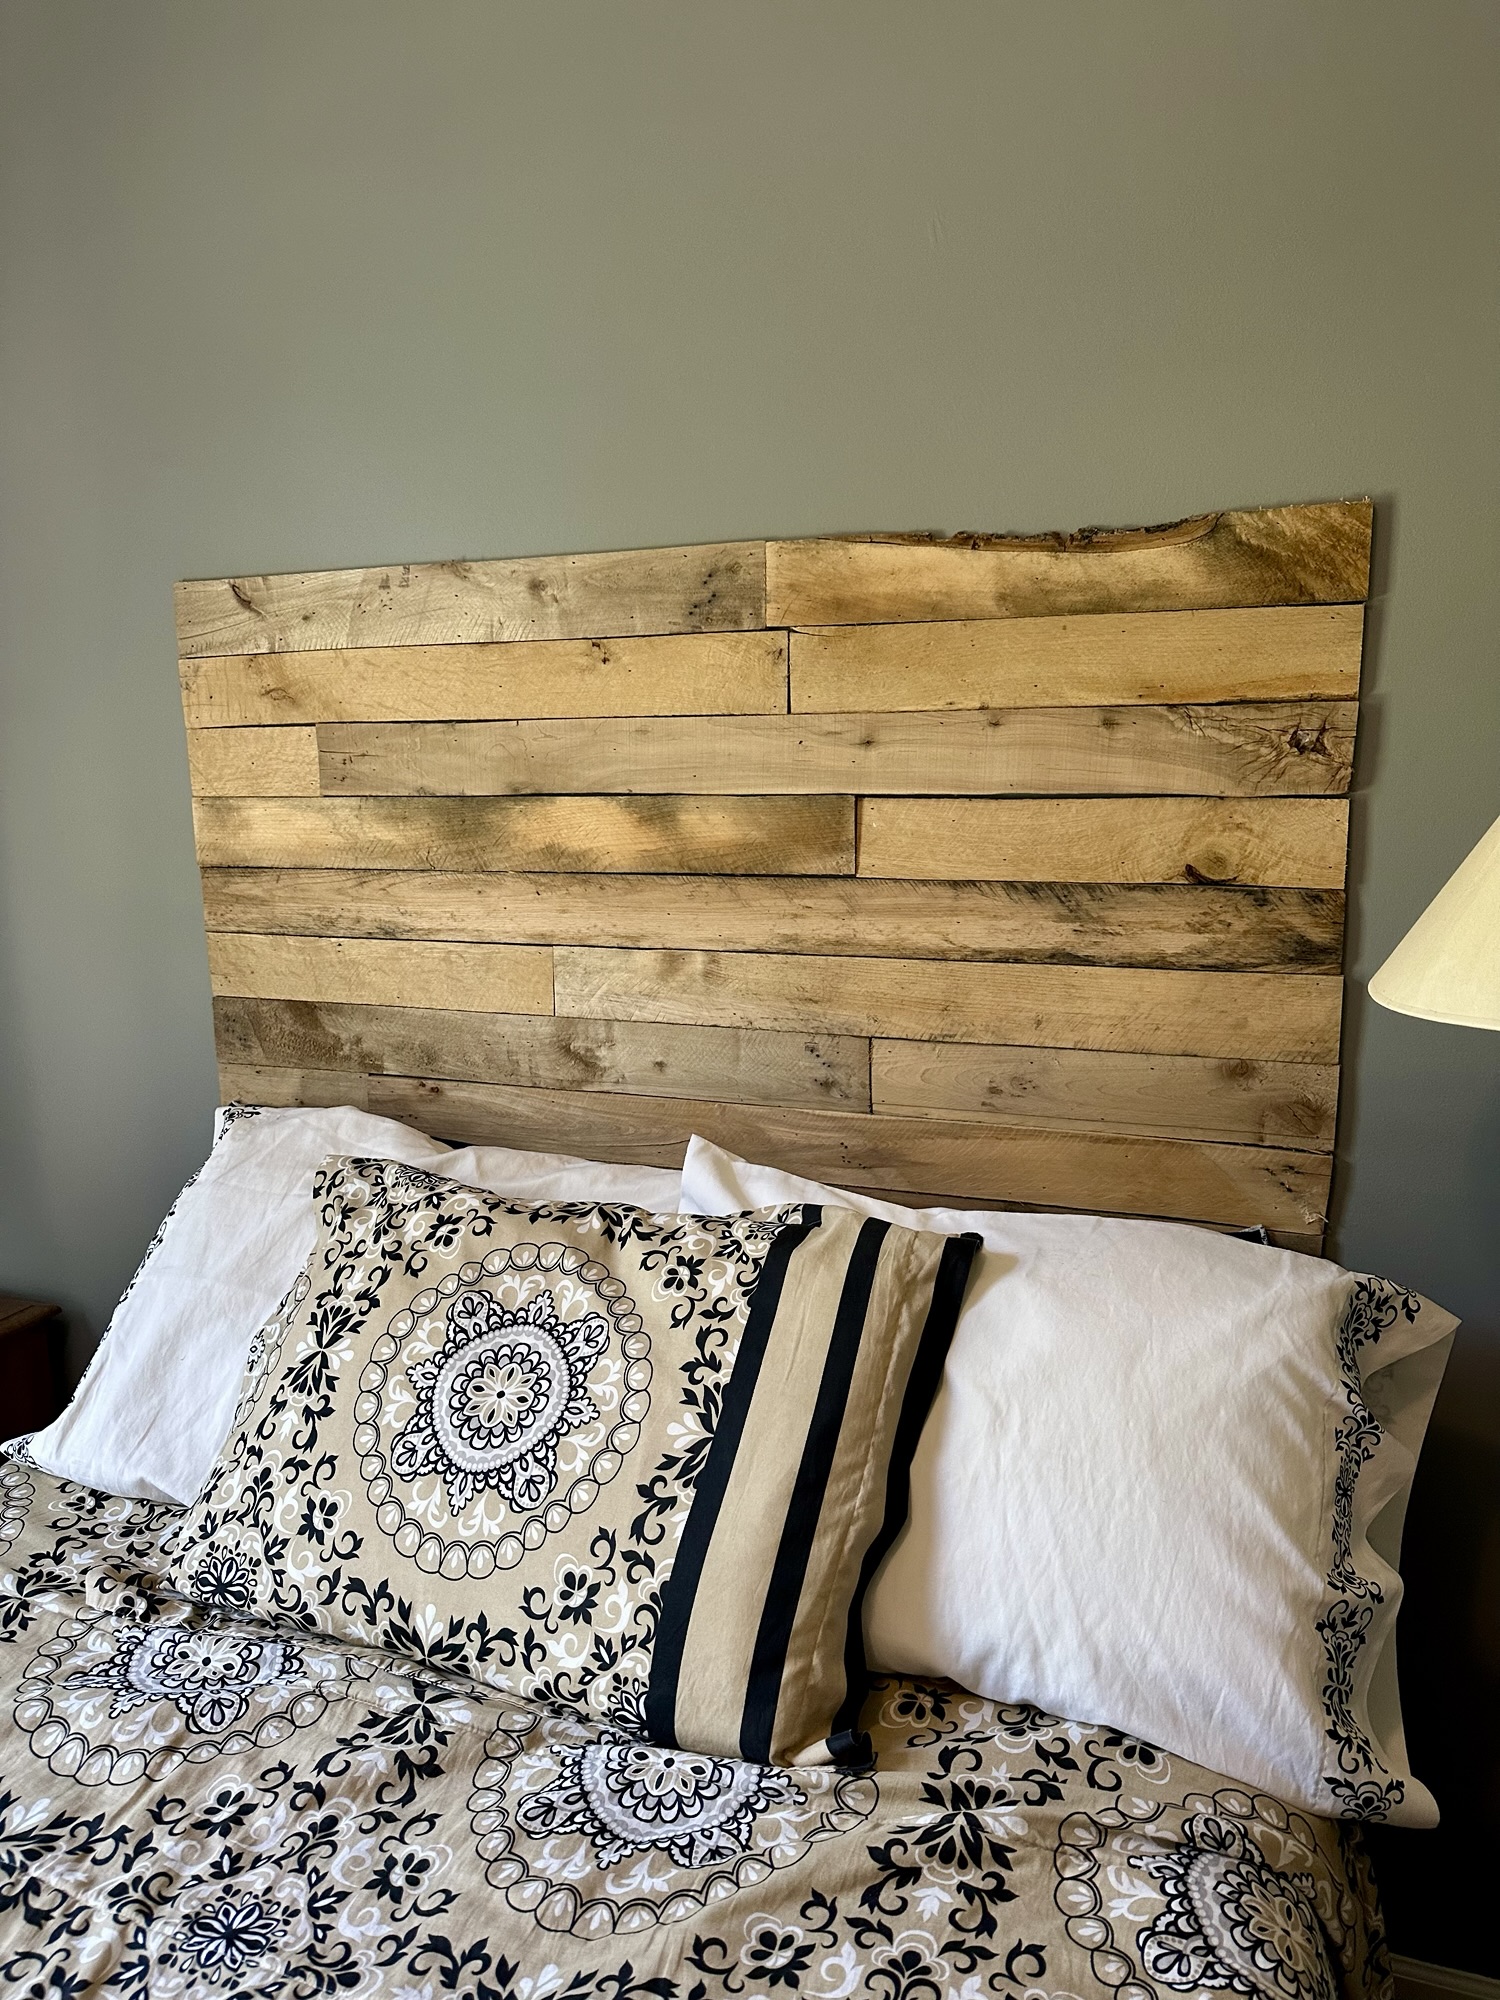
My parents’ guest room bed needed a headboard, and the empty wall also needed something decorative to add interest to the room at all (aside from one poster on another wall). Since they have a lot of scrap wood, we decided to create a headboard that would attach right to the wall and add some rustic charm to the room.

A guest room with a bed dressed in patterned bedding, a bedside table, a lamp, and a burgundy upholstered chair against a grey wall.
BEFORE: No headboard and bare wall.

This was a very easy project and took me about an hour and a half…and that half hour was mostly spent looking for my dad’s level. 😜 You could use nice, new wood, but the scrap wood they had worked very well to create a rustic looking headboard.


Supplies:

(As an advertising affiliate and Amazon Associate, I earn a small commission from qualifying purchases. But it doesn’t cost you anything extra and helps me keep up my site!)

  • old scrap wood
  • nails
  • painters tape

Tools:

  • level
  • pencil
  • miter saw (or other saw for cutting small pieces of wood)
  • nail gun (or use small nails and a hammer)

Step 1: Plan and mark the sides. After sliding the bed a little bit away from the wall, I took a pencil and lined it up with the side of the bed, marking on the wall to identify how far over the headboard should go. I did this to both sides.

A hand holding a pencil with a small level attached, positioned near a wall, indicating a marking for a headboard installation.
Marking the sides.

Then, taking the level that I eventually found, I drew a straight line up from that mark and ended up deciding that 45 inches was a good height up the wall. That would give plenty of room for the headboard to stick up above the pillows and take up some of the blank wall space. I used the level again and marked a line across, connecting the two side lines.

Taking painters tape, I ran it along my lines to outline my shape. That let me visualize the space where my headboard would go. It also made it very easy when attaching the boards, because I lined up the ends of the boards against the tape for a straight line.

View of a guest room bed with green painter's tape outlining the area for a headboard on an empty wall.
Headboard space outlined.

Step 2: Cut wood. From side to side of my headboard space was 53.25 inches (this is a full-size bed). I wanted the shorter pieces of wood staggered, but I also cut a few the full length across. Basically, I went through the scrap wood and held pieces end-to-end that looked good, then marked one at 53.25 inches to cut with a miter saw.

Because my wood was so rough, I did scrape off some loose chunks and wipe them down quite a bit so it wouldn’t create splinters. If you’re using nice wood, now would be a good time to sand the pieces.

I didn’t worry about getting exactly the right amount of wood cut, but I did enough to make several rows and then took the pieces inside, stacked together so I knew which boards went together to make 53.25 inches.

A collection of scrap wood pieces stacked on a bed, with a level and painter's tape visible, set against a patterned bedspread.
Wood pieces ready.

Step 3: Nail wood onto the wall. I started at the bottom and used one of my long pieces that ran the whole length across. Using the level, I held the board in place and used Brad (my nail gun) to secure the board onto the wall. You definitely want to be sure this first, bottom board is level before stacking the rest on top of it.

A hand holding a level against a wooden plank attached to a wall, with a bed and floor visible in the background.
First board on.

SIDE NOTE: Since my wood was so rustic, I didn’t worry about the nail holes. If you’re using nicer wood, you might want to be sure to space your nails evenly for less chaotic holes, and/or you could use wood filler to fill the holes if you’re going to stain or paint the wood.

From there, I took the rest of my boards and added one row at a time, making sure the ends lined up at the tape.

A partially completed rustic wooden headboard affixed to a wall, with painter's tape outlining the intended shape above the bed.
Staggering each row.

I worked my way up to the top, and I’d cut enough initially to make it almost all the way – I only needed to go back to cut one last row at the top. And for the top, I found a piece of wood that had a cool, natural edge, so I used that for the very top. The top did overlap my tape slightly, so I pulled the tape off before securing that final row. But the tape did show me that everything was still straight and level! The rest of the tape I pulled off once I was finished.

That was it! This was a very cheap and easy way to create a permanent headboard that’s big and adds some rustic decor to the room. Hopefully guests like it too!

A rustic wooden headboard made from scrap wood is mounted on a wall above a bed adorned with a patterned comforter and pillows. A nightstand and a lamp are visible beside the bed, with a cushioned chair in the corner of the room.
AFTER: New rustic headboard.
A rustic wooden headboard mounted on a wall above a bed with white and patterned bedding and decorative pillows.


DIY Must-Have Lists

Click to see more!
Click to see more!
Click to see more!
Posted on 3 Comments

Outdoor Chair Makeover

These chairs have needed my attention for quite a while. They were still in sturdy shape, so I knew they had a little life left in them. They just looked terribly worn out.

Two weathered wooden outdoor chairs on a deck, one with faded paint and the other slightly cleaner, surrounded by greenery.
BEFORE: Chairs in need of love.

Supplies:

(As an advertising affiliate and Amazon Associate, I earn a small commission from qualifying purchases. But it doesn’t cost you anything extra and helps me keep up my site!)

Tools:

…I’m just now realizing that I intended to use my new paint sprayer on this project, but I completely forgot. 🤦‍♀️ If you have a paint sprayer, you could do this much more quickly, but I used a cheap brush. You could also use painters tape if you need help with a clean edge between the different paint colors, but I always find I do okay with just a simple little craft brush to make clean lines.

Step 1: Sand and clean chairs. I took my handheld sander and went over every part of the chairs that I could. I used 80 grit sandpaper but only needed one sheet.

A handheld sander being held over a wooden deck with outdoor furniture visible in the background.
Sander ready.

There was some old stain peeling away that needed to be sanded. There were rough spots that I wanted smoother. And there were other places where the wood was just really worn and old, so I sanded those parts down too. Really, you want to sand all over at least a little bit to help the paint adhere.

Once the chairs were sanded, I wiped them down with a wet rag to get off cobwebs, dirt, dust, etc.

Worn wooden chair on a deck, showing a weathered surface with slats and a structure in need of refinishing.
Roughly sanded.

Step 2: Spray paint the hardest parts to paint first. Really, you could paint your outdoor chairs a bunch of different ways, but I focused on how the slats ran across the back and seat. The arms of the chairs and sides of the back and seat had pieces that ran a different way, so these slats seemed like they would look good as their own thing.

I went with black. You could use any color as long as it’s a paint that’s intended for outdoor use. I had some leftover black spray paint, so that’s what I used.

For these harder-to-do parts of the chairs, I definitely recommend spray paint (or a paint sprayer 🤦‍♀️). Spraying on the slats was easier than trying to use a brush and get around all the sides. It was definitely faster. Did this spray paint get on the other parts of the chairs that would be a different color? Sure. But I didn’t worry about this since I knew I’d be painting the other parts next and covering the black anyway.

Basically, start painting the chairs by using spray paint in the color that you want on the majority of the chair, or the most difficult-to-paint parts of the chair. Some might say to use the lighter color first so you can be sure your other paint color will cover it, but my lighter blue covered this black just fine. 🤷‍♀️

Close-up view of a worn outdoor chair with a black slatted seat and backrest, showing signs of damage and peeling paint.
Black spray paint on.

Another good reason to use spray paint first is because it dries quickly, helping you get to the next step.

Step 3: Paint the other chair parts. Once the tricky slats were painted, I took my lighter blue paint and used a brush to paint the arms of the chair, the bottom braces, and the side pieces around the seat and back. There wasn’t much need to spray this paint, since these sections were so large that a brush worked just fine. To paint where the blue met the black of the slats, I used a tiny craft brush and made clean lines of blue paint against the black.

Close-up view of a recently painted outdoor chair with black slats and light blue arms, resting on a tarp.
Painted where blue meets black.

If you use a spray for the rest of the chair too, you’ll need to cover the first painted areas and tape along the edges. That seemed like too much effort, and I figured that a brush would be faster than the prep required for my paint sprayer.

Two outdoor chairs in a garage setting: one is already painted light blue with black slats, and the other is partially painted. There is a paint can nearby, and the chairs are placed on a tarp.
Painting the blue.

I did 2 coats of this light blue, just to be sure the coverage was good over the old wood. I also had a 5-year-old helper, so I went over her areas a few times. 😬

Step 4: Seal. Once all the paint was dry, I gave it overnight to gas off and settle in. The next day, I took a clear gloss spray paint and went over every inch of the chairs to seal and protect the paint.

Once that was dry, the chairs were done! These look so much better than before, and they go nicely with the blue decor I have on the rest of my deck. I like that painting them this way looks a little more interesting than just painting or staining them one solid color too.

Two freshly painted outdoor chairs in light blue with black slats, placed on a wooden deck surrounded by greenery.
AFTER: Painted chairs.


DIY Must-Have Lists

Click to see more!
Click to see more!
Click to see more!
Posted on Leave a comment

Pea Gravel Dog Kennel Fix

I let this go for way too long, but this July I finally got around to making our little dog area look decent. I also wanted to get on top of this before another rainy/snowy season when the ground becomes all muddy. Wet and muddy dog prints – not so cute across my kitchen.

Aerial view of a garden area with sparse vegetation and patches of dirt, bordered by a wooden deck and fencing.
BEFORE: Messy dog kennel.

The best fix I came up with was to make a pea gravel bottom instead of dirt, and I used landscape cloth to help deter future weed growth. To help hold gravel in place on the “human used” side of our gravel patio, I’d used some very handy ground cover paver forms (see picture at the very bottom), but I didn’t want to spend that much on the dog side. Long story less long, I should have spent the extra $$ and bought more of the heavy-duty paver forms, but I’d decided to try a less expensive option. You could use the less expensive forms like I did, because at the end I figured out a way to make them work almost as well. But honestly, I really like how the more expensive ones work way better and take less gravel.


Supplies:

(As an advertising affiliate and Amazon Associate, I earn a small commission from qualifying purchases. But it doesn’t cost you anything extra and helps me keep up my site!)

Tools:

  • Scissors
  • Rake and shovel

Step 1: Clear area and level the base. I cut back a lot of plants and pulled a bunch of weeds. Our oldest dog is a digger, so I had holes and lumps all over the ground to deal with. Taking a metal rake and a shovel, I scraped along the ground and shoveled dirt around until the area was fairly level. I was careful to keep the side along our house a little higher than the rest to help with drainage.

Cleared area before laying gravel, showcasing a leveled dirt space adjacent to wooden planter boxes and surrounding greenery.
Weeded and leveled.

Step 2: Enclose the space. The fencing that I used for the kennel area is fantastic. It can run straight or turn at angles where each section of gate connects. It doesn’t look bad if you have to fudge it a little bit by overlapping to make it fit, either. You can buy sections at a time if you’re not sure how much you’ll need, but it was pretty easy to figure out that I needed 10 ft along one side and 13 feet along the other. (The back side was just the house wall, and the last side of the dog area was already enclosed under our deck.)

Starting right against the house, I shoved in a pole/stake to hold that end of the gate in place, then connected the next section of gate with a pole running between the first and second sections. It was easy to do this in a straight line, adding sections of gate and poles until I reached my planter box at the other end. This was my 13-ft side. Here, I took another section of gate to make the corner. Then I ran more fencing along the planter box, overlapping a section in the middle to get the right overall length of about 10 feet. I had a very narrow gap at my planter box’s corner, but I just used a leftover pole/stake and shoved that into the box’s dirt to block off any escape attempts.

Installing this fencing took me literally 10 minutes.

Very easy + Looks nice + Sturdy and secure against my 65-pound mutt = 👍

Step 3: Lay the landscape fabric. I had quite a bit of this leftover from another yard project, but I had to buy a roll to finish. This is pretty easy once your ground is level, because all I had to do was roll it out from the house to the fencing on the far end. Scissors cut the fabric well, and then I took the roll and started again to cover the next strip of ground. I overlapped each strip a little bit to help cover everything, and it helped to use my rakes to hold one end down while I rolled out each strip.

It’s worth noting that I had a sprinkler head right smack in the middle of the space. When I rolled the fabric over this spot, I cut a hole and made sure the sprinkler head had plenty of room to stick through. (More on that later, as I had to take this into consideration with each following step.)

A fenced dog area with landscape fabric and gravel laid down, surrounded by greenery and a house wall.
Fencing and fabric done.

Step 4: Lay out the paver forms. Again, I wish I’d bought these paver forms, but I used these more flexible forms and eventually found a way to make them work by adding these anchoring spikes. The flexible forms do NOT come with enough spikes to secure the forms if you’ve got a dog (or kids) that are rough on the space. I found after laying them and after filling everything with gravel that they too easily pulled up in the middle where there were no anchor spikes, and the forms being loose ruined the whole point. 🤦‍♀️ BUT, if secured with more spikes through the little holes here and there, the forms stayed quite well.

So, learn from my mistake and make sure you secure these forms down really, really well.

Package of anchoring spikes for landscaping, featuring details about their durability and suitability for no-dig edging.
Use these for extra securing!

Anyway…I stretched out and unfolded the flexible forms and spread this wide mesh across the space, securing it at one end, then the other. (I now know I should have secured it everywhere I could with extra spikes, so do that now.) I do like that they come with little fasteners to attach one side of one strip to another side of another strip, and it’s pretty easy to make one, big form this way to fill the space. The material also cuts pretty easily with scissors, so you can adjust the size and shape more easily than you can with the more heavy-duty forms.

Close-up of flexible paver forms resting on landscape fabric, showing their design and holes for anchoring.
Fasteners to join sides.

Cutting here and securing there, I eventually covered my space with the forms. I made sure that a big opening allowed my sprinkler head to have space. I also made sure to add extra anchor spikes all along the exposed side to hold that down where the dogs would be running a lot.

A dog area featuring a textured black ground cover laid out in a patterned formation, enclosed by fencing and greenery in the background, with a wooden structure overhead.
Forms done.

Step 5: Fill with gravel. After hauling 10 bags home from Lowe’s in my Jeep, I got smart and ordered 35 more bags to be delivered so I didn’t cause a smelly mess in my Jeep. When figuring out how much you’ll need, take your square footage and look at what the bag says about coverage. I needed 130ish square feet, and it needed to be about 3 inches deep. I ended up needing about 50 bags total.

It was heavy, dirty work, but it was satisfying to dump each bag and then spread the gravel into the forms. I made sure not to fill the circular form I’d made around the sprinkler head, and it kind of looks like a little drain in the middle.

Done! I had some hiccups with this project, but once I got those extra anchor spikes in, these forms worked pretty well. Our older dog can’t dig as easily with the forms in place, and the gravel certainly looks better than the dirt mess that was there before. The below picture was taken about a week after I finished, so you can see how I might want another bag of gravel to cover the forms now that the gravel has settled, but I don’t mind seeing the pattern of the forms a little bit. The important thing is that our dogs can’t move them anymore!

Aerial view of a newly created dog area featuring pea gravel, bordered by plants and a fence against a backdrop of green bushes and grass.
AFTER: Pea gravel dog kennel.

And in case you’re wondering, this is what the end result looks like with the more heavy-duty forms, which I used under our deck and on the side of the patio that we humans use. 🙂

An outdoor gravel patio area beside a house, featuring a textured stone surface and a section covered with pea gravel, surrounded by landscaping and furniture in the background.


DIY Must-Have Lists

Click to see more!
Click to see more!
Click to see more!
Posted on Leave a comment

Making a Cement Wall Pretty

My mom had a very specific request for her Mother’s Day present this year. She wanted me to paint flowers on a cement retaining wall in her back yard. This wall stands behind a small flower garden, and the large, grey cement backdrop was definitely asking for some love.

If you have a cement retaining wall similar to this, or if you have cement exposed along the side of your house on a hill, this is a fun way to add some colorful artwork – especially if you have kids or grandkids who play in the area.

A cement retaining wall in a backyard, partially covered by a small flower garden with green plants and blooming flowers. Supplies for painting the wall, including a paint roller, paint tray, and concrete paint, are set on the ground.
BEFORE: Plain cement wall.

Supplies:

(As an advertising affiliate and Amazon Associate, I earn a small commission from qualifying purchases. But it doesn’t cost you anything extra and helps me keep up my site!)

Tools:

  • Paint roller
  • paint brushes (craft brushes work great)

Step 1: Clean the cement. You could hose down the wall and wait for it to dry, if there’s mud or other gunk stuck on the cement. My mom did this part on her own (yay, group effort on this project!) and just wiped the wall down to get off dirt and cobwebs.

Step 2: Background paint. I’d definitely recommend using outdoor cement paint that will be durable and also adhere properly to the wall. We used the Dutch Boy Porch and Floor paint because I’d used it before on other projects and trusted it to work.

Containers of Dutch Boy paint for a DIY flower mural project, featuring various colors including red, green, blue, and white.
Paint.

This comes in a variety of color options, and my mom picked a light sky blue for the background. She again did this step herself, and it dried very quickly so that she was able to do 2 coats within an hour. Honestly, a quart probably would have been plenty rather than a whole gallon, if you don’t want to spend quite as much.

A cement retaining wall painted light blue, surrounded by colorful flower beds and greenery in a backyard setting.
Base/background paint on.

Keep in mind that the cement doesn’t have to be in great shape for this to work. Our cement wall was pitted with uneven chunks all over, but you’ll be covering this “character,” and it’s easy to work around the bad parts. My mom did use a smaller brush to really get the background paint into the holes and cracks all over the wall, but for the most part she used a roller. You might notice that she did not go all the way to the ground, and this was because she wanted to add a bit more dirt to the flowerbed, plus plants will be growing along the bottom to cover that up. If you want a nice, straight line along the ground, you could either paint right down to the dirt or roll a straight line across the bottom.

Close-up of a light blue cement retaining wall, showing pitted texture and imperfections.
Close-up of imperfect wall.

Step 3: Outline flowers/design. This is when I came in. Using a permanent marker, I drew outlines of flowers, stems, and leaves all along the cement wall. I did this fairly quickly because we were just going for a cartoon-y flowerbed design. If you want to do something nicer and more detailed, I’d still use a marker to get your planned outlines, but it will take longer, of course.

A cement retaining wall painted light blue with outlines of various flowers drawn on it, situated behind a small flower garden.
Outline in marker.

Step 4: Paint the art! Rather than painting one flower at a time, I did one color at a time. I liked doing one color at a time because it helped me get a feel for where I wanted how much of each color, and it also meant I didn’t have to go back and forth cleaning my brushes between colors.

First, I used green to get the stems and leaves filled in.

A cement retaining wall painted light blue with outlined flowers and green stems in a backyard garden, surrounded by blooming flowers.
Green first.

Again, you can get this paint in whatever colors you want, and my mom bought a quart each of green, white, yellow, and red as well as the gallon of the base blue color. This was WAY more paint than I needed, even with a wall this big. The small 8 ounce sizes of your individual colors might be plenty, so keep that in mind when buying paint.

Anyway, I used a few different brushes, but small craft brushes worked just fine. I did like having straight-edged brushes when doing the parts that went right against my outlines. Straight little brushes definitely worked best for the long stems, too.

It’s worth noting that this kind of paint wipes off easily if you slob a bit – which happens when you paint vertical surfaces, if you’re like me. I just used my finger or a paper towel. Just be sure to wipe off the mistakes before the paint dries, since it dries pretty quickly!

Also worth noting: The paint often went over the black marker of my outlines, but not really enough to cover it completely, so keep that in mind if you make a mistake with the marker. Before you paint, you may want to use your base/background paint to cover over any outline mistakes.

After the green, I used red to paint red flowers. Then I mixed in a little white to make a pink color.

A colorful mural of flowers painted on a cement retaining wall, with a light blue background and various flower designs outlined in black marker. The wall is situated in a backyard with green plants and pink flowers visible in the foreground.
Red and pink painted.

Next I mixed a little yellow into that to make a pretty orange/coral color. I did a few flowers with this color, and I also used it to do the centers of some of the other flowers.

Coral color added.

Only then did I clean my brush, and I used yellow to finish the last flowers. I also used my yellow to make the centers of the rest of the flowers.

Colorful painted flowers on a blue cement retaining wall, surrounded by a flower garden and grass.
Yellow painted.

You could mix your colors to do MANY different colors and shades of flowers, but we were happy with this much. (You might’ve noticed where I missed a green leaf. I did fix that once I was done with my other colors. 😜 We also let my daughter paint a flower…once I had the majority of this done and looking how I wanted.)

Step 5: Outline. Because I wanted a cartoon-y feel, I went back over my outlines with the permanent marker to outline the flowers, leaves, and stems. If you’re painting a lot more detail or going for a more realistic look, you could skip re-outlining everything. This really did help make our flowers pop, though.

A large, cartoon-style flower design painted on a light blue cement wall, featuring orange petals with a yellow center and green stem.
Outline.
Outline.
Colorful flowers painted on a cement wall, featuring red and yellow flowers with green stems against a light blue background.
Outline.

Step 6: Apply a clear sealer. This sealer should also be made specifically for cement. This is definitely an important step to help protect your painting from sun, rain, scratches, etc. it’ll also add a nice shine over the painting.

That’s it! This certainly adds some cute artwork and color where there was bland and unattractive cement before. I also laughed a little bit as I was finishing up because bees started checking out the bright flowers. Guess we’re not the only ones who like it! 😂

Colorful mural of various flowers painted on a cement retaining wall in a backyard, with a light blue background.
AFTER: Pretty painted wall!


DIY Must-Have Lists

Click to see more!
Click to see more!
Click to see more!
Posted on 2 Comments

DIY Doggie Door Insert

In. Out. In. Out.

Opening our sliding door for the dogs was starting to take up approximately 82% of our day, and my kids and I were sick of it. But those sliding door inserts with doggie doors in them are NOT cheap, so today I figured out how to make one myself. I had scrap wood, paint, and window screen, but all total this project would only have cost me $85 – certainly cheaper than the $175+ doors I’d shopped for!


Supplies:

(As an advertising affiliate and Amazon Associate, I earn a small commission from qualifying purchases. But it doesn’t cost you anything extra and helps me keep up my site!)

  • Doggie Door (ours was the XL, comes with screws)
  • Three 2x2s
  • Screen (cheapest to get a replacement kit like this one)
  • Paint
  • Staples
  • Scrap wood

Tools:

  • Tape measurer
  • Drill
  • Staple Gun
  • Miter saw (or something to cut the 2x2s)
BEFORE: Having to open the sliding door for our dogs.

Step 1: Measure for the doggie door insert. Since this doggie door was only about $56, I opted to buy this part rather than try to figure out how to make one from scratch. It worked perfectly, so I’m glad I saved myself the headache.

First, I measured for 2x2s that would attach across the top and bottom of the doggie door. I wanted my long side pieces to also attach tightly, so I pulled the wood in a bit to allow room for the side pieces to go all the way down. Starting at the bottom, I measured from the bottom corner screw hole to the other bottom screw hole. This was 14 inches. The same was true for the top – 14 inches.

Measuring for the top and bottom pieces.

I wanted a third piece at the very top of the whole insert, so I planned for another 14-inch piece there too.

As for how tall the insert would be, I noticed that my sliding door’s frame would perfectly fit the 2x2s inside the track at the top as well as along the side where the door would normally close. I had about an inch of depth inside the tracks, so I made the tall sides of my door insert a half inch shorter than the whole height from the bottom of the door to the top inside the track. This would let me install the whole insert by pushing the top piece up inside the track, then lower the bottom piece in place so the whole thing would sit on the bottom track but also stay in place at the top, just inside the tracks. As for the side, I could just slide it over into that track space where the slider normally closed. By doing this, the insert would be held in place at the top and along one whole side, and that would make it easy for the sliding door itself to gently hold the other side in place.

So, this height for the 2 sides needed to be 76.5 inches.

Step 2: Cut the wood. I cut three pieces of 2×2 down to 14 inches. Then I cut two more to 76.5 inches each. That was it!

Step 3: Paint. In all honesty, I didn’t paint the wood pieces until I had the whole thing assembled and the screen on, BUT it would be much easier to do now, before you have to worry about slobbing paint on the screen. 🤦‍♀️ I’ll save you that trouble by telling you to paint your wood pieces at this point rather than later.

Step 4: Place wood pieces around the doggie door and secure. This was SO much easier than I’d feared, and I did it all on my living room floor in about 15 minutes.

(Note: If you buy a doggie door like the one I used, be sure to remove the solid insert that normally would be used to “close” the opening. You might not be able to get it out once the whole doggie door frame is assembled. I completely discarded mine, since I’ll just take my constructed doggie door out of the doorway entirely when I don’t want the dogs to use it.)

Anyway, by pulling the two sides of the doggie door slightly apart, I could set the bottom piece, top piece, and side pieces in place evenly (where normally the doggie door would fit inside a normal door). My 2x2s wouldn’t fit all the way inside like a normal door because the screw hole things get in the way. But the 2x2s set inside enough to hold in place so that I could screw the two sides of the doggie door back together and the whole thing held tightly.

First, I held one hand pushing on the doggie door’s frame to be sure it held the bottom 14-inch 2×2 pinned in place, and then I screwed the bottom section of the doggie door together by using the screws provided.

Once the bottom was secured, I did the same along one side, again holding the frame tight to be sure the long 2×2 stayed in place. Most importantly, you want to be sure the corners at the bottom line up nicely. (See picture below.)

Screwing parts together with wood in place.

Once the bottom and one side were done, I took my second 14 inch piece and fit it along the top part of the doggie door. Pushing the frame down to hold this 2×2 in place, I pushed the last side piece in place as well, again making sure the bottom corners of the 2x2s were even. Then I screwed the doggie door’s top together, and that other side.

Doggie door with surrounding pieces on.

Lastly, I put the very top 14-inch piece in place and made sure the corners lined up with the ends of my long side pieces. Then I used my drill to screw in 1 screw at each end.

Insert frame assembled!

Top piece attached.

Step 5: Add a screen. We had a scrap screen door lying around that had never fit right over the door to our garage, so I cut off a section of that screen. If you need to buy screen, it’s fairly inexpensive to get a repair kit for a screen like the one I linked in my supplies list. You want to make sure your section of screen is a little bigger than the actual opening, so I measured for 53×16 inches and cut the screen down to that size.

With my frame lying back-side up (the side that will go outside), I positioned the screen over the open space of my frame. Then I used a staple gun to staple the screen edges into the wood frame. Pretty easy!

Screen stapled on.

After the screen was on, I took a few scrap pieces of wood and set them around the edges, over the staples, to really hold the screen in place and keep it secure. These wood pieces I nailed on with a few little nails. (You could also use wood glue, but I’m not that patient.) Just be sure not to place the wood too far to the outer edges, where they’d be in the way of the 2x2s fitting inside your door’s tracks. You could skip this step altogether, but I wanted to help my screen stay as secure as possible.

Back wood pieces covering screen staples.

Once my whole doggie door insert was assembled, I carried it to my open sliding door and lifted the top so it slid up a little into the top track, then I moved the insert to sit on the bottom of the doorframe, and finally I pushed it over to fit inside the track along the wall where the door would normally close. It stood in place pretty well like that all on its own, but with the sliding door closed against it, it was really secure.

My 5-year-old gave it a test run, and she reported that it worked great! 😂

Trial run.

That was it (after I painted 🤦‍♀️)! With the sliding door closed tight against the insert, it looks pretty even – like it belongs. And I’m really glad the insert stays put in the door’s track system even when we open the sliding door wider, because now we can still open the slider if we humans want to get outside too. I only remove the insert at night or when it’s raining and the dogs don’t want outside anyway.

AFTER: Doggie door insert – always ready!

I’m happy to report that the dog in the picture figured it out pretty quickly. Our younger mutt is less sure about this thing, but hopefully she’ll get the hang of it. 🤞


DIY Must-Have Lists

Click to see more!
Click to see more!
Click to see more!