Posted on Leave a comment

Making a Wardrobe a Built-in

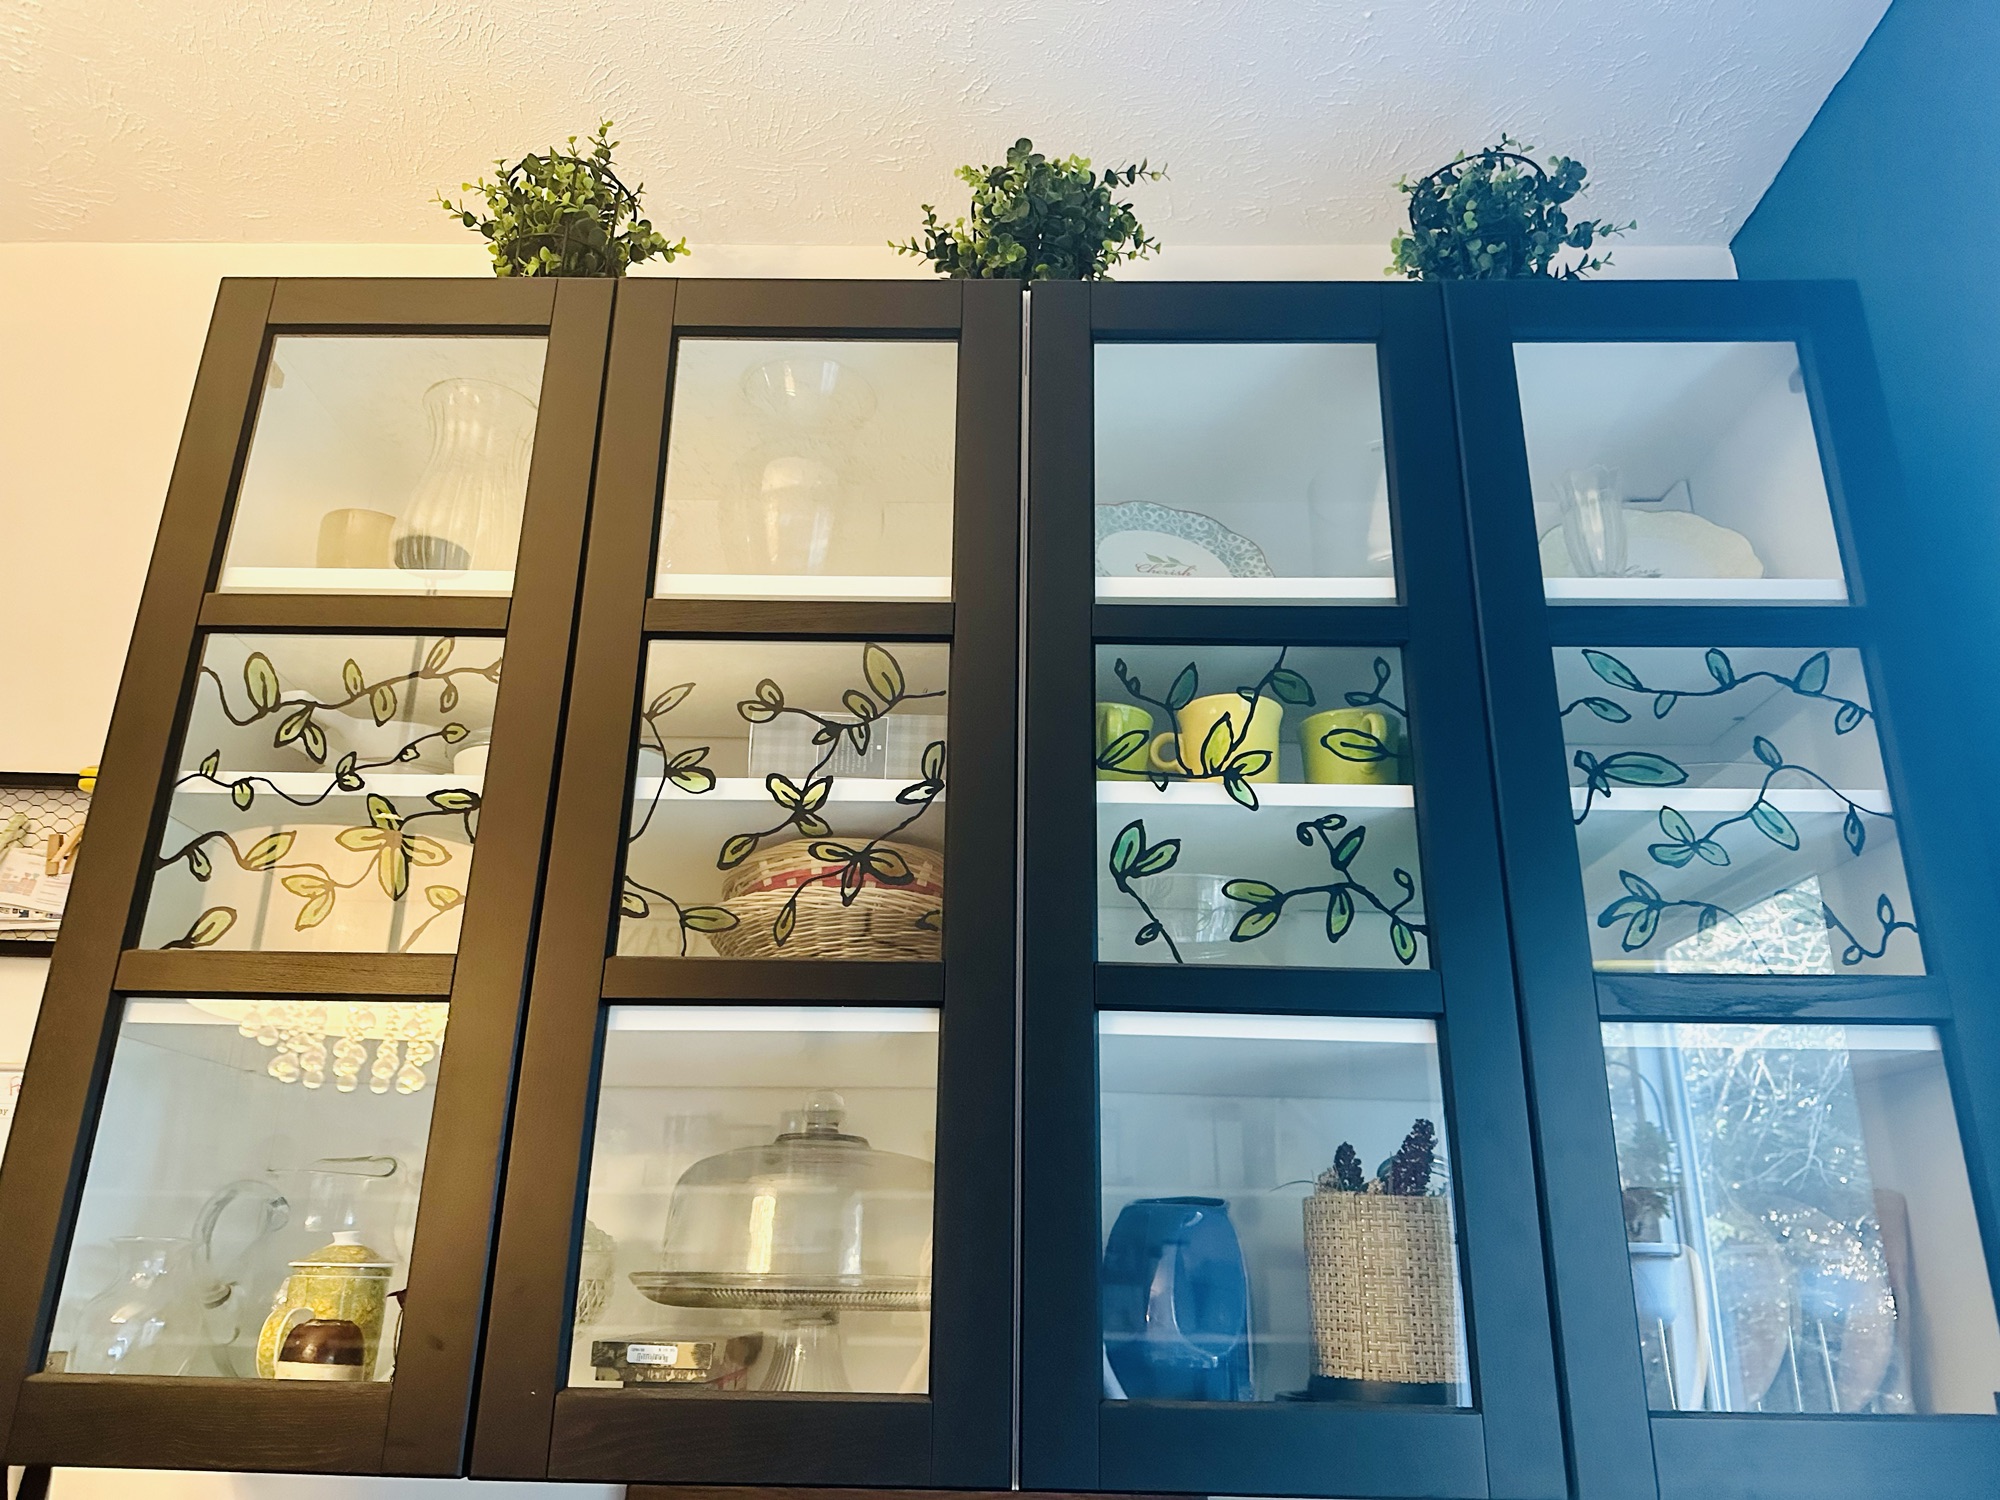
I’m not one to refuse free furniture to make over, and our guest room badly needed a closet/storage. So, when my aunt offered to give me her big IKEA wardrobe, I was happy to enlist my husband, brother, dad, uncle, and cousin to move it. Haha – it was heavy and awkward!

BEFORE: Gifted wardrobe.

Supplies:

(As an advertising affiliate and Amazon Associate, I earn a small commission from qualifying purchases. But it doesn’t cost you anything extra and helps me keep up my site!)

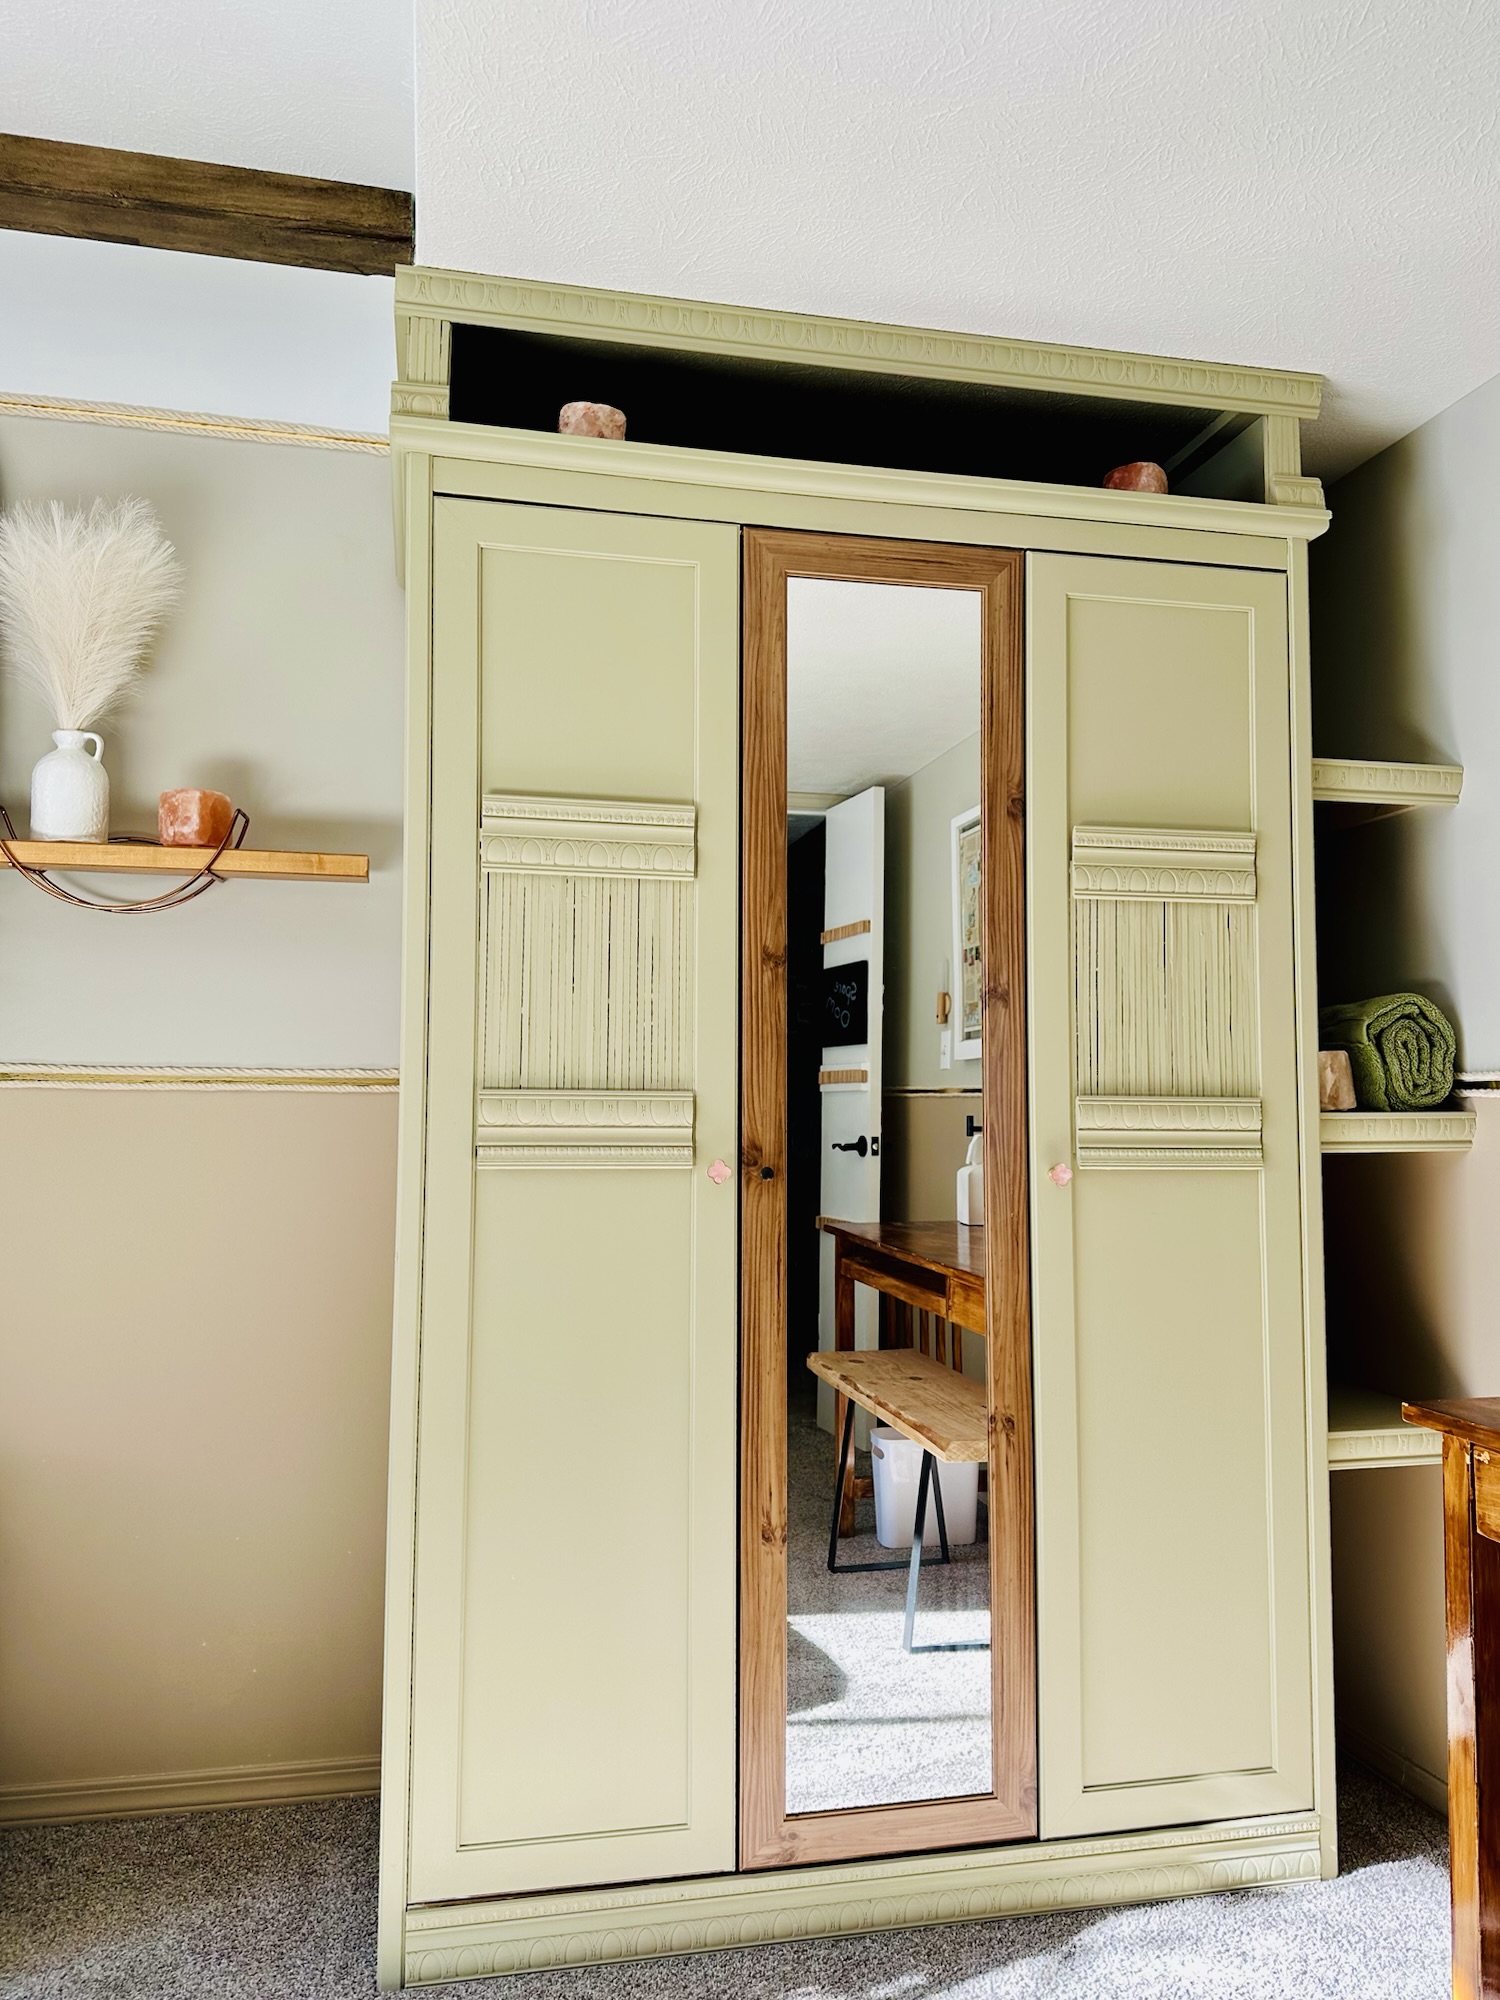
Step 1: Plan and position. Our guest room has a very low ceiling where a conduit runs overhead, so I knew there was limited wiggle room. But it fit!

I decided to line up the main body of the wardrobe with the end/side of the conduit overhead, and the decorative parts would stick out farther. It just looked best that way and added to the illusion that it was a built-in. That positioning left me with an 11-inch gap between the other side of the wardrobe and the wall in the corner. Here, I planned to make 3 open shelves that would go the full depth of the wardrobe.

For the top, I had 10 inches of space. It seemed a waste to close it off entirely, so I decided to build side “walls” that would line up with the main body of the wardrobe. The back wall and ceiling would work as the rest of this long, open shelf space.

As for my painting plan, I decided to use the same green that I’d used on our guest bathroom’s vanity (as well as the base color for my shower panels). I also had a few door pulls left from that vanity, so that would further coordinate all our guest room features.

For the center mirror door, I decided to leave that the “natural” wood color of the original IKEA wardrobe. This would make the mirror really stand out and also break up all the green. The mirror door was also the “wood” in the best shape – I needed to paint the rest of it.

I didn’t want to leave the doors plain, especially since I’d decorated the main doors of the guest room in a way that I’d always intended to duplicate on the closet/wardrobe for that room. I remembered how I’d done it, and I just needed those same materials.

After a quick shopping trip to Lowe’s (where I forgot to use a Christmas gift card 🤦‍♀️), I ended up only spending $100 for this whole project! So, if you have a wardrobe and some spare paint, you can easily make this happen for around $100!

Step 2: Add decorative pieces to the original wardrobe. With my plan in mind, I started with the fronts of the wardrobe doors. First, I took a whole bunch of thin bamboo sticks and hot glued them across the 2 outer doors, keeping them inside the doors’ surrounding border pieces. I started by using a level and making a line at the height that matched what I’d done on the guest room’s main doors – 28 inches (somewhat arbitrarily). Taking 2 sticks at a time, I glued them on across the doors, with the tops along that line I’d drawn. It took a little while, and I of course burned my fingers, but I knew the end result would be cool.

Glueing bamboo sticks.

Next, I needed 4 pieces of my really decorative moulding to be 11 inches, fitting across the door fronts to cover the tops and bottoms of my bamboo sticks. I placed these at the same height and spacing as what I’d done on my main doors. I used both wood glue and a few short nails from my nail gun to hold these on.

Added decorative moulding.

I also took my very fancy moulding and cut a piece to 48 inches, and this I used to cover the base of the original wardrobe. (I also had to run it through my table saw to make it a little more narrow so that it wouldn’t stick up and get in the doors’ way. So, if your moulding is too wide, cutting it down is a quick fix.) This nicely covered the whole bottom and added a decorative touch that matches the doors.

Step 3: Add braces for top space and side shelves. Copying the general idea of what I’d done in my master closet, I cut 2 braces for each of my 3 desired open side shelves, so that meant 6 pieces of 1x2s at 20 inches. My wardrobe was about 21 inches deep before the front corner piece, so I wanted to place the braces all the way against the back wall, leaving a little space at the front so a decorative piece would be able to fit across. That’s why I cut the braces to 20 inches rather than the full 21 of the wardrobe’s depth.

I eyeballed where I wanted the 3 shelves, and I started at the top. Using a level, I made a straight line along where the brace needed to go on the wall. Across from that, on the wardrobe’s side, I drew another line for that brace. (I found this second brace’s placement by measuring from the ceiling to my line on the wall across from it.) I repeated this for the 2 lower shelves’ braces.

Once I had my marks, I took each 20-inch brace and used a little wood glue on each, held them in place under the lines I’d marked, and then used a few nails from my nail gun to secure them in place.

Adding shelf braces.

Easy.

For the open shelf space that I was adding to the top of the wardrobe, I again needed 20-inch pieces of 1x2s. I needed 4, placing 2 at each side, top and bottom, again all the way against the back wall to leave some room up front.

Figuring out the top braces.

Starting with the bottom piece that would be on the main room’s side, I lay one on the top of the wardrobe. I had to be sure the end result would line up with the edge of the conduit, so I needed to leave room for my piece of 1/8 inch plywood to run straight up and down from the wardrobe to the ceiling/underside of the conduit. (This would be the side that needed to sell the idea that everything was one piece with the original wardrobe.) Basically, I held my 1×2 in place while holding a level and lining it up with the edge of the conduit, then leaving 1/8 inch of room. (See picture once this plywood is on, below.) I again used wood glue and a few brad nails to hold this bottom piece in place.

Going across to the other side of the wardrobe, I placed that bottom piece the same distance from the edge of the wardrobe – about 2 inches – and secured it in place.

For the top brace pieces, I used my level and made sure the top pieces were directly over the bottom pieces. Again, glue and a few brad nails secured these pieces onto the ceiling.

That was it for my braces. (It’s actually easier than I make it sound, I once you get going.)

Step 4: Add shelves and top sides. Using 1/8 inch plywood, I use my table saw and cut 3 pieces for my shelves. These were 10.75 inches wide and 20 inches deep. That meant I had a little wiggle room to fit them in my 11-inch wide space, but they went the whole 20 inches along my braces, again leaving a little room up front to add decorate pieces.

I set these shelves in place and nailed them onto the braces.

For the top of the wardrobe, I needed a piece of plywood standing up against the top and bottom braces to create each side. My space was 10 inches, so I cut just short of 10 inches high (in case my ceiling was uneven), again making the pieces 20 inches deep. I held these against the outside of the braces and nailed them in place, making sure they connected with the back wall and didn’t stick out beyond the braces at the front.

One top side done.

Step 5: Add last decorative pieces. Remember how we left room at the fronts? I took some matching decorative moulding and cut pieces for the fronts of each of my 3 shelves. These were the full 11 inches long. I held each piece so that the top sat flush against the plywood going across the shelf, and I made sure they sat flat against the ends of the 1×2 braces. Then, I nailed each piece into the ends of the 1x2s. These ended up fitting perfectly to sit slightly behind the front corner of the original wardrobe.

Added decorative fronts to shelves.

For the top, I took 2 scrap pieces of wood that were wide enough to cover the ends of the 1×2 braces and also the plywood sides. I cut these just under 10 inches to go from the top of the wardrobe to the ceiling. Be SURE these are level, because they need to make the original wardrobe and your new top space look lined up. Nail them into the ends of the 1×2 braces, one for each side.

Front piece on top side.

For the very top along the ceiling, I measured the decorative piece that had been the top of the original wardrobe. This was 52 inches, so I cut a piece of my matching decorative moulding to 52 inches. I held this against the ceiling, lined up the ends with the ends of the original wardrobe’s top piece, and nailed it into the wood pieces I’d just attached to the front sides.

Picture of top piece once I remembered. lol

For my new top side facing the main part of the room, I used bamboo sticks, cut them to the right length, and ran them across the side and also around the little piece on the front. I also took two pieces of 21-inch 1×2 to border this side. I placed one along the top of the bamboo sticks, where the side met the ceiling/conduit, lining it up behind that front moulding piece that sticks out. The other 1×2 piece I placed along the bottom of the bamboo sticks, setting it right on top of the original wardrobe’s decorative part that stuck out.

Adding the decorative sides…from later.

I then took a short, 2.5 inch piece of moulding and put that at the bottom of the bamboo sticks on the top front piece. This mirrored the long moulding piece across the top.

I didn’t bother with all of this for the other top side since that faces the wall, but I did add bamboo sticks to the other side’s front piece. I then finished it off with another 2.5 inch piece of moulding across the front piece.

The other side’s front.

(All of this decorative work on the sides was actually done later, hence the paint in the pictures above, but now would have been the better time to do it so everything was painted at the same time. 😜)

Step 6: Prep, paint, and prime. If you haven’t already, remove any door pulls/handles.

I don’t normally use painters tape, but I did here because everything was so tight against the ceiling and the carpeted floor. I also didn’t want to paint the inside of the wardrobe, so I taped off along the bottom edge. This took a while, but better safe than super-messy.

I also went over all of my new wood with a little sander to get off any rough bits. A few areas needed wood filler – between one of my shelves and the front piece to fill a gap, and also all my nail holes.

Once everything was ready, I took a little brush and gave the original wardrobe a quick coat of primer.

Primer on.

Once this was dry, I took another little brush and started painting everything with my green paint. I was careful along the edges of the doors, but everything else was easy because of my taping.

Once I had the whole wardrobe, shelves, and new top sides and moulding done, I painted the back wall and ceiling inside my top space. This helped it look like it was part of the wardrobe without having to add more wood in there. This works because it’s so high and deep that no one will ever really see back in there clearly anyway.

I ended up letting it dry and then doing a second coat over everything, just to be safe.

Step 7: Replace hardware. With the paint dry, I removed all the tape. It looked good! The last thing to do was to put the door pulls on. I used the original one for the mirror door and put my 2 new pulls on the outside doors, and I like how that also helps set off the mirror.

AFTER: Built-in wardrobe!

All done! Out extra blankets, air mattresses, sheets, towels, etc. all fit so nicely in here now, plus there’s room for more if I need it! I’ve had this project in mind for a long time, so I’m thrilled it finally worked so well.


DIY Must-Have Lists

Click to see more!
Click to see more!
Click to see more!
Posted on Leave a comment

Color Splash Furniture Makeover

This would have gone a little differently without the help of my 4-year-old, but she wanted to help and I didn’t want to disappoint her. It was fun to work together, and at least she’s proud of her work. So, here’s how I made over her dresser…with a few pointers on how I’d planned on doing it by myself.

When we first moved into our current house, I did a quick paint job for my old dresser that had been revamped MANY times already. I didn’t figure a dark brown would be very kid-approved, so I painted the whole dresser a plain white for the time being and added cute knobs. But I didn’t even do 2 coats, and clearly it needed something new.

BEFORE: Plain dresser in need of love.

Fast-forward to now, and it was time for something more fun. Ruby wanted a “color splash” and, boy, did we find a way to make that happen. 😜

Supplies:

(As an advertising affiliate and Amazon Associate, I earn a small commission from qualifying purchases. But it doesn’t cost you anything extra and helps me keep up my site!)

Step 1: Prep and base coat. Our dresser had a glossy white paint that first needed to be cleaned off (think years of sticker gunk and…slime, possibly?). Taking the dresser into my garage, I next removed the drawers and sanded the main body of the dresser. I used my little handheld sander, but you could just use a strip of sandpaper. I went over the whole dresser, sanding over the glossy paint to roughen it up a bit so that new paint would adhere better to the surface.

Lightly sanded.

If your furniture has fresh, never-painted wood, you’re probably fine to just paint a base coat of whatever color you want.

If your wood is stained, you definitely want to sand that down before painting a base coat. If your paint is peeling, you definitely want that off too. There are a lot of videos out there about stripping paint, but basically, just get your wood to the point where new paint will adhere.

Because the pouring paint won’t cover every part of the dresser, you want to give the dresser a base coat of paint that the pouring paints will go over. I left most of our dresser white. For the front pieces that would be exposed around the drawers, however, I used a purple spray paint and quickly did a base coat of that for the front. I didn’t worry about it getting on the top, sides, or bottom because I figured that might look kinda cool with the pouring paint going over these places anyway.

Whatever you use for this base coat, it doesn’t have to be perfectly flawless, since the “color splash” will cover a lot.

Base coat of purple added.

Step 2: Remove hardware. I had an interesting situation where I’d had to use washers to make the drawers thick enough for screws to tighten on the knobs. I’d apparently put on these washers when the white paint had been a little wet, because most of they would NOT come off. So, I decided I’d simply paint over the washers to help hide them anyway.

You can probably just remove whatever knobs or pulls are on your drawers and set them aside for later use.

Hardware removed.

Step 3: Make a plan and set up. I planned to do one drawer at a time simply because that’s what I had room to do. You could try all at once if you have a bigger space, but I liked taking my time too. Just be sure that you put something (I used cardboard) under where you’re working, because the paint will drip. Each drawer should stand on their backside, with the drawer front facing up. Also be sure they are fairly level so the paint will flow evenly.

I kept all of the drawers ready nearby and carried them over one-at-a-time to my piece of cardboard where I was working. I also made sure I had space to set them to dry once each was done – I used my kitchen island for this, since I’d be able to easily wipe off any paint that dripped while drying.

As for the pouring paints, I/we picked the colors we wanted and set these out so they were ready. We used neon yellow, purple, hot pink, and light pink from my box set of pouring paints. (Ruby picked her own, completely different colors for the sides of the dresser that she was painting…yay.) I also kept the Floetrol bottle open and ready next to my pouring paints as well. And, I ran an extension cord for my blow dryer so I’d have room to maneuver. Lastly, I kept a few spare gloves ready if I needed them – though I ended up only using one, and you don’t necessarily have to use a glove, because the paint washes off easily.

Narrowing down colors 😜

It really helped to have all of this ready first so I wasn’t making a mess as I moved things around, and it helped me be able to work more quickly.

Side note: I set up so that I could do the drawers first. However, you could start on the main part of the dresser rather than the drawers…which would have been my plan if I’d had my way. I would start with the top, and once that was dry, then I would turn the dresser on its side and do one side, let that dry, and then turn it over and do the other side. This process would take quite a while because you’d need to let each side dry before moving to the next, but at least I could’ve started the process and given the drying time a head start before starting on the drawers. It is probably easier to practice and get the hang of pouring paints on smaller drawer fronts, but you could tackle the main dresser first if you’re confident!

Step 4: Pour the paints! It is absolutely necessary to use Floetrol for this project, or else the paints won’t flow like they should. I had a leftover bottle that wasn’t even half-full, so it doesn’t take a lot. Also, it’s important to use the appropriate kind of pouring paints for the colors, because regular acrylic paints don’t flow as well. You could mix acrylic paints with Floetrol, but buying the right kind in the first place seemed easier. 🤷‍♀️

Anyway, start by pouring a little bit of Floetrol on each drawer front and then wiping it around so that it covers the whole surface. You also want the Floetrol going over the edges slightly, as this will help the colors flow over the sides instead of building up at the edges.

Floetrol on.

Once the Floetrol was on (and keep in mind that this will basically disappear, so don’t count on it for color coverage), I took each paint color and squeezed out lines, drips, and swirls over the drawer fronts. It doesn’t have to look pretty! The trick is really to just get enough colored paint on so that you’ll be able to blow it around and cover the space you want – you get a feel for this as you go.

Colors ready.

With the Floetrol and pouring paints on, I took my blow dryer and turned it on high. (Yours might work better at a different setting, so practice a few times to get the feel for what you need.) Holding my blow dryer pretty close to the paint, I blew it around and moved in different directions until I got the look I wanted. This is the fun part!

Blowing colors around!

Once all your color is blown around and no longer shows lines or dripped circles, you can stop. Be careful not to overdo it, or your colors will run together too much and get all muddied.

If you make a mistake and don’t like it, you can wipe it off quickly and start over – that’s another nice thing about the Floetrol. Or, if you don’t like a part of the painting, you can add more colors and blow that around to fill in or go over that part.

Step 5: Dry. After I was done with each drawer, I carefully went around the undersides and wiped off the dripping, excess paint with my finger. This helped get rid of the majority of the dripping right away so that I could move them to dry on my counter. I lifted each drawer and kept the top level, making sure they didn’t touch each other in case the drying paint stuck.

As I finished more and more drawers, I paused every now and then to wipe the undersides if I saw drips. After a while I stopped seeing drips altogether, so I just left them alone to dry.

Drawers drying.

I let the drawers dry overnight to be sure they were entirely dry before putting the dresser back together.

Side note: Now is when I poured paint for the top of the dresser. I used the exact same process as I’d used for the drawer fronts, only this was a bigger space. Ruby liked the drips over the sides of the dresser (which she’d painted herself), so I sucked it up and left them be. As I explained above, I would have done the sides of the dresser the same way too. This would have required more time as each side dried before turning the dresser for the next side, but the process would have been the same, repeating the steps above.

Painting the top…with supervision.
Top painted.

Optional step: Apply a clear coat. You could go over the dried paint with a spray-on, clear gloss if you want a protective finish. I opted not to bother, since I’m hoping someday to talk her into letting me do the sides. 😉 But, it would help to protect the paint and also to give the dresser a nicer finish.

Step 6: Return hardware. I used the same knobs I’d used before, but you could always change it up if you like.

After putting the drawers back in place, the dresser was finished! This certainly is a fun way to add some color to a bedroom, and it completely changed the look of the boring white, banged up dresser. My daughter also really likes that she can switch which drawers go where, changing the look even more if it gets too “boring” in this current configuration…which I don’t see as a likely issue, but what do I know? 😆

AFTER: Color splash dresser!


DIY Must-Have Lists

Click to see more!
Click to see more!
Click to see more!
Posted on Leave a comment

Easy Painted Glass Windows

A looooong time ago, I came up with a way to decorate my pantry’s glass cabinet doors so that they looked kind of like stained glass — temporarily. They’ve been like this for so long that I knew I liked the design, so I decided to make it more permanent. The old method (See my post “Faux Stained Glass for Windows or Cabinet Doors”) was done by painting Saran Wrap and then taping that to the backside of the glass door. But now, I’d paint directly on the glass. This is a much better look if you decide you want it to be permanent, because it eliminated the plastic crinkles of the Saran Wrap that you can see from the front.

BEFORE: Temporary version.

I put this off for so long largely because I thought I’d have to take the doors down in order to paint them for real, but after painting vases vertically (see how I did that at “Faux Stained Glass Vase”), I realized the liquid leading didn’t drip like I’d thought it would! This meant I could leave the doors in place and just paint them as they were. I didn’t even have to empty the cupboards at all. Phew!!

Supplies:

(As an advertising affiliate and Amazon Associate, I earn a small commission from qualifying purchases. But it doesn’t cost you anything extra and helps me keep up my site!)

Step 1: Clean the glass. It was very easy to remove the painted Saran Wrap that I’d taped to the inside of the cabinet door, so again I can safely recommend that method if you just want something temporary. Once those sections of wrap were off, I gave the inside of the cabinet doors a quick wipe, but they weren’t that bad. Just be sure that you remember you’re doing this on the INSIDE of the glass doors…though I suppose you might as well feel productive and clean the outside too.

If you’re doing this on real windows (and I’m already looking around my house for options 😜) then you definitely want to give them a good quick wash with Windex or whatever. You don’t want a bunch of dust stuck on the glass while you paint. And remember, this will only work on the INSIDE of the windows, because you don’t want the paint getting ruined by the elements outside.

Step 2: Draw outlines with liquid leading. Again, it’s probably best to do this on the inside of the glass doors, so as to keep your work safer from everyday handling of the doors. So, you’ll want to open the doors and work on that side.

Ready with the liquid leading.

For my vases, I’d painted with the colored glass paints first, but here it seemed smarter to make my outlines first. That way, the black would show up best on the front side of the doors, and the color could slob a little on the black without showing from that side.

Anyway, I tried to make the stems and leaves look like what I’d done temporarily on the Saran Wrap before, since I’d liked that design so much. It helped a lot to stand on a chair so my arm didn’t get tired, but it didn’t take me too long to draw my design with the liquid leading. As with my vases, it didn’t drip, I could wipe it off quickly if I messed up, and it was easy to apply by squeezing out lines as I went.

I did try to get as close to the edges as I could, and it helped that my doors had those black divider sections on the front, so I could go behind those a bit without it being noticeable from the front.

Drawing my outlines.
Outlines drying.

I gave this several hours to dry, just to be sure it wouldn’t wipe away as I used my brush while painting with the colors.

Step 3: Paint with colors! I’d run out of the dark green (Viridian, from my set) that I’d used earlier on the Saran Wrap, but it was easy enough to use the light green first and then add a bit of Cerulean blue to make green leaves – blending these paints looks really pretty when light goes through. I squeezed out a quarter-sized amount of paint at a time and used a small craft brush to paint inside the leaf outlines, not worrying if it got over the black since that would not be visible from the front side of the glass.

The glass paint I used.

Once this was all dry, that was it! The cabinet doors look much nicer now without the plastic crinkles, and the look is now much more permanent, like it was always part of the doors.

AFTER: Finished painted glass doors.

There are SO many different designs you could paint, so let me know if you come up with other great ideas!


DIY Must-Have Lists

Click to see more!
Click to see more!
Click to see more!
Posted on Leave a comment

Easy Closet Shoe Shelves

Growing kids have growing feet, and we have a lot of shoes around here. Somehow, it’s almost impossible to keep both shoes of a pair in the same room of our house (why?!), and shoes become invisible once in a pile.

BEFORE: Empty closet nook. Pile of shoes.

So.

For anyone who doesn’t want to buy those shoe racks that sit at the bottom of a closet (which take up floor space, are difficult to see if hanging clothes are in the way, and unfortunately encourage kicking off shoes “near” the shelves on the floor), here was my DIY solution. It also allowed me to make use of that weird nook space inside the side of the closet. This project was very easy, very quick, instantly useful, and WAY better than piling shoes on the floor.

Supplies:

(As an advertising affiliate and Amazon Associate, I earn a small commission from qualifying purchases. But it doesn’t cost you anything extra and helps me keep up my site!)

  • Wood boards, about 1x12x36 inches
  • Paint or stain
  • L-brackets and screws

Step 1: Measure and mark shoe shelf placement. I initially thought I’d put a shelf pretty low, but then I realized it might be good to leave a decent amount of space between the floor and the underside of the lowest shelf. For now, my daughter can put her dirty clothes basket under there. When she’s older, she could put taller boots and heels on the floor as if it’s the lowest shoe shelf.

First, I found a stud along the back wall. Mine was about 8 inches out from the corner. If you don’t have a stud where you’re putting your shelves, you can just use wall anchors, which is what I had to do on the other side between the closet door and the corner. It really doesn’t matter if the two marks are the same distance from the corner or not – it might even help if they’re spaced a bit differently to help balance and support the shelf.

Once I had that stud marked 8 inches from the corner, I decided on 18 inches up from the floor. Like I said, I wanted a pretty good space between the shelf and the floor. If you want to run a lot of shoe shelves up the whole side of your closet (I would if this was MY closet), you could start lower to really commit that side of your closet to shoes.

Marking for bracket placement.

With that lowest shelf’s placement figured out, I decided to put the next shelf 10 inches up from the first. Easily enough, I measured 10 inches straight up from each wall’s marks.

If you’ve got more shelves to do, just keep going up! I’d personally change up the spacing to allow for different kinds of shoes – flats on shorter shelves, heels on higher shelves, etc.

Step 2: Attach L-brackets. With my wall marks done, I took my drill and a screw, held my first L-bracket over my back wall’s mark, and drilled the bracket onto the wall, into the stud. My bracket only required 2 screws, so that was easy!

I then went to the other side where the shelf would run across the side of the closet and repeated this for that wall’s L-bracket, only this time I needed to add a wall anchor first. Finally, I did the next shelf’s brackets the same way.

Back wall brackets on.

I will say that, if you plan to put a lot of really heavy shoes on your shelves, you might want to add a bracket on the side wall too, near the center of where your shelf is going to sit. But really, just these two brackets hold the shelf pretty stable, and that’s also why it helps to drill into a stud.

Step 3: Find and/or cut wood for a shelf. I’m running out of scrap wood, but I do still have a bunch of cabinet doors. With an unusual degree of luck, I had 2 cabinet doors that were exactly 35 inches long – just what I needed to go across the side of the closet! They were 11 inches wide, too, which fit perfectly and would be wide enough to fit even grown-up shoes once my daughter’s feet get to that point.

If you have nice 1×12 pieces of wood, that would work nicely too. Just be sure to measure your space’s width and length, and cut the wood accordingly.

My daughter decided that she wanted her shelves bright yellow, so I painted them quickly before moving on. If you use real wood, I think staining them would look really pretty…or paint them, or wrap them in contact paper – anything goes!

“Shelves” ready for painting.

Step 4: Attach the shelves to the L-brackets. To be sure I could get the drill under the shelf, I started with my top shelf first so that the lower shelf wouldn’t be in the way. Taking 2 little screws, I placed the shelf on top of the highest brackets and drilled the screws through the top of the bracket into the underside of the shelf. Repeating this for the other end, my top shelf was secure!

I lay on the floor and repeated this for the lower shelf.

Bracket screwed into shelf.

That was it! Like I said, this was extremely easy. It’s a great use of that goofy space at the end of a closet, it still leaves the floor free for other uses, and it’s SO much easier for my daughter to store and find her shoes. It’s also low enough that there is still plenty of room to hang clothes on the far end of her closet system, too.

Now, I just have to talk her into taking the stickers off the walls. 😬

AFTER: New shoe shelves!


DIY Must-Have Lists

Click to see more!
Click to see more!
Click to see more!
Posted on Leave a comment

Building a Raised Bed (or Sunken Ship) with Storage (or a Below-Deck Fort)

It’s become a problem that my daughters think I can make pretty much anything. And the problem doesn’t lie so much with them as with me, because almost always I think of a way to make it happen and then create a whole bunch of work for myself.

Enter: Sunken pirate ship bed.

“Oh, Alice, I don’t think I could possibly make… Ok, yeah. I’ve got an idea.” 🤦‍♀️

Honestly, I figured this one out as I went and ended up making the bed high enough to create a play space underneath. I mostly did this for cubby storage, but after throwing on a “secret door,” the space worked perfectly as a below-deck level to the ship/bed.

With a very vague plan, I ran to Lowe’s and bought a bunch of wood.

Supplies:

(As an advertising affiliate and Amazon Associate, I earn a small commission from qualifying purchases. But it doesn’t cost you anything extra and helps me keep up my site!)

  • 2x4x8 wood – 10 boards
  • 1x4x8 wood – 20 boards
  • 2x2x8 wood – 5 boards
  • 1x12x6 wood – 2 boards
  • 3-inch wood screws
  • brad gun and nails
  • Charred wood accelerator
  • old curtains
  • old basket
  • decorative rope
  • cubby boxes
  • 2 door hinges
  • 1 door catch and hook
BEFORE: Lots of wood.

Step 1: Measure what you need. Working with a full mattress, I needed my bed frame to be at least 76×54. Also, I decided that I wanted 5 cubbies on each side of the bed, so I needed to make 5 openings that were wide enough apart and high enough to fit my 12×12 cubby boxes. Other than that, I had a lot of freedom for how to build this thing.

It was also now that I decided/realized that I would have to build this bed in place, because I’d never fit it through our hall and doorway. And I really didn’t want to carry big sections up the stairs either.

Step 2: Create 2 sides. Again, my main objective was to make spaces for cubbies to slide under the bed and line each side. Wanting 5 sections on each side, I knew I needed 6 divider pieces spaced evenly between the top and bottom pieces of each side. These top and bottom pieces needed to be 76 inches long (to fit the mattress and give a little wiggle room), so I cut four 2x4s to 76 inches.

Next, I cut twelve 2×4 pieces (6 for each side) to 20 inches. I tested out my placement while I still had the boards in the garage just to get a look.

Planning my spacing.

Satisfied, I took the pieces up to the bedroom and began to screw the 12 divider pieces onto the sides’ tops and bottoms. I used a pencil to mark every 15 inches (ish) and then set the dividers in place on the floor with the top pieces and bottom pieces against the ends of the dividers.

Spacing dividers.

Using 3-inch screws, I first screwed the end dividers into the top and bottom of the first side to make big rectangles. These were easiest to line up and make sure they were square, and that helped the inner dividers to be right too.

I next took my interior dividers and centered them on the 15-inch marks I’d made. I used a kids hardcover book to make sure they were square – a very professional tool, sure, but it works. I ended up using 2 screws at each end to be really sure they were on solid.

Once both sides were assembled, I stood them up and spaced them like the sides of a bed – at 48 inches apart so that from far side to far side was 54 inches.

Sides done.

Step 3: Create 2 ends. This might’ve been over-building a bit, but I wanted to be sure the bed was sturdy and solid. Since my sides were 48 inches apart, I needed end pieces that were 48 inches long. So, I went back out to the garage and cut 4 more 2x4s for tops and bottoms, this time at 48 inches long. I also cut 4 more 20-inch divider pieces, 2 for each end.

Taking these back up to the room, I decided to bring the dividers about 12 inches in from each end. I wanted a big space in the middle because, by this point, I was getting the idea for the door leading under the bed.

While attaching the dividers, I used the kids book again to keep them square as I positioned the dividers and screwed them onto the top and bottom of each end piece.

Sitting the end pieces up, I positioned them in place and then used pocket screws to attach the tops and bottoms onto the ends of the side pieces.

Ends done.

Step 4: Create the top. First, I cut 4 long 2x2s down to 76 inches to run the length of the bed. I wanted these for supports to hold the crosspieces that the mattress would rest on. I could have put the crosspieces straight onto the 2×4 top pieces, but I knew from my daughter’s old bed that this way there would be more give to the crosspieces and make the bed more comfortable. 🤷‍♀️ I can’t really explain why, but the added bit of flexing really is nice.

Laying 2 of these support pieces on the far sides of the side 2×4 top pieces, I screwed them on at each end and once in the middle. For the 2 other supports, I spaced them evenly across the center of the bed and screwed them onto the ends.

(I ended up adding little legs under these middle supports, so you might as well do that now too. My legs needed to be about 22 inches. I used one screw for each to hold them on.)

2×2 supports.

For the crosspieces to hold the mattress, I had a bunch of 1x4s from my daughter’s prior bed frame. That bed’s specs had been a little wide for the mattress, so I cut the 1x4s down a little bit to be the right 54 inches to go across from side to side. I cut 13, purely because that looked like enough and worked for my spacing.

I positioned these 1x4s across the top supports, then screwed them on with shorter screws.

Crosspieces on.

Step 5: Cover the ends. To hide the crosspiece ends and also make a little lip that would hold the mattress, I cut 2 more 1x4s to 76 inches. These I held along the side 2x2s so that they covered the gap between each side’s 2×2 and the lower 2×4 while also sticking up just a bit above the crosspiece ends. I checked with a level to make sure they were right, and then I used my brad gun to nail these cover pieces onto the 2×2 and 2×4 along each side.

Side covers on.

I didn’t bother with covering the end against the wall, but I cut another 1×4 for the foot of the bed. I made this board 55 inches long to cover the gap exposing the ends of the 2×2 supports.

End cover on.

Step 6: (optional) Add steps and a door. If you’re building this for a little person too short to climb into the bed, it’s a good idea to add steps to give them a boost. I took scrap 2×3 pieces and cut two 10-inch braces, and I used scrap 2x4s to cut one 15-inch step.

Holding the 2×3 braces against the divider pieces of the section my daughter chose for her step, I screwed them into the 2×4 dividers. Then, I held the step in place and screwed that onto the tops of the braces. Easy.

Adding the step.

I created 2 more steps for either side of the big opening at the end of the bed. These were slightly narrower steps, but it was the same process.

End steps on.

Next came the “hidden” door over that big opening at the end of the bed. I had some spare hinges, so I screwed on 2 near the top and bottom of the divider where I’d be attaching the door. (See above picture.)

I had a lot of extra 1×4 scraps, so I cut 2 at 19 inches for the sides and 2 at 18 inches for the top and bottom.

First, I screwed on the side that attached to the hinges. I made sure to hold the board up a little bit so it wouldn’t scrape against the bottom 2×4 at the end of the bed.

Next, I took the top door piece and used my nail gun to attach it to the backside of the hinge-side piece. I thought about using a level, but since my cut was straight for the hinge-side piece, I just lined up the top of the top piece with that. I also made sure to use a little screw to secure them more than just the brad nails, since I’m sure this door will be yanked on a lot.

Securing the top piece of the door.

Once this top piece was secured, I did the same at the bottom.

For the far side piece, I made sure that the door would shut as I held the wood where I wanted it in front of the top and bottom pieces. Then I nailed this on too, and also used a single screw at the top and bottom.

Door surround done.

Once the surrounding sides of the door were done, I took some little 1x2s and cut them to about 18 inches. These I spaced across the front of the door like bars, and I nailed them on with two brad nails at either end.

Adding door bars.

Step 7: Create headboard and/or ship’s mast. I cut four 1x4s to about 53 inches and positioned them vertically against the head-end of the bed, spacing them the same as the 2×4 ends of either side and the 2 head-end dividers below. These 1x4s I screwed onto those 2x4s below so that they stuck up and would support the headboard crosspieces.

As for the mast at the headboard end, I took a long 2×2 and positioned it to be centered across the headboard. This I screwed into the top 2×4 at that end. (If you don’t want a mast, just skip this.)

Headboard supports on.

After these supports, I cut four more 1x4s to run the whole 56 inches across the head of the bed.

Adding headboard boards.

You could go all the way up like this, but for my sunken ship purposes, I wanted a gap in the middle the rest of the way up so that the mast would stand out. So, I cut six 1x4s to run only across the end sections, about 19 inches, for the remaining way up the supports.

I considered spacing these headboard crosspieces, and that would look nice too, but my daughter liked it better solid. That’s probably widest, considering stuff can fall through less gaps this way.

Step 8: Insert shelves for cubbies. I wanted the cubbies to sit flat rather than tip on the 2x4s at the bottom of the bed, so I took 2 long 1x12s and cut them to 67 inches long. Then I cut them on my table saw to be 7 inches wide. This left me with about 5-inch strips too. I took all of these 67-inch long boards up to the bedroom and slid them under the bed along each side.

With the 7-inch board sitting on top of the 5-inch board, that brought my long shelf boards up so that they were level with the bottom 2x4s. I used little brad nails to secure the 7-inch board on top of the 5-inch board. This meant no more tipping cubbies, plus I had nice, long shelves along the floor just under each side of the bed. If my daughter doesn’t want cubby boxes in all the sections, there’s a shelf to hold books or something down there.

Placing shelves in place.

Step 9: Sand and stain/paint. It made the most sense to wait until the bed was assembled before sanding my edges, since this way I’d know what would be exposed and what wouldn’t. Taking my small hand sander, I went over all the corners, ends, and edges to smooth down any sharp points.

Once that was done, I decided to use charred wood accelerator on the wood rather than normal stain or paint. Since we were going for a “sunken ship” look, I wanted to age the look of the wood and get it nice and dark. If you’ve never used this stuff before, it is SO cool. I’ll put up the video on my Instagram soon to show how it looks as it goes on, but basically you brush it on and it makes the wood…age and look charred. It also dries pretty quickly, which was good for impatient children waiting to play under the bed. 😆

Applying age-accelerator.

Step 10: Finishing sunken ship touches. I tinkered around with ideas on how to make the rest of the mast support a “sail,” and I ended up securing a tension rod to the wall high over the top of the mast. At the top of the mast, I took a little basket and screwed it onto the top for a lookout. Taking old curtains, I put them on the tension rod and slid one to each side of the mast, then used some decorative rope to tie the curtains onto the lower part of the mast. Tugging the curtains a bit, I pulled them out to “billow” a little bit, the tucked the ends behind the lower center section of the headboard.

Attaching the “sail.”

Next, I made the bed and tucked the cubby boxes into the open spaces around the sides.

The final touch? Sitting Captain Snoopy in the lookout. 😆

AFTER: Raised bed with play area!

Considering I had no real plan when I started, I’m pretty happy with how this project came together without too much trouble. There’s storage. There’s a play area. And now I’m one step closer to finishing my kid’s “Under the Sea” bedroom makeover!

Testing the door.
Setting up the play space below deck.


DIY Must-Have Lists

Click to see more!
Click to see more!
Click to see more!