It was time to give my 4-year-old a different bed. Her room is fairly tiny, so I thought for quite a while about how to give her the most space but also a bigger bed. (She’s a wiggler – she needs a bigger bed than a twin.) I finally decided to go up for more real-estate. She liked the idea of bunk beds, so I figured this would help with sleepovers while also, on an average day, giving her more room to play up on a second level. We had a spare, full-sized box springs and mattress, so I planned to put this under a lofted bunk bed…with some extra levels for playtime.
Supplies:
(As an advertising affiliate and Amazon Associate, I earn a small commission from qualifying purchases. But it doesn’t cost you anything extra and helps me keep up my site!)
- 11 pine 2x4x8s
- 13 pine 1x4x8s
- 3 pine 1x6x8s
- 3 pine 2x2x8s
- 1/8 inch plywood sheet
- 8-ft piece of baseboard
- 8-ft piece of wood casing
- One pallet
- Paint (I used Unicorn Spit)
- Framing screws
- small nails/nail gun
- wide board for headboard, batting, and cloth (optional for headboard)
- 2 L-brackets, 2-inch size (optional for the headboard)
- staples and staple gun (optional for the headboard)
Step 1: Build the bedframe. I did use the frame of her old bed that I’d built before, so you do need to follow those instructions first. I’ve included those supplies in THIS supply list above, but the full instructions for this first step can be found at “Using a Pallet to Make a Toddler Daybed With Bookshelf Headboard.” The only thing different is that you don’t want to attach the pallet bookshelf to the head of the bedframe, because that will be used in a different place later. This frame is very simple to make, and I’d also recommend painting it now (as I obviously had done) because that makes it easier to reach before it’s up as a bunk bed.

Step 2: Assemble sides of loft. Using 2x4s and screws, I made two tall side braces that would stand at either end of the bedframe to hold it aloft.
I cut 6 of these 2x4s to 55 inches, and these were the vertical pieces. I cut 4 to 41 inches to act as the crosspieces sitting at the top as well as running along the outsides at the bottom for stability. (These bottom pieces I removed later because the pallet bookshelf holds the one side plenty secure without it, and the other side ended up having a 51-inch piece across the bottom for the climbing platform. So, if you want to cut that one bottom piece to 51-inches now, that saves some trouble later.)
Starting with what would be the pallet bookshelf side, I took 3 of my 55-inch pieces and lay them on the floor with the 41-inch top piece sitting up against the ends. I brought the 2 side pieces in 2 inches so that I would have room to screw up through that top brace into the bedframe that would sit on top. (You can see one of my prepped screws at one end in the picture below.) I also wanted to leave room for myself to screw up into the middle 2×2 of the bedframe, so I moved the middle 55-inch piece slightly back. This left me about 15 inches of space between the back 55-inch piece and the middle 55-inch piece while the middle to front pieces had a 17-inch space. Using my drill, I screwed 2 screws into each end, securing the 55-inch pieces onto that top 41-inch piece.
For the other end of the 55-inch pieces, I lay another 41-inch piece over the boards so that it would be on the outside of the loft side. Then I used 2 more screws for each and screwed them in place to hold the whole rectangle together.
MAKE SURE everything is square, or everything from now on will be off, end up less level, and potentially result in an unsteady bed frame. These sides are literally responsible for all the heavy lifting.

With that first side done, I stood it up and tested out placement in the room. It worked out that I could run an entire 8-foot 2×4 along the back wall and still have the space I wanted, so to make things easier, I put that back 2×4 in place now and used 2 screws to attach my first completed side into that back support. (See picture above, with one screw in and 1 waiting for me to take the picture.)
For my other side, I repeated the process same as for the first side. The only difference would be to use a 51-inch 2×4 along the bottom outside instead of a 41-inch piece, since that’s what I ended up needing later to complete my climbing platform on that end. Again, I screwed the second completed side into the back 2×4 brace, making sure this was placed at the 76-inch mark, where it needed to sit under the bedframe. Also, you can again see where I left a few inches at the top and readied screws in place for the bedframe above.

SIDE NOTE: If you have bigger kids and want to make this extra secure, you could add another 2×4 back piece about midway up, going across from side to side. This would be easy to install later if you decide it needs it, too. I might do this someday and add a little shelf across, which would be nice for a phone, glasses, etc.
Step 3: Set bedframe on the loft sides. Impatient for help, I hulked out and lifted the bedframe up onto my loft sides all by myself. (5/10, do not recommend.) After minor adjustments, I got the bedframe exactly in place so that the top 2x4s sat directly under the 2×2 braces along the bottom of the bedframe. Also make sure the front ends of the supports don’t stick out farther than the bedframe’s front side.
Once the bedframe was in place, I used those prepped screws on the undersides of the top supports to screw up into the bedframe at either end’s front, back, and middle 2x2s.

Step 4: Build the climbing platform. First, I cut 2x4s into 3 short legs at 26 inches each. These I lined up along the wall at the end where I’d left a space between the bed and the wall. (This is where that back 2×4 sticking out longer than the bed comes into play.) Next, I took a 51-inch 2×4 piece and lay that across the tops of these legs. Using 2 screws for each, I screwed down into the legs. I also took a single screw and used that to secure the back leg to the back 2×4 that connected everything.
As you can see from the picture below, I had a vent to work around, so spacing of my legs was completely arbitrary around that. Basically, just space them evenly so they’ll support the platform, and be sure to have one right at the front end.

SIDE NOTE: Again, this whole bed was planned because my daughter’s room doesn’t have a lot of space, so I knew this climbing platform would be nice and secure, stuck in that corner. If your climbing end is more in the open, you might want to build this a little more sturdily. You could add another 2×4 across the back from the back leg to the back of the loft side. Once the other side of the platform’s support is on, you could add a 2×4 across the front end too.
For the other side of the platform’s support, I took another 51-inch 2×4 and ran that across the outside of the loft’s side so that the top was level with the wall side’s support. I then took a few screws and screwed that (making sure it was level!) onto the 3 vertical loft 2x4s – these worked as legs for that side.
With the 2 sides of my platform’s braces/supports ready, I cut a bunch of 1x6s to 18 inches. These I very easily lay across the braces and used a nail gun to secure them in place.

As you can see from the picture above, my 51-inch support on the loft’s side stuck out farther than that side. This gave the platform a little extra length. But it also meant I needed another leg at that end, so I cut a 28-inch piece of 2×4 and screwed that to stand at the end of the support ALONG THE OUTSIDE so that it rose to be level with the top of the 1×6 going across to make the platform.
This was also when I decided I needed a 51-inch support along the bottom, but you should already have that in place. You’ll want to screw the leg onto that as well, adding stability.
With the platform done, I cut a 16-inch piece to create a step where the platform stuck out farther from the loft side. This I secured with 2 screws at either end – one end on my new leg and one end on the front loft piece. Again, make sure the step is level. (You could also put a step at the end of the platform rather than this side spot, but I wanted to be able to slide my daughter’s crib through the space at the end.) I DID take 28-inch pieces of 1x4s to cover the front ends, hiding the less pretty 2x4s. (See the picture a ways below that shows the painted platform.)
Above the platform, I took 2 more 2×4 pieces and cut them to about 20 inches, then screwed them on as steps to climb from the climbing platform onto the top bunk. I put these across the loft side 2x4s that were closest to the wall. This left an empty space between the other loft sides so there’s room to crawl up there from the bed, if she wants.

Step 5: Secure pallet bookshelf and/or make shelves along the other loft side. Again, how to make this pallet bookshelf can be found on my earlier blog post about how to make the bedframe (link at the top). We still really liked it, so I set the bookshelf pallet on the inside of the other loft side. Pretty easily, I screwed this into the 3 vertical 2x4s of that loft side. This also REALLY helped stabilize the whole frame. I was then able to get rid of the 2×4 running across the bottom of that loft side.

SIDE NOTE: If you don’t want to use a pallet for a bookshelf, you could also make shelves all up and down that loft side. Or, you could just leave the bottom brace on and also add steps all up that side. For us, we needed more bookshelves!
As for how to add shelves, I added one above the pallet because we needed a little more room for books. I had a dresser sitting against the outside of that loft side, so this worked as a back for our shelves. If you want shelves, you could use similar furniture or else just take a sheet of plywood and secure it to the outside of the loft side.
For the shelves’ braces, I grabbed 4 little scrap pieces of 2x4s (2 for each shelf). These little pieces I screwed into the insides of the loft side’s 2x4s, making sure they were level across from each other.

Next, I set my 2x4s on top of these braces, made sure the edges lined up, and secured each end with a screw into the braces. I did one shelf between the front 2×4 and the middle 2×4 and one shelf between the middle 2×4 and the back 2×4.

In order to keep the books in place, these shelves needed a front piece, so I took a nicer, thinner piece of scrap baseboard and put that across the entire loft side, right in front of the shelves. (This baseboard was the same as I’d used on the pallet bookshelf.)
Step 6: Build the front rail. I cut a bunch of 1x4s to18 inches, since this would match the back/original rail that goes along the wall. These I placed on the original bed frame (the new bunk) along the inside of the 1×4 front piece that ran along the bedframe. Using my nail gun, I nailed these 1x4s vertically onto the front piece. I spaced these so they ran evenly across the front.
That done, I took a long, 76-inch 1×4 and nailed it along the tops of these to complete the wood rail. To cover the kind of ugly ends where the bedframe connected to the loft sides, I also took two 20-inch 1×6 pieces and used them to cover either end of this front rail, hanging low enough to cover the loft side top pieces.

Step 7: Build a headboard. I made this more complicated than it needed to be because I wanted a solid headboard that I could hang a stuffed animal-holding net from. If you’re doing stairs all the way up instead of bookshelves, you don’t need to do a headboard. Or, you could do the same thing as what I did for the front rail.
Here’s what I did. First, I took a 2×4 and screwed it across the loft’s side to act as a support brace for the headboard to sit on. Next, I took a solid piece of wood that ran the full width of the bed and rose about 10 inches, and I wrapped some batting around this board, stapling it on. Then I took an old curtain (she has blinds now) and wrapped the board from the underside, leaving the front and top unwrapped for now. I used a staple gun to secure the curtain all along the bottom of the board.
With this headboard prepped, I set it on that 2×4 support and screwed it into the main loft side’s top 2×4 along the bottom. Now I wrapped the curtain the rest of the way around the board, and I used my staple gun to hold the curtain tight around the headboard, stapling along the bottom where the back of the board met the bedframe.

To really help hold on the headboard, I took 2 little L-brackets and screwed them into the back of the headboard and also the backsides of the front and back rails. This made the headboard very secure and strong. (Strong enough for me to attach the stuffed animal net, which she can reach from the top bunk.)

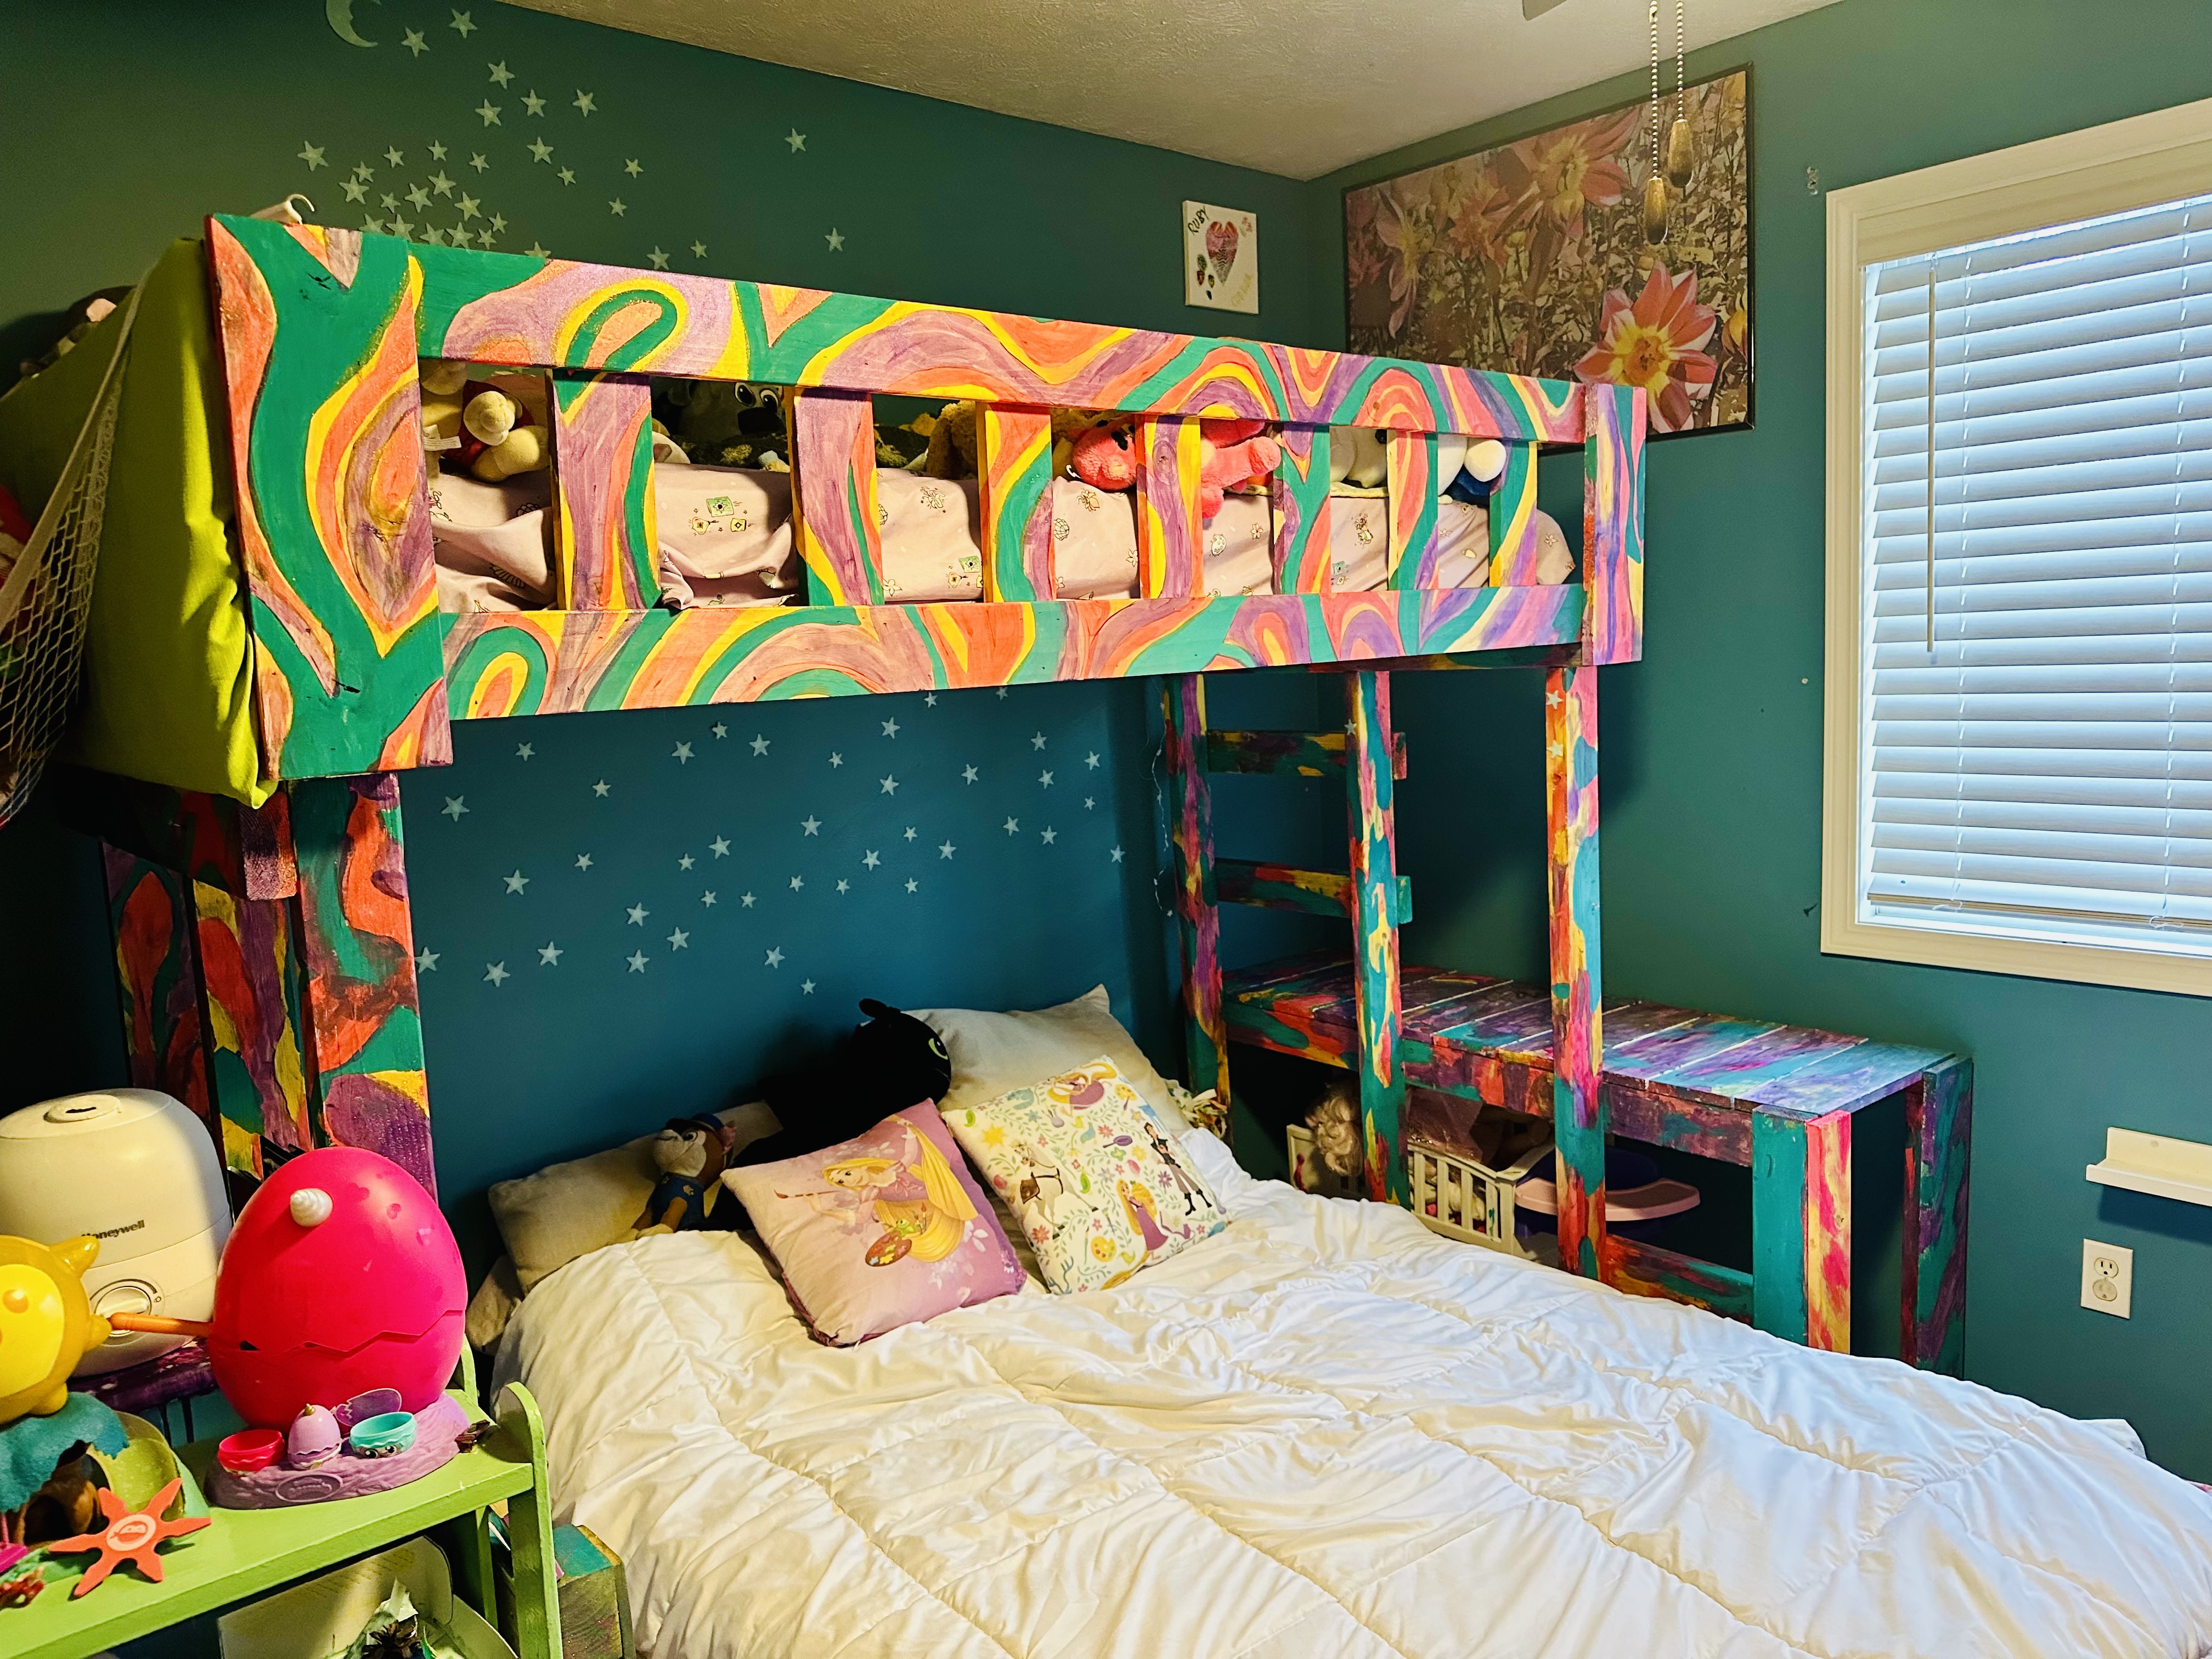
Step 8: Paint! We went crazy. 😜 My daughter loves anything fitting a “rainbow theme” and wanted to use the same unicorn paint that we’d used on her original bed. This worked out in that it made the bunk bed, climbing platform, and new loft sides match. It was a little rough, however, because mommy wanted to make pretty swirls and my daughter…did her own thing. 😂 But she loves the colors and how it turned out, so okay.

Yay! Now she has a “Big Girl Bed” to wiggle in at night, plus a climbing platform to play on, plus a whole bunk to use as a fort and for sleepovers. And as an added bonus, her baby’s crib fits under the climbing platform, so her doll gets its own little room too. Plus, the stuffed animals are completely out of the way but have their own, accessible home!


DIY Must-Have Lists


This is just incredible!! I love looking at all the wonderful things you create! Keep these fun ideas coming!
Love, Karen
Miss Lovell/Mrs Drexel
Thank you! 🙂