Posted on Leave a comment

Custom Closet Stand/Bench Surround

During the January that will never end, we’ve had many, many snow days. This equals a mess. And when we don’t have snow days, we gear up for every trip outside. This also equals a mess, plus puddles. And so many mittens.

A while ago, I removed the doors to the closet right off our garage and inserted a bench with a shoe rack, plus moved in two little cupboard/shelving units to hide stuff away. Can my family be bothered to put things on these shelves? No. And since the bench didn’t quite fill the whole expanse, I always intended to use that extra space on the sides for bags and bigger items… But of course mittens and all sorts of “precious” things ran for their lives and disappeared down these sides. Also, my girls had to stand on the bench to reach the coat hooks, but with the bench against the wall, there wasn’t room without them falling over backwards. They also could barely climb over all the shoes to get to the bench.

None of this was working.

BEFORE: Ill-fitting bench.

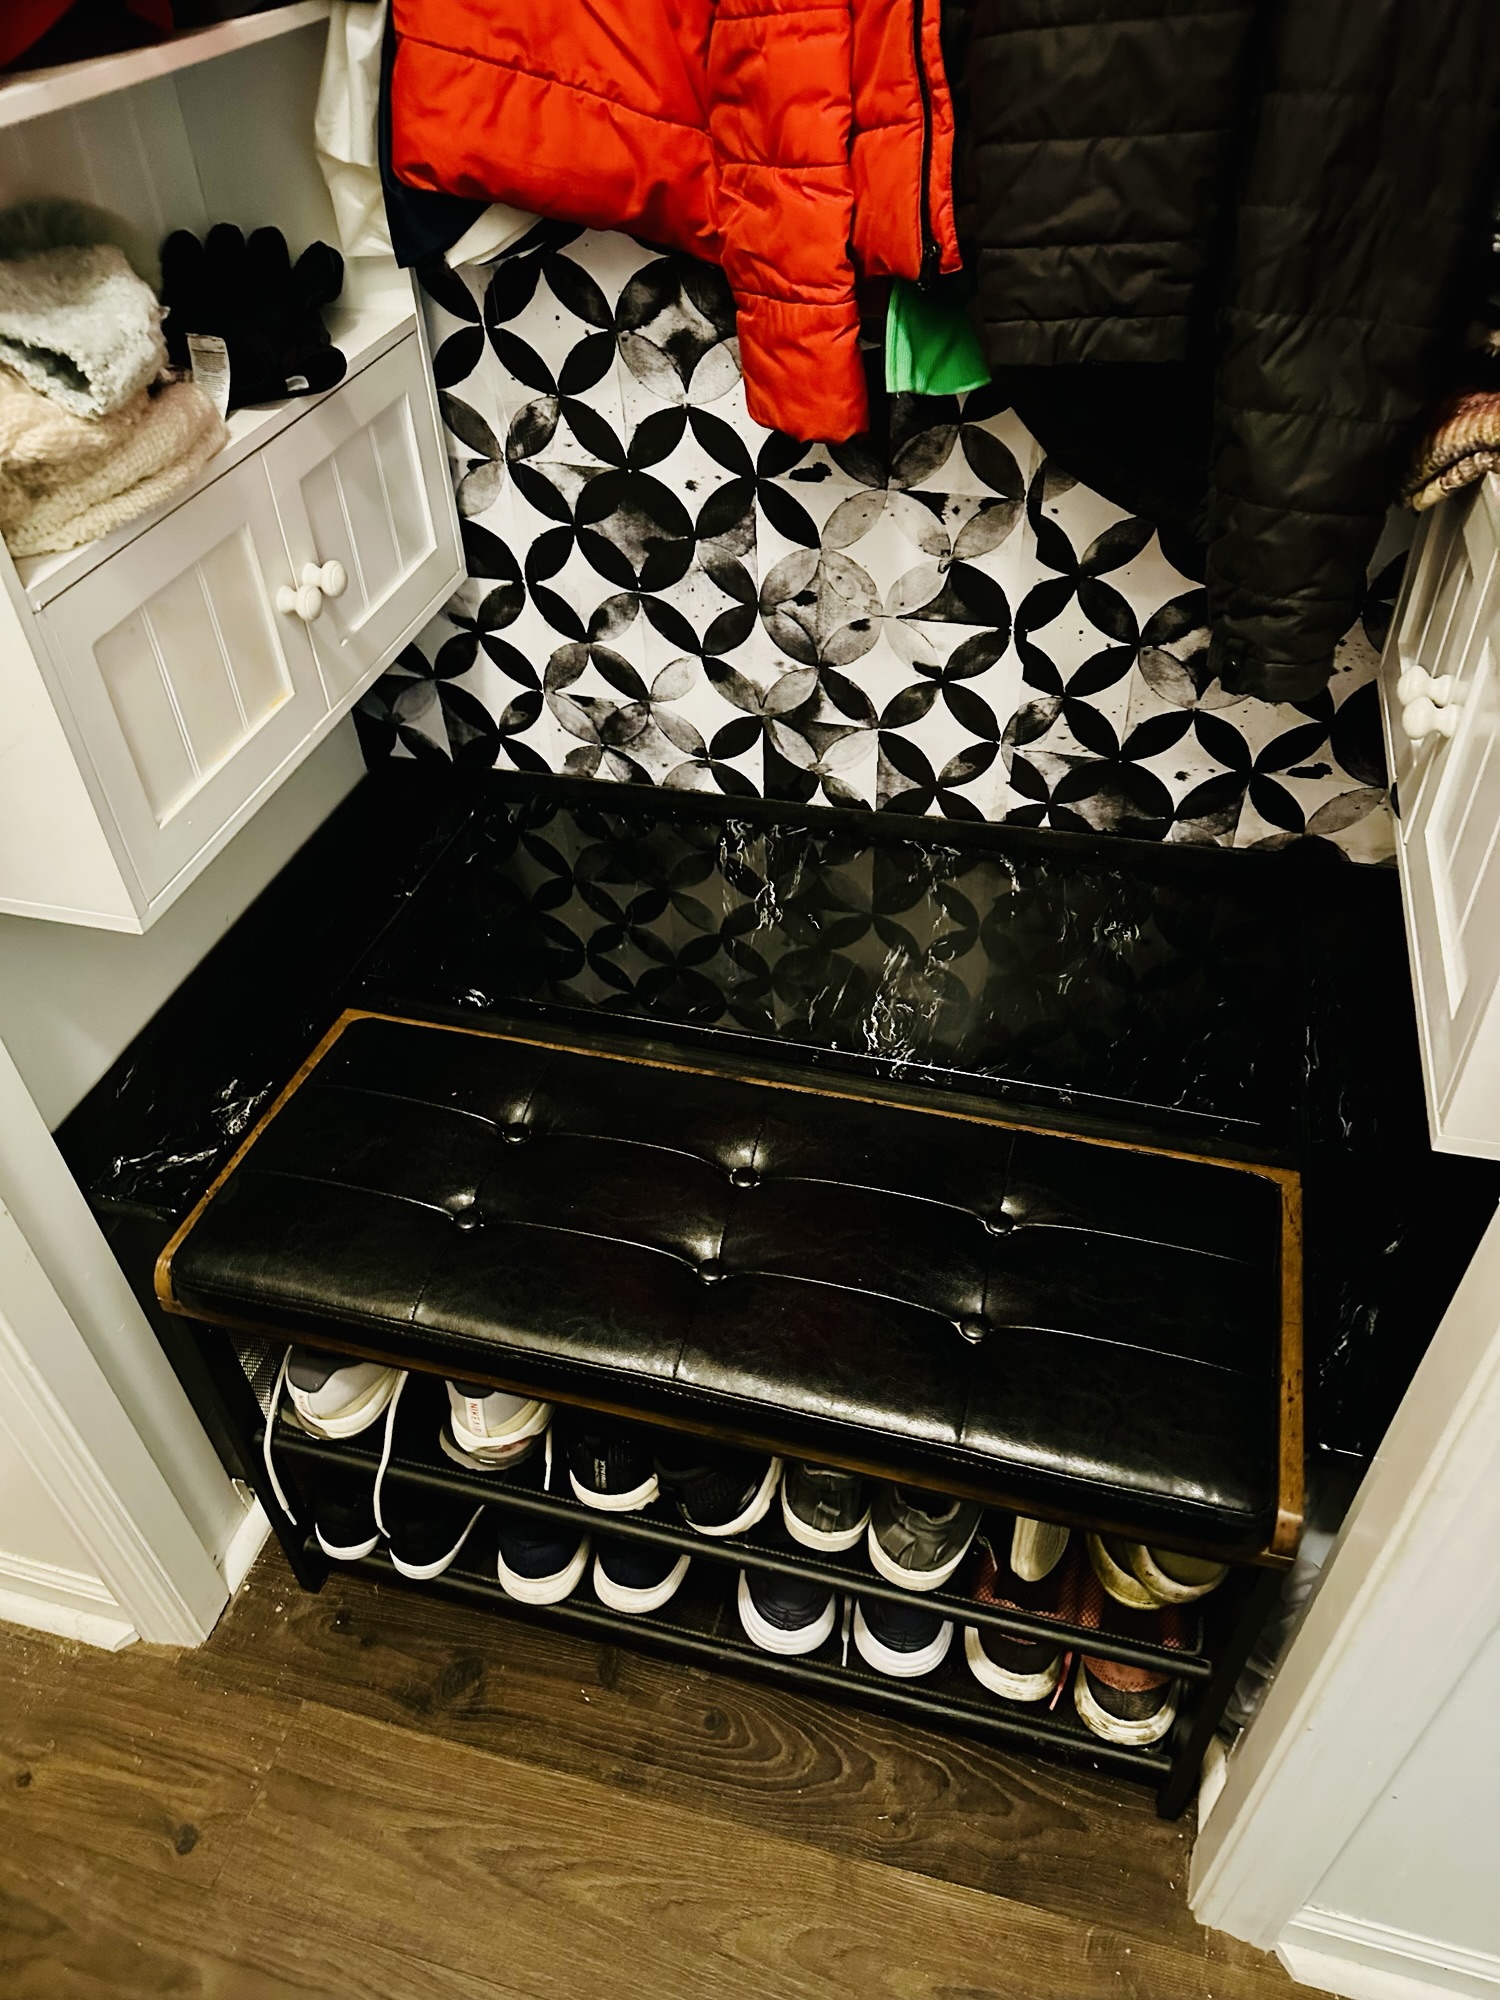
So, I finally snapped a few weeks into January and found a way to block precious items from ever falling into the abysses again. By building a kind of stand/bench around the nice bench I already had (I didn’t want to get rid of it, since we really like it, but it needed to be more functional) I created a place to set wet things while they dry. And, now the girls can stand on the bench and reach the coat hooks without falling over. PLUS, this gives me hidden storage for extra boots, bags, etc.

The nice thing about doing this custom is that it fits exactly into our closet space. I could have built a whole new bench insert and shoe racks (I know people will point that out) but I genuinely like the bench we have, and it looks nicer than what I would’ve come up with.

Supplies:

(As an advertising affiliate and Amazon Associate, I earn a small commission from qualifying purchases. But it doesn’t cost you anything extra and helps me keep up my site!)

  • Spare bench
  • Two 2x4s
  • Screws
  • 3/4 inch 4×4 MDF sheet
  • Paint
  • Epoxy, dyes, mica powders
  • L-brackets

Step 1: Remove closet items and measure. Our closet has one side wider than the other. I don’t know why, but it made measurements a little complicated. I decided that I liked the bench centered in the doorframe rather than centered between how far the shelves stick out. This left me with 5 inches on one side of the bench, 8 on the other, and 15 inches between the back of the bench and the back wall. I wanted ALL of that space covered, with absolutely no space for things to fall through. The bench was also 19 inches high, so I wanted the top of my stand to be level with the bench’s seat.

Step 2: Cut bracing pieces and assemble. Using 2x4s, I cut two pieces to cover the full width of my closet, 41 inches. (Yes, you can see from the lower picture below that I used one shorter scrap piece. This worked fine, but if you’re living in a perfect world, splurge and cut yourself two pieces at the full width. 😆)

For the front piece, I cut 3 legs at 16 1/4 inches, since this would bring my whole height once completed to 19 inches, like my bench. Basically, just figure out the height you want and make sure that the legs + the piece going across + the stand’s top = the height you want.

Also note, I didn’t need legs for my back wall piece, since I knew where the studs were. If you don’t want to screw into your studs, create extra legs for that back piece going across too.

To assemble these braces, I stood up my 3 legs and lay the long piece across. I made sure to bring in the 2 legs on the ends so that the closet’s baseboard wouldn’t be in the way. I only used 1 screw to secure on each leg. You could use 2 if that feels sturdier. Just be sure that the heads of the screws don’t stick up higher than the wood.

Adding legs to brace.

Once that front brace was assembled, I set it in the closet and tested placement by setting the bench where I wanted it to be. I nudged and wiggled until the brace was exactly lined up and straight, then I just made little marks on the walls at either end so I’d know where to line things up if it got bumped. You don’t have to secure this brace to the walls at all, which makes this pretty easy! Once I knew the correct placement, I took the bench back out again so it wasn’t in the way.

For the back piece, again, I just screwed it into the back wall’s studs.

Placing braces.

Step 3: Make the stand’s top pieces. You could use plain wood, then paint or stain it. You could use countertop stone pieces… There are probably many options for how to create the top of this bench surround. I decided that I wanted something dark (to match the look going on with our wallpaper) and something waterproof (so we could lay wet stuff on it to dry). Since I had a bunch of leftover MDF and epoxy, that’s what I went with. I also chose this because I could match the bathroom countertop in that same area of the house, and I plan to do the same with our laundry room counter nearby – we can have a matching “wing of the house” this way. 😜

First, I checked my measurements for the 2 side pieces I’d need. One was 5 inches wide (wall to side of bench) and 24 inches long (back wall to front doorway’s inner side. The other was 8 inches wide and again 24 inches long. I cut these 2 boards of MDF, then tested their fit. 👍

Testing the top pieces’ fit.

For the bigger, middle piece that would sit behind the bench, I decided to leave a little wiggle room so my fingers could get in there to lift off this part. Under here was where I’d get that extra storage. So, I went with 14 inches deep (back of bench to back wall) and 26 1/4 inches long (left top board to right top board, leaving a little room, about 1/2 inch either side).

For my FULL process on how I epoxy counters, etc. see this post. Basically, if you go this route, follow the instructions of whatever epoxy you’re using. I use StoneCoat Countertop epoxy, and it’s always worked great for me. For this project, I used only 2 Solo cups’ worth of epoxy – first for the color coat and then for a clear, protective coat overtop.

Ready to epoxy.

First, I sanded the corners of my MDF, especially the sides that would be facing the bench, not facing the wall. Next, I used plain-old latex paint and put on a coat of black. I gave this about 4 hours to dry.

Next, I mixed the epoxy according to instructions – I can do this by look and feel at this point, but be sure to follow your instructions if you’re new to this because mixing it well is very important. Then I added a little black epoxy dye into my epoxy, stirred, poured that on my boards, and sprinkled on a little gold mica powder. Using a glove, I wiped around until I liked the look of it, being extra carful to make sure it went over my corners to get the sides. Then I took a few drops of white acrylic paint and wiped that around to make little, broken, marble-like lines. NOTE: This acrylic paint will shrink up and get crackly, so keep an eye on the look as it progresses, because it won’t necessarily end up looking like what it looks like right away.

Once done with my design, I hit the surface with a quick pass of my kitchen torch to get out bubbles, let it sit for 20 minutes, torched out bubbles again, and then let it set for 10 hours. Once it was not tacky to the touch, I poured on my clear coat, torched it, and again let that set.

Ignore the mess 😜

Again, different epoxies vary, but I let mine set for a week to cure. After that, it was ready for light use, even though it takes a full 30 days to completely cure. When my pieces were ready, I sanded the undersides to remove the dried bumps of dripped epoxy. Then they were ready.

Again, you could use something else for the top pieces of your stand/surround, but I really like how this epoxy always turns out, plus it’s super-durable.

Step 4: Installation and finishing touches. Taking my top pieces to my waiting braces, I started with the 5-inch side. Making sure I had that 5-inch piece turned so the nicer edges were away from the walls, I set it in place and found that it fit perfectly.

Before securing it in place, I went underneath and installed a little bracket thing. This I screwed to the inside of the front wall/doorframe side. If you don’t have these, use a little L-bracket, which honestly would work better and easier. (I just happened to have these things and was looking for a way to use them. lol)

Anyway, I added this bracket with the top board in place so that placement was easier – I could see exactly where it needed to go to be a level support.

Once done testing the placement of my 5-inch top board, I removed it and applied a little wood glue on the tops of the 2 braces where they’d touch my top piece.

Glue and bracket ready.

Once ready, I pushed the 5-inch piece into place on the wood glue. I next went under the braces and screwed up through them – don’t get too long of a screw!! – to secure the brace and the top piece together. I also went under and screwed the bracket to the underside of the top board.

I repeated all this for the 8-inch side’s top board.

All of this keeps the loose brace in place rather than having to attach it to the side walls because, if your top side pieces sit snug enough in the space, this whole stand/bench surround won’t even wiggle.

8-inch side on.

It was at this point that I decided I wanted to paint the braces in the same black as the paint I’d used for my top pieces’ base layer. You could do this earlier, if you choose, but I liked seeing everything in place and knowing exactly how much would be visible anyway – I needed to be careful with the little paint I had left.

Painted braces black.

For the middle top piece, I considered putting hinges on it. But, I can easily imagine little fingers getting pinched with a slam. Or, I could’ve put handles on it, like drawer pulls, to make lifting it out of place easier. But, I wanted everything to look nice and smooth, without anything to catch on little butts if they sat back on this part. So, I opted just to put little cupboard bumpers on the bottom corners of the big middle piece. This lifts it slightly where the piece rests on the 2×4 braces, making it both easier to grab and also more stable so it doesn’t move around or do any damage when set back in place.

Step 5: Place the bench in place! With everything secured, I slid my bench back into place in the gap. It fit great, with no room for losing treasures, and looks really nice. My 3/4 inch MDF worked perfectly to bring the full height of my stand to match the bench’s 19 inches, so it all looks like it is meant to go together.

The best part? The next snowstorm, the girls threw all their stuff on the bench’s surround, everything dried without making a soggy mess, and no mittens were lost.

AFTER: Bench with custom surround stand.


DIY Must-Have Lists

Click to see more!
Click to see more!
Click to see more!
Posted on Leave a comment

Color Splash Furniture Makeover

This would have gone a little differently without the help of my 4-year-old, but she wanted to help and I didn’t want to disappoint her. It was fun to work together, and at least she’s proud of her work. So, here’s how I made over her dresser…with a few pointers on how I’d planned on doing it by myself.

When we first moved into our current house, I did a quick paint job for my old dresser that had been revamped MANY times already. I didn’t figure a dark brown would be very kid-approved, so I painted the whole dresser a plain white for the time being and added cute knobs. But I didn’t even do 2 coats, and clearly it needed something new.

BEFORE: Plain dresser in need of love.

Fast-forward to now, and it was time for something more fun. Ruby wanted a “color splash” and, boy, did we find a way to make that happen. 😜

Supplies:

(As an advertising affiliate and Amazon Associate, I earn a small commission from qualifying purchases. But it doesn’t cost you anything extra and helps me keep up my site!)

Step 1: Prep and base coat. Our dresser had a glossy white paint that first needed to be cleaned off (think years of sticker gunk and…slime, possibly?). Taking the dresser into my garage, I next removed the drawers and sanded the main body of the dresser. I used my little handheld sander, but you could just use a strip of sandpaper. I went over the whole dresser, sanding over the glossy paint to roughen it up a bit so that new paint would adhere better to the surface.

Lightly sanded.

If your furniture has fresh, never-painted wood, you’re probably fine to just paint a base coat of whatever color you want.

If your wood is stained, you definitely want to sand that down before painting a base coat. If your paint is peeling, you definitely want that off too. There are a lot of videos out there about stripping paint, but basically, just get your wood to the point where new paint will adhere.

Because the pouring paint won’t cover every part of the dresser, you want to give the dresser a base coat of paint that the pouring paints will go over. I left most of our dresser white. For the front pieces that would be exposed around the drawers, however, I used a purple spray paint and quickly did a base coat of that for the front. I didn’t worry about it getting on the top, sides, or bottom because I figured that might look kinda cool with the pouring paint going over these places anyway.

Whatever you use for this base coat, it doesn’t have to be perfectly flawless, since the “color splash” will cover a lot.

Base coat of purple added.

Step 2: Remove hardware. I had an interesting situation where I’d had to use washers to make the drawers thick enough for screws to tighten on the knobs. I’d apparently put on these washers when the white paint had been a little wet, because most of they would NOT come off. So, I decided I’d simply paint over the washers to help hide them anyway.

You can probably just remove whatever knobs or pulls are on your drawers and set them aside for later use.

Hardware removed.

Step 3: Make a plan and set up. I planned to do one drawer at a time simply because that’s what I had room to do. You could try all at once if you have a bigger space, but I liked taking my time too. Just be sure that you put something (I used cardboard) under where you’re working, because the paint will drip. Each drawer should stand on their backside, with the drawer front facing up. Also be sure they are fairly level so the paint will flow evenly.

I kept all of the drawers ready nearby and carried them over one-at-a-time to my piece of cardboard where I was working. I also made sure I had space to set them to dry once each was done – I used my kitchen island for this, since I’d be able to easily wipe off any paint that dripped while drying.

As for the pouring paints, I/we picked the colors we wanted and set these out so they were ready. We used neon yellow, purple, hot pink, and light pink from my box set of pouring paints. (Ruby picked her own, completely different colors for the sides of the dresser that she was painting…yay.) I also kept the Floetrol bottle open and ready next to my pouring paints as well. And, I ran an extension cord for my blow dryer so I’d have room to maneuver. Lastly, I kept a few spare gloves ready if I needed them – though I ended up only using one, and you don’t necessarily have to use a glove, because the paint washes off easily.

Narrowing down colors 😜

It really helped to have all of this ready first so I wasn’t making a mess as I moved things around, and it helped me be able to work more quickly.

Side note: I set up so that I could do the drawers first. However, you could start on the main part of the dresser rather than the drawers…which would have been my plan if I’d had my way. I would start with the top, and once that was dry, then I would turn the dresser on its side and do one side, let that dry, and then turn it over and do the other side. This process would take quite a while because you’d need to let each side dry before moving to the next, but at least I could’ve started the process and given the drying time a head start before starting on the drawers. It is probably easier to practice and get the hang of pouring paints on smaller drawer fronts, but you could tackle the main dresser first if you’re confident!

Step 4: Pour the paints! It is absolutely necessary to use Floetrol for this project, or else the paints won’t flow like they should. I had a leftover bottle that wasn’t even half-full, so it doesn’t take a lot. Also, it’s important to use the appropriate kind of pouring paints for the colors, because regular acrylic paints don’t flow as well. You could mix acrylic paints with Floetrol, but buying the right kind in the first place seemed easier. 🤷‍♀️

Anyway, start by pouring a little bit of Floetrol on each drawer front and then wiping it around so that it covers the whole surface. You also want the Floetrol going over the edges slightly, as this will help the colors flow over the sides instead of building up at the edges.

Floetrol on.

Once the Floetrol was on (and keep in mind that this will basically disappear, so don’t count on it for color coverage), I took each paint color and squeezed out lines, drips, and swirls over the drawer fronts. It doesn’t have to look pretty! The trick is really to just get enough colored paint on so that you’ll be able to blow it around and cover the space you want – you get a feel for this as you go.

Colors ready.

With the Floetrol and pouring paints on, I took my blow dryer and turned it on high. (Yours might work better at a different setting, so practice a few times to get the feel for what you need.) Holding my blow dryer pretty close to the paint, I blew it around and moved in different directions until I got the look I wanted. This is the fun part!

Blowing colors around!

Once all your color is blown around and no longer shows lines or dripped circles, you can stop. Be careful not to overdo it, or your colors will run together too much and get all muddied.

If you make a mistake and don’t like it, you can wipe it off quickly and start over – that’s another nice thing about the Floetrol. Or, if you don’t like a part of the painting, you can add more colors and blow that around to fill in or go over that part.

Step 5: Dry. After I was done with each drawer, I carefully went around the undersides and wiped off the dripping, excess paint with my finger. This helped get rid of the majority of the dripping right away so that I could move them to dry on my counter. I lifted each drawer and kept the top level, making sure they didn’t touch each other in case the drying paint stuck.

As I finished more and more drawers, I paused every now and then to wipe the undersides if I saw drips. After a while I stopped seeing drips altogether, so I just left them alone to dry.

Drawers drying.

I let the drawers dry overnight to be sure they were entirely dry before putting the dresser back together.

Side note: Now is when I poured paint for the top of the dresser. I used the exact same process as I’d used for the drawer fronts, only this was a bigger space. Ruby liked the drips over the sides of the dresser (which she’d painted herself), so I sucked it up and left them be. As I explained above, I would have done the sides of the dresser the same way too. This would have required more time as each side dried before turning the dresser for the next side, but the process would have been the same, repeating the steps above.

Painting the top…with supervision.
Top painted.

Optional step: Apply a clear coat. You could go over the dried paint with a spray-on, clear gloss if you want a protective finish. I opted not to bother, since I’m hoping someday to talk her into letting me do the sides. 😉 But, it would help to protect the paint and also to give the dresser a nicer finish.

Step 6: Return hardware. I used the same knobs I’d used before, but you could always change it up if you like.

After putting the drawers back in place, the dresser was finished! This certainly is a fun way to add some color to a bedroom, and it completely changed the look of the boring white, banged up dresser. My daughter also really likes that she can switch which drawers go where, changing the look even more if it gets too “boring” in this current configuration…which I don’t see as a likely issue, but what do I know? 😆

AFTER: Color splash dresser!


DIY Must-Have Lists
Click to see more!
Click to see more!
Click to see more!
Posted on Leave a comment

Easy Painted Glass Windows

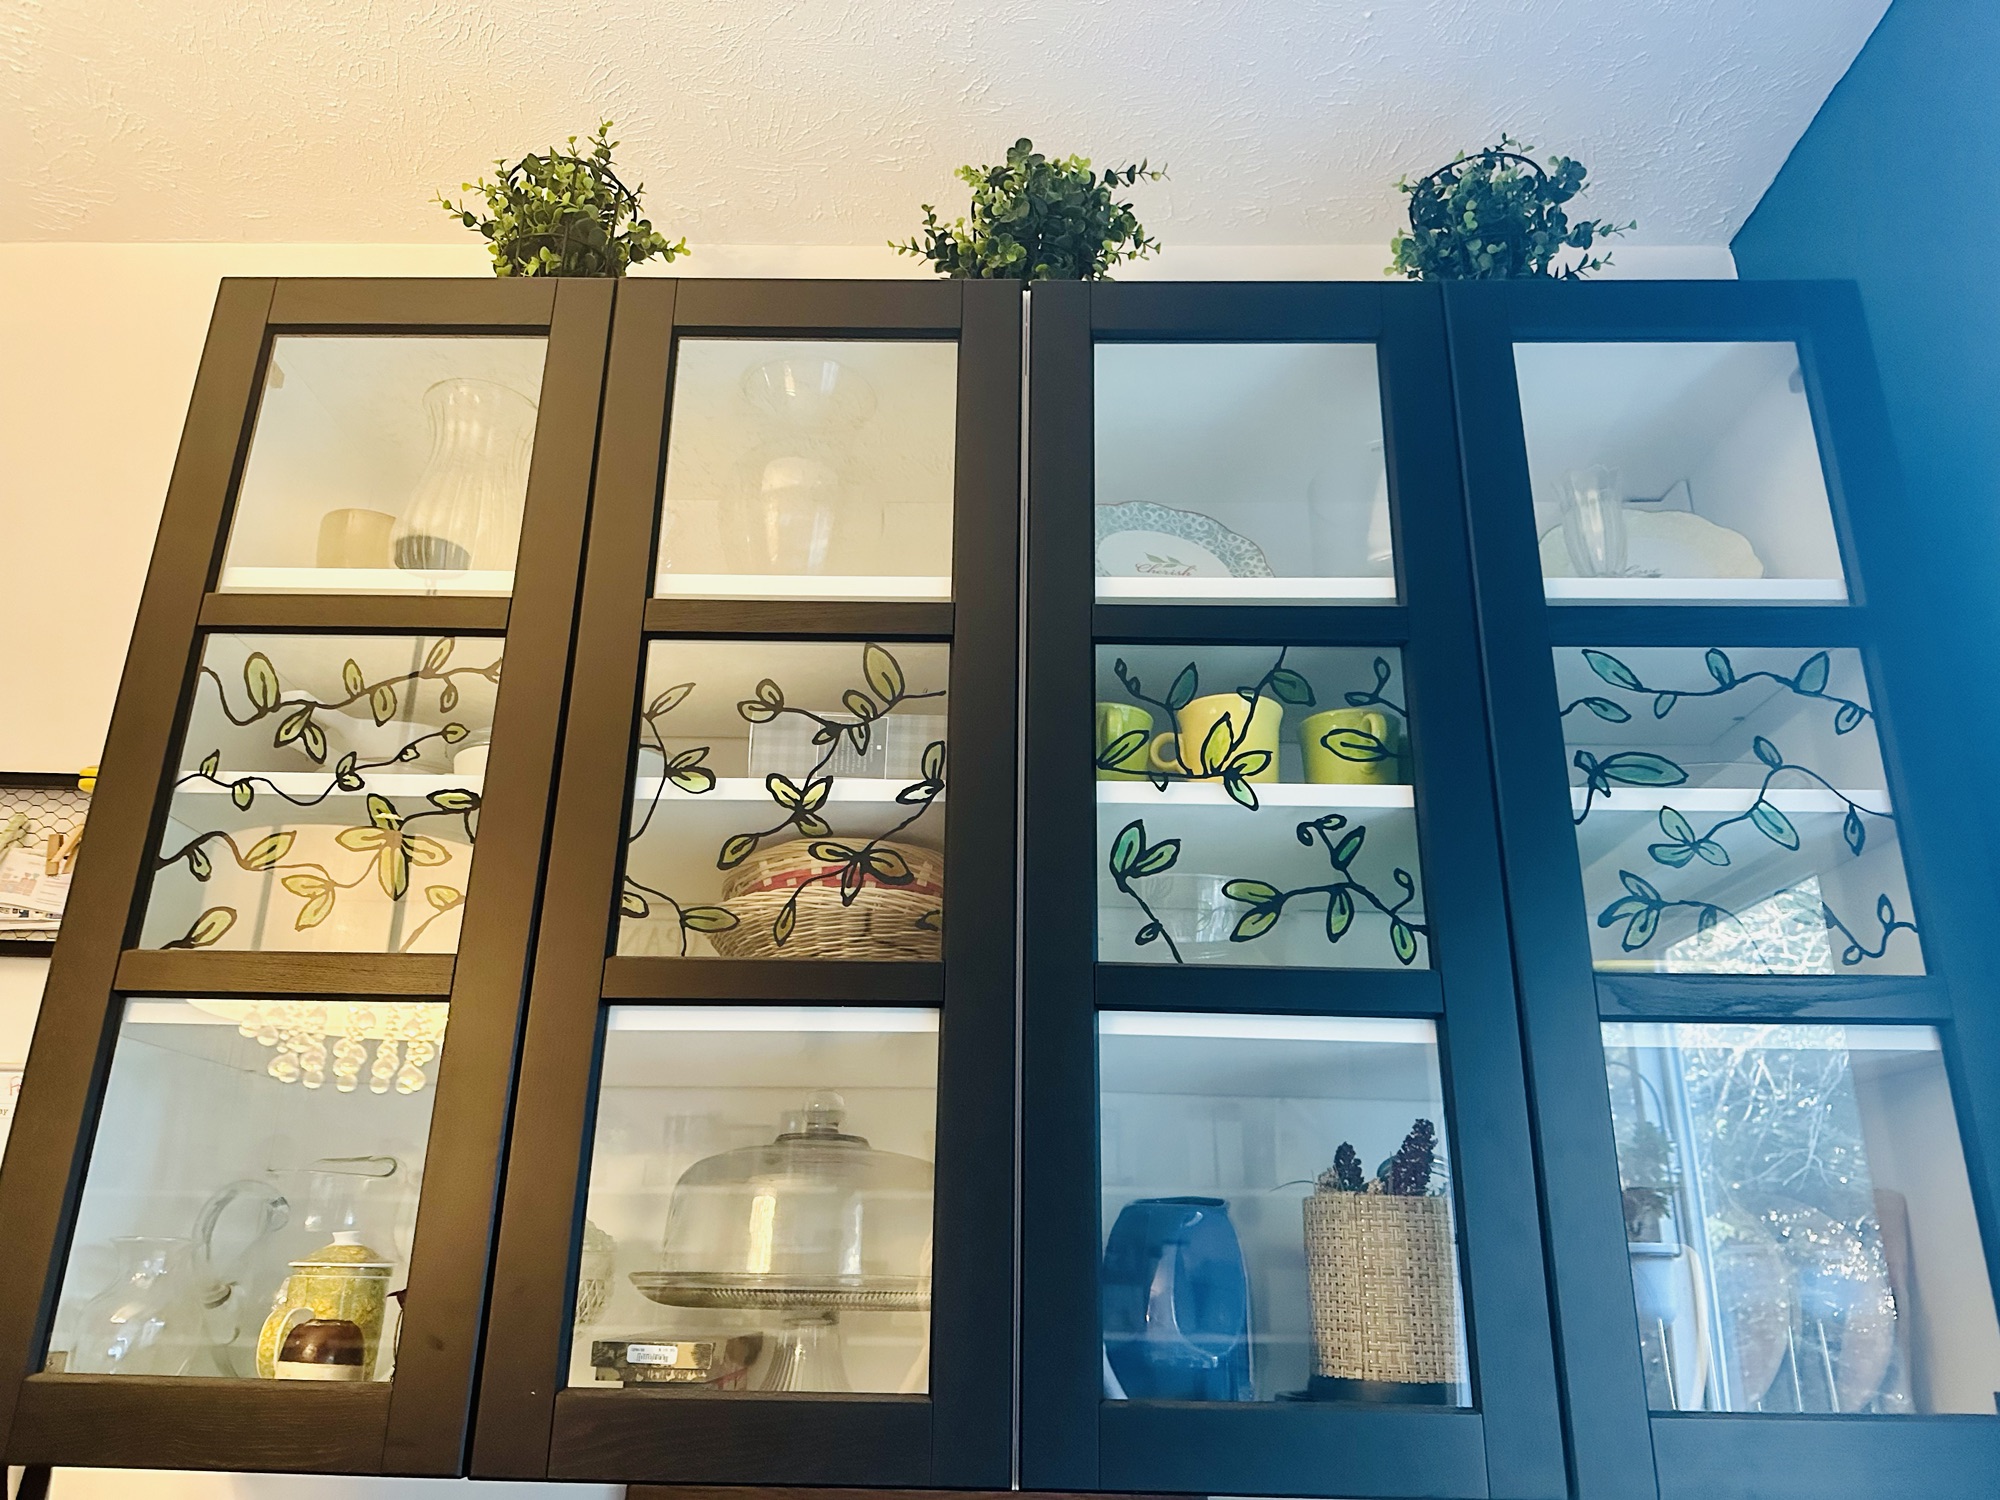
A looooong time ago, I came up with a way to decorate my pantry’s glass cabinet doors so that they looked kind of like stained glass — temporarily. They’ve been like this for so long that I knew I liked the design, so I decided to make it more permanent. The old method (See my post “Faux Stained Glass for Windows or Cabinet Doors”) was done by painting Saran Wrap and then taping that to the backside of the glass door. But now, I’d paint directly on the glass. This is a much better look if you decide you want it to be permanent, because it eliminated the plastic crinkles of the Saran Wrap that you can see from the front.

BEFORE: Temporary version.

I put this off for so long largely because I thought I’d have to take the doors down in order to paint them for real, but after painting vases vertically (see how I did that at “Faux Stained Glass Vase”), I realized the liquid leading didn’t drip like I’d thought it would! This meant I could leave the doors in place and just paint them as they were. I didn’t even have to empty the cupboards at all. Phew!!

Supplies:

(As an advertising affiliate and Amazon Associate, I earn a small commission from qualifying purchases. But it doesn’t cost you anything extra and helps me keep up my site!)

Step 1: Clean the glass. It was very easy to remove the painted Saran Wrap that I’d taped to the inside of the cabinet door, so again I can safely recommend that method if you just want something temporary. Once those sections of wrap were off, I gave the inside of the cabinet doors a quick wipe, but they weren’t that bad. Just be sure that you remember you’re doing this on the INSIDE of the glass doors…though I suppose you might as well feel productive and clean the outside too.

If you’re doing this on real windows (and I’m already looking around my house for options 😜) then you definitely want to give them a good quick wash with Windex or whatever. You don’t want a bunch of dust stuck on the glass while you paint. And remember, this will only work on the INSIDE of the windows, because you don’t want the paint getting ruined by the elements outside.

Step 2: Draw outlines with liquid leading. Again, it’s probably best to do this on the inside of the glass doors, so as to keep your work safer from everyday handling of the doors. So, you’ll want to open the doors and work on that side.

Ready with the liquid leading.

For my vases, I’d painted with the colored glass paints first, but here it seemed smarter to make my outlines first. That way, the black would show up best on the front side of the doors, and the color could slob a little on the black without showing from that side.

Anyway, I tried to make the stems and leaves look like what I’d done temporarily on the Saran Wrap before, since I’d liked that design so much. It helped a lot to stand on a chair so my arm didn’t get tired, but it didn’t take me too long to draw my design with the liquid leading. As with my vases, it didn’t drip, I could wipe it off quickly if I messed up, and it was easy to apply by squeezing out lines as I went.

I did try to get as close to the edges as I could, and it helped that my doors had those black divider sections on the front, so I could go behind those a bit without it being noticeable from the front.

Drawing my outlines.
Outlines drying.

I gave this several hours to dry, just to be sure it wouldn’t wipe away as I used my brush while painting with the colors.

Step 3: Paint with colors! I’d run out of the dark green (Viridian, from my set) that I’d used earlier on the Saran Wrap, but it was easy enough to use the light green first and then add a bit of Cerulean blue to make green leaves – blending these paints looks really pretty when light goes through. I squeezed out a quarter-sized amount of paint at a time and used a small craft brush to paint inside the leaf outlines, not worrying if it got over the black since that would not be visible from the front side of the glass.

The glass paint I used.

Once this was all dry, that was it! The cabinet doors look much nicer now without the plastic crinkles, and the look is now much more permanent, like it was always part of the doors.

AFTER: Finished painted glass doors.

There are SO many different designs you could paint, so let me know if you come up with other great ideas!


DIY Must-Have Lists

Click to see more!
Click to see more!
Click to see more!
Posted on Leave a comment

Painting Fan Blades

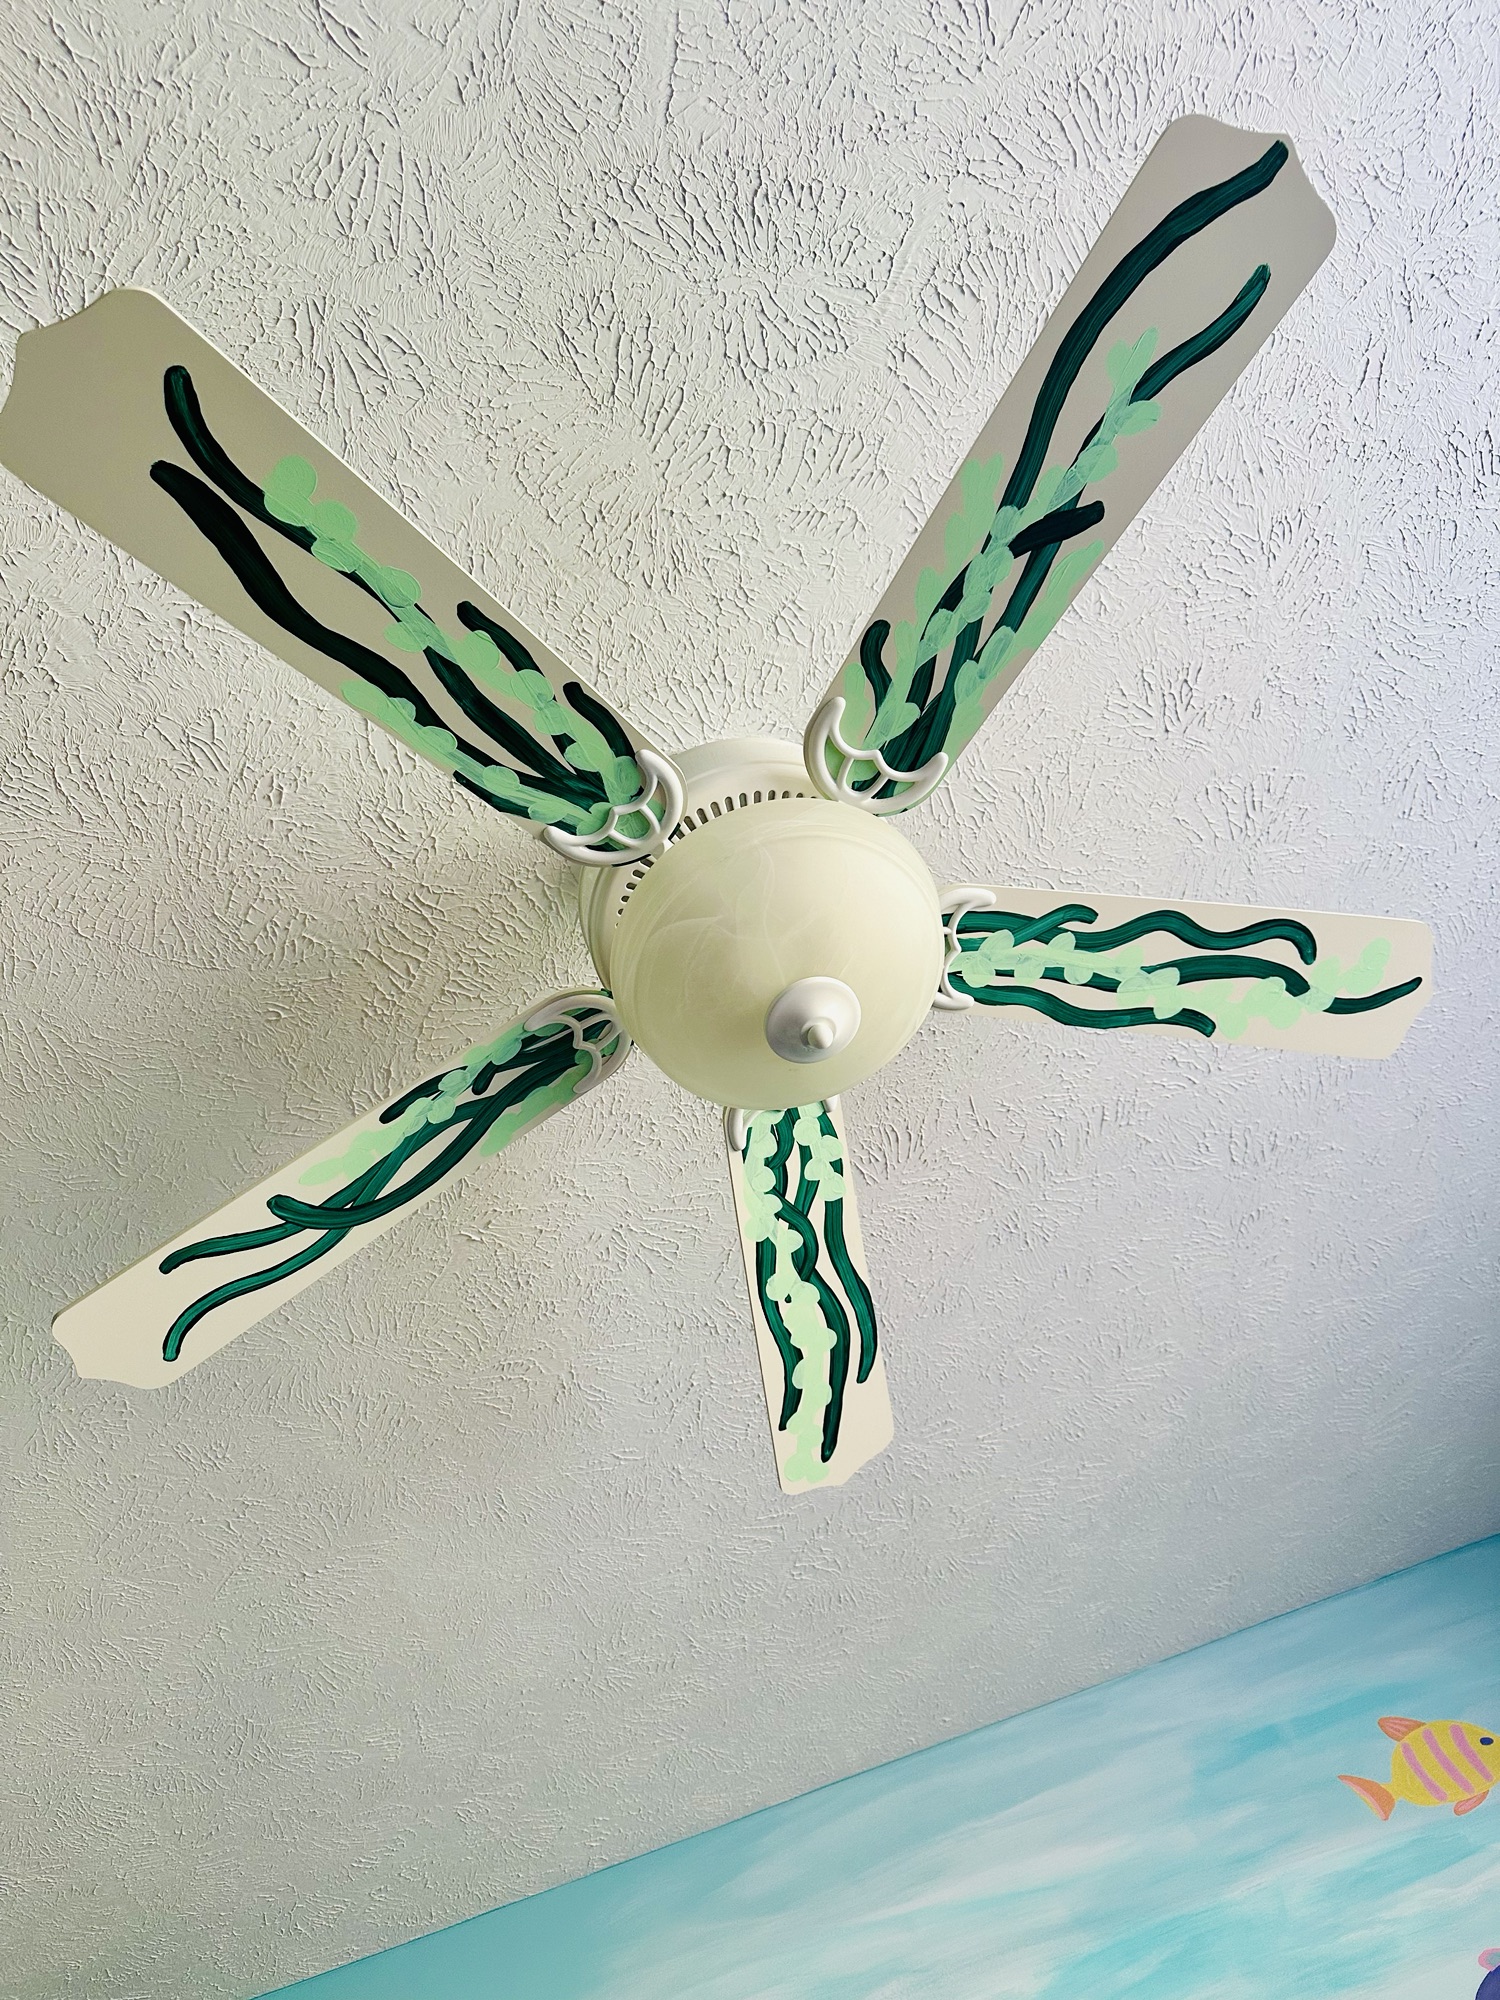
This was the last project for my 6-year-old’s room makeover! She wanted a “kelp forest” ceiling, but after creating a cave over a good chunk of her ceiling, we compromised by deciding to paint her fan blades so that they looked seaweed-y.

Painting fan blades was something I’d never tried before, and it was super easy! This might not be a new idea to anyone, but I can now personally recommend that you give it a go if you’re interested!

BEFORE: Plain white ceiling fan.

Supplies:

(As an advertising affiliate and Amazon Associate, I earn a small commission from qualifying purchases. But it doesn’t cost you anything extra and helps me keep up my site!)

  • Screwdriver
  • Paints

Step 1: Detach fan blades. I suppose I could have painted the blades while they still hung from the fan in the ceiling, but I didn’t want to risk dripping paint. Also, it seemed like my arm would get tired. Plus, by taking them down, I was able to clean them. 😜 I was also glad I’d detached them because, in the end, this meant that the painted portions went under the metal decorative parts where the blades attach to the fan, and that looked pretty cool.

My fan blades were held on by 3 screws each, so I used a screwdriver and simply unscrewed one blade at a some, carefully setting aside the washers and screws to reattach the blades later.

Removing the fan blade screws.

Step 2: Clean the blades. Mine were not real wood, and they wiped down pretty easily with a lightly damp cloth. After removing a considerable amount of dust from the top side of the fan blades, I made sure to use a clean paper towel to wipe and dry off the bottom side, which was the side I’d be painting.

Cleaned and ready.

Optional Step: My fan blades were in pretty good shape – and a nice white color – but you might want to apply a base coat of paint over each blade if they look rough. I considered painting them blue (which would make sense with our “under the sea” theme), but I did not obtain permission for that. You could start with whatever base color you choose, especially if your blades are wood and you really want to change the look.

Step 3: Paint the design. I took 2 different green colors – one dark and one light – to make my seaweed/kelp/plants. My dark green was a latex paint, and my light green was acrylic. Both adhered just fine. I started with my dark green and made long, weedy, wavy lines. Once that dried, I took my lighter green and painted more leafy-looking plants. I didn’t want to overdo it, so I stopped there…

Dark green painted.
Light green added.

You could do really pretty flower designs, abstract shapes, stripes, or really anything! I have a feeling I will end up painting my other daughter’s fan too, so let me know if you come up with any great ideas!

Step 4: Reattach the fan blades. Once the paint was dry, I took the blades one at a time and lined up the holes to screw the washers and screws back in place. I did find it was easiest to start with the screw nearest where I was standing between the blades, secure that one first, and then have everything stable to screw in the screw closest to the actual fan.

Screwing the blades back on.

That was it!

This was incredibly easy, and the painting possibilities are endless!

AFTER: Painted seaweed fan!


DIY Must-Have Lists

Click to see more!
Click to see more!
Click to see more!
Posted on Leave a comment

Easy Closet Shoe Shelves

Growing kids have growing feet, and we have a lot of shoes around here. Somehow, it’s almost impossible to keep both shoes of a pair in the same room of our house (why?!), and shoes become invisible once in a pile.

BEFORE: Empty closet nook. Pile of shoes.

So.

For anyone who doesn’t want to buy those shoe racks that sit at the bottom of a closet (which take up floor space, are difficult to see if hanging clothes are in the way, and unfortunately encourage kicking off shoes “near” the shelves on the floor), here was my DIY solution. It also allowed me to make use of that weird nook space inside the side of the closet. This project was very easy, very quick, instantly useful, and WAY better than piling shoes on the floor.

Supplies:

(As an advertising affiliate and Amazon Associate, I earn a small commission from qualifying purchases. But it doesn’t cost you anything extra and helps me keep up my site!)

  • Wood boards, about 1x12x36 inches
  • Paint or stain
  • L-brackets and screws

Step 1: Measure and mark shoe shelf placement. I initially thought I’d put a shelf pretty low, but then I realized it might be good to leave a decent amount of space between the floor and the underside of the lowest shelf. For now, my daughter can put her dirty clothes basket under there. When she’s older, she could put taller boots and heels on the floor as if it’s the lowest shoe shelf.

First, I found a stud along the back wall. Mine was about 8 inches out from the corner. If you don’t have a stud where you’re putting your shelves, you can just use wall anchors, which is what I had to do on the other side between the closet door and the corner. It really doesn’t matter if the two marks are the same distance from the corner or not – it might even help if they’re spaced a bit differently to help balance and support the shelf.

Once I had that stud marked 8 inches from the corner, I decided on 18 inches up from the floor. Like I said, I wanted a pretty good space between the shelf and the floor. If you want to run a lot of shoe shelves up the whole side of your closet (I would if this was MY closet), you could start lower to really commit that side of your closet to shoes.

Marking for bracket placement.

With that lowest shelf’s placement figured out, I decided to put the next shelf 10 inches up from the first. Easily enough, I measured 10 inches straight up from each wall’s marks.

If you’ve got more shelves to do, just keep going up! I’d personally change up the spacing to allow for different kinds of shoes – flats on shorter shelves, heels on higher shelves, etc.

Step 2: Attach L-brackets. With my wall marks done, I took my drill and a screw, held my first L-bracket over my back wall’s mark, and drilled the bracket onto the wall, into the stud. My bracket only required 2 screws, so that was easy!

I then went to the other side where the shelf would run across the side of the closet and repeated this for that wall’s L-bracket, only this time I needed to add a wall anchor first. Finally, I did the next shelf’s brackets the same way.

Back wall brackets on.

I will say that, if you plan to put a lot of really heavy shoes on your shelves, you might want to add a bracket on the side wall too, near the center of where your shelf is going to sit. But really, just these two brackets hold the shelf pretty stable, and that’s also why it helps to drill into a stud.

Step 3: Find and/or cut wood for a shelf. I’m running out of scrap wood, but I do still have a bunch of cabinet doors. With an unusual degree of luck, I had 2 cabinet doors that were exactly 35 inches long – just what I needed to go across the side of the closet! They were 11 inches wide, too, which fit perfectly and would be wide enough to fit even grown-up shoes once my daughter’s feet get to that point.

If you have nice 1×12 pieces of wood, that would work nicely too. Just be sure to measure your space’s width and length, and cut the wood accordingly.

My daughter decided that she wanted her shelves bright yellow, so I painted them quickly before moving on. If you use real wood, I think staining them would look really pretty…or paint them, or wrap them in contact paper – anything goes!

“Shelves” ready for painting.

Step 4: Attach the shelves to the L-brackets. To be sure I could get the drill under the shelf, I started with my top shelf first so that the lower shelf wouldn’t be in the way. Taking 2 little screws, I placed the shelf on top of the highest brackets and drilled the screws through the top of the bracket into the underside of the shelf. Repeating this for the other end, my top shelf was secure!

I lay on the floor and repeated this for the lower shelf.

Bracket screwed into shelf.

That was it! Like I said, this was extremely easy. It’s a great use of that goofy space at the end of a closet, it still leaves the floor free for other uses, and it’s SO much easier for my daughter to store and find her shoes. It’s also low enough that there is still plenty of room to hang clothes on the far end of her closet system, too.

Now, I just have to talk her into taking the stickers off the walls. 😬

AFTER: New shoe shelves!


DIY Must-Have Lists

Click to see more!
Click to see more!
Click to see more!