At the risk of spoiling Christmas gifts, here’s how I took plain bowls and decorated them. This was a pretty easy and fun way to make gifts for people, so here’s a Christmas gift idea if you’re looking!

I first heard that you could decorate these bowls using markers, but I experimented and didn’t really like the stroke marks that markers created. Instead, I used acrylic paint pens, and these worked much better to get brighter, sharper color and smoother, more “liquidy” strokes. What works best might depend on what kind of bowl you use – wood, ceramic, etc. – but these were made from bamboo fiber materials, and acrylic paint pens worked best for me to get the results I wanted. 🤷♀️I really like these bowls because they’re eco friendly, the lid stays put and doubles as a cutting board, and they come with two serving utensils, so you’re giving someone a nice set rather than just a plain bowl, too.
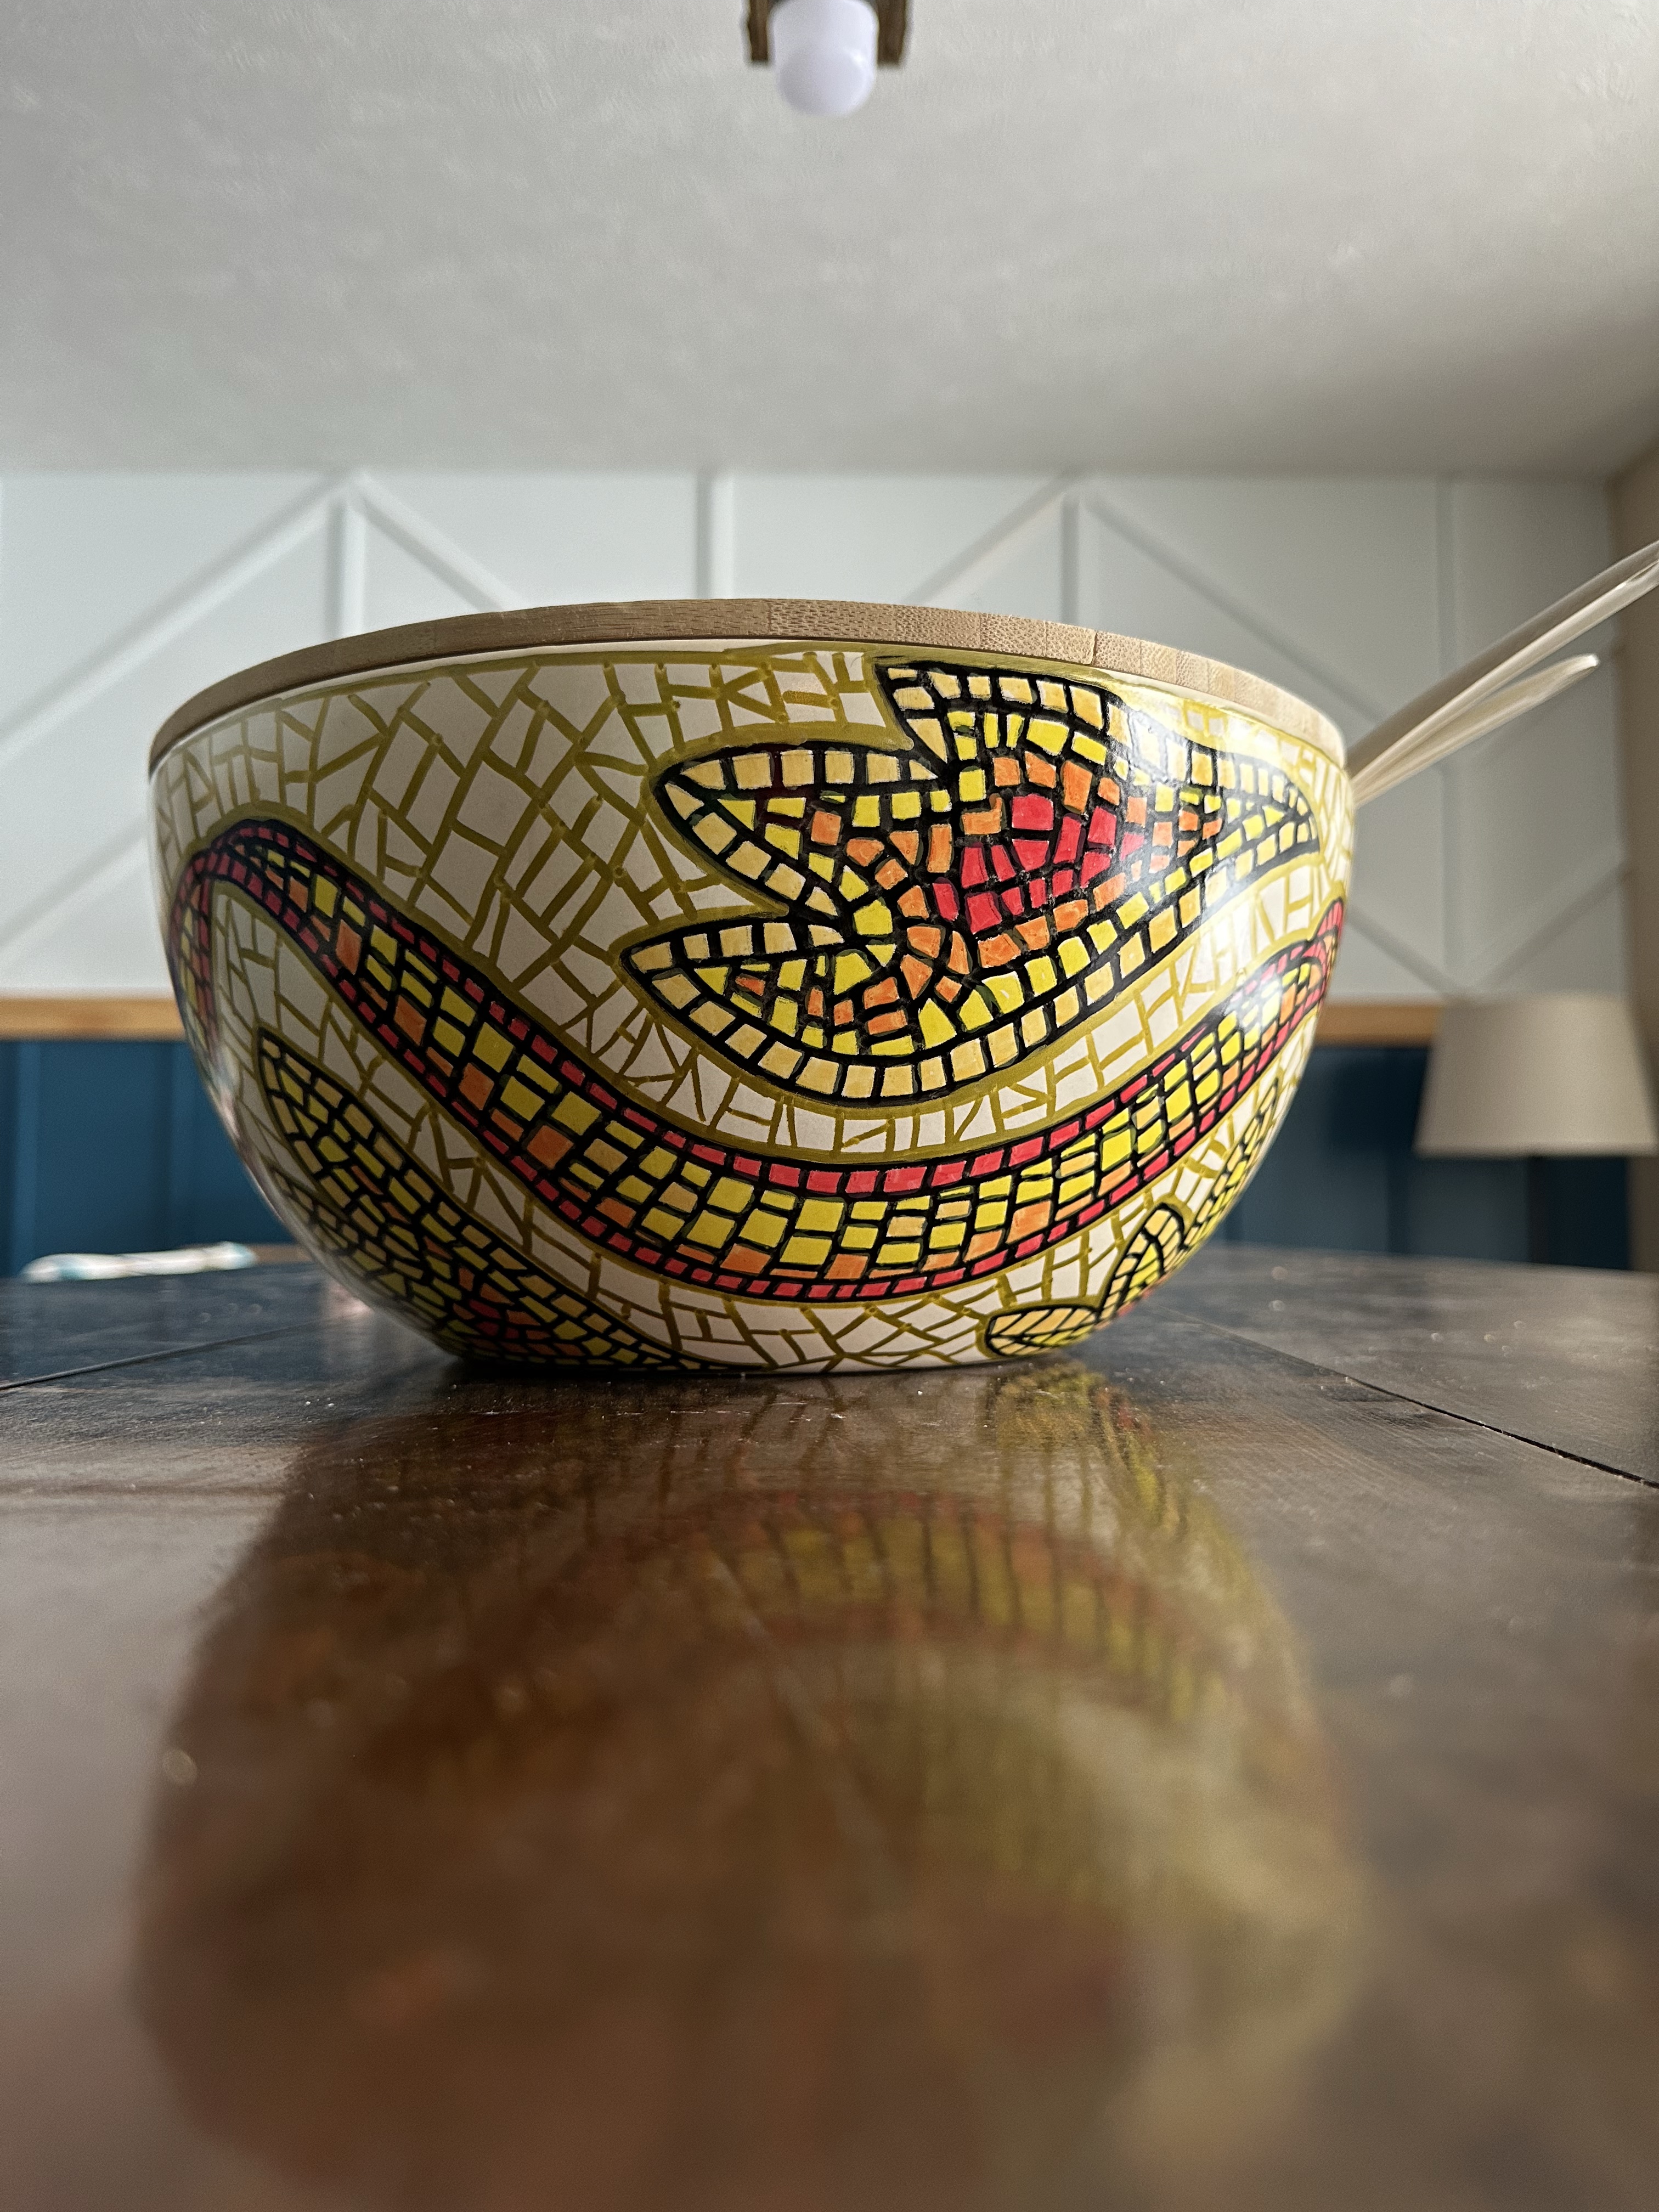
I got it in my head that I wanted to do mosaic patterns around the bowls, and this was probably more time consuming than if I’d drawn/painted normal pictures or shapes. But I think the end result looks pretty cool, and it looks a little fancier than just drawing straight flowers on a bowl (something I’d done first to 2 other bowls).
So here’s how I made “mosaic” art on these decorate bowls!
Supplies:
(As an advertising affiliate and Amazon Associate, I earn a small commission from qualifying purchases. But it doesn’t cost you anything extra and helps me keep up my site!)
Step 1: Sketch the plan. In order to be sure my design would be evenly spaced between top and bottom as well as matching up as I worked around the bowl, I took a pencil and outlined my basic plan. This was way easier once I flipped the bowl upside-down, and that’s how I worked with the bowls from then on. Just remember the bowl is upside-down if you’re drawing pictures and want them to look right once the bowl is flipped back over. 😜

Step 2: Outline. Once my pattern was sketched in pencil, I took a black acrylic paint pen and carefully traced my pencil outline. Then, once sure of my boundaries, I began making my little lines all over to create the “mosaic” look of my design. This is what took time, but it was easy and fun to cross and zigzag and divide my lines to make cool mosaic patterns.

Step 3: (Optional) Fill in mosaic around your main pattern. I gave my black a little while to dry to make sure I didn’t accidentally wipe it as I painted my next step on the bowl. It was also at this time that I carefully scratched a black line and found that it did scrape off a bit, but I’d already planned for this (more later). Just be sure, as you’re adding color, to not drag your hand or scratch over your design – it might smear or scrape off.
Anyway, while the black dried, I stared at the bowl a while and decided I wanted to completely cover it in a mosaic look. But I didn’t want to add more black lines for fear it would just look like I left those blank. So, I took a gold acrylic paint pen (it came in my same acrylic paint pen set) and went to work making lines and patterns all around my main design. I also outlined along the black sections to make them stand out.

I was careful not to cross onto the black outlines, but wherever I goofed I could easily paint back over the gold with black to fix my slob spots.
Step 4: Add color. Satisfied now with my overall mosaic base, it was time to add color. I decided to use red, orange, yellow, and a light peach – again, all from that same paint pen set, so there are lots of color options! Completely at random, I started filling in the mosaic little squares and rectangles with one color at a time, working my way all around the bowl. I started from darkest to lightest, but I don’t think it really matters how you choose to apply the color.

I noticed that, if I accidentally went over the black outline with the lighter colors, this would lighten the black a little bit. But, it wasn’t super-noticeable and seemed to darken again as it dried. If any slobs were too bad, I painted back over them with black. (My 5-year-old told me I did a pretty good job of staying in the lines, which is nice to hear from such an accomplished artist.)

Step 5: Spray on sealer/gloss. In order to give the paint as much time as I could to set and dry, I left the bowl overnight on a high shelf where nothing (ahem, the cat) would touch it.
The next morning, I carefully lifted the bowl and carried it to my better-ventilated craft room to spray on some high-gloss, clear sealer. I used a spare paint can on top of my turntable, then rested the upside-down bowl on top. This way, I could spray from the top of the bowl to the bottom evenly while turning the bowl slowly all the way around.
I did a very light first coat to make sure it didn’t run my paint or leave drip trails.

After the first coat dried (about an hour), I touched it to be sure and also found it was now much more difficult to scrape off any of the paint design. To be sure, though, I gave the bowl another good coat of my gloss spray, again making sure to cover the whole upside-down bowl.
That was it! This wasn’t a particularly difficult craft project, but you can make any design of your choosing to cover these bowls. And with the protective gloss on, they’re sure to stay pretty for a while. I wouldn’t submerge the bowls in water or soap or anything – certainly not a dishwasher – but these bowls would work great as serving bowls for nut mixes (especially with the serving utensils), rolls, popcorn balls, or anything that can be easily wiped out of the bowls after use.

Now to make 4 more before Christmas! Wish me luck! (And follow me on Instagram to see how they turn out…which I’ll post after Christmas, so I don’t spoil the rest of my gifts. 😆)
DIY Must-Have Lists