Posted on 1 Comment

How to Turn a Bifold Door Into Art

A while back, I started working on our upstairs linen closet by making a nice little shelf organizer. I mentioned then that I had an idea for changing up the closet’s bifold door, and now I’ve finally gotten around to it! This was pretty simple once I figured it out, and since I used materials I mostly had already, it only cost me $3 and a quick trip to Lowe’s for the magnetic catch.

Best of all – no more bifold door! (I hate them to an irrational degree. 😜) There are 6 doors in this tiny hall, so making this one look different at least lessens the forest of doors.

BEFORE: Ordinary bifold door.

Supplies:

(As an advertising affiliate and Amazon Associate, I earn a small commission from qualifying purchases. But it doesn’t cost you anything extra and helps me keep up my site!)

Step 1: Uninstall the bifold door and remove the unneeded hardware. First, I reached up to the top track and popped down the little pin with the roller that let the door slide on the track. Then, I moved to the top of the other side and popped down the pin that held that door section on the pivot bracket. This freed the door so that I had to catch it, and I carefully lifted the door’s bottom pin out of the bottom pivot bracket to completely free the door.

It’s important to leave that bottom pivot hardware and the top pivot hardware – these will make the door swing open and closed later. But the first top hardware with the roller is no longer needed because the door won’t need to slide on the track. Also, you need to remove the hinges on the backs that hold the door sections together.

Also, if you have a handle on the door, you need to take that off. (This could be replaced later, but I didn’t want or need one.)

Step 2: Cut door if necessary. My doorframe had a kind of overlap around it to cover the gap between the door and the doorframe. Since a swinging door would hit this, I had to cut my bifold door to make it narrower in order to avoid hitting that overlap. I decided, since my doors were hollow, to cut one inner side and take off about 3/4 inch to make the door thinner. By cutting off the inner side, it would leave the outer sides of the door solid – this would look better and also be more solid for attaching my decorative pieces.

Side note: I could have changed the whole doorframe, but that seemed like a lot of work I didn’t want to deal with. If you want to make a kind of hidden door/bookshelf kind of thing, you could do that too by changing the door frame.

Anyway, I took one of the bifold door sections and ran it through my table saw to cut off 3/4 inch. (If you don’t have a table saw, a circular saw or jigsaw would work too.)

Setting my 2 door sections upside down on sawhorses, I lined them up so that the cut side was on the inside, touching against the solid inner side of the other door section.

Cut and thinned inside edge.

Step 3: Fasten door sections together. To make the 2 sections of the bifold door into 1 solid, swinging door, you just need to put something solid across the backsides of the doors. The easiest way to start this is to use the same hinges that joined the doors before, only now you turn them the other way so they act as solid braces (see picture below). This will hold the doors together, but to really keep them from bending at all…

Taking 3 scrap wood pieces, I put wood glue on each and then used Brad (my nail gun) to nail them in place near the top, middle, and bottom of the door. That really made my 2 doors secure as 1 door now.

Flipped hinge and bracing wood.

(These strips of wood will also be nice if I want to screw in hooks to hang bags or whatever on the inside of the closet.)

Since now is the time to flip the door over so that the front side is on top, this is a good test for how solid the door is.

Step 4: Attach the canvas. You could use real canvas or anything you think will be strong enough not to rip/break. I had an old window shade from my daughter’s room that was pretty long, so I used that. It wasn’t quite long enough, but it was wide enough that I’d have extra to run a strip at the top and bottom to cover the whole door. Since I planned to put decorative wood pieces near the top and bottom anyway, I knew I could use those to cover the seams of my “canvas.”

If you’ve got one big piece to work with, obviously that would be easier. But, this wasn’t a bad way to go if you don’t have something big enough.

After cutting my shade free from the roller, I simply measured so that my main piece would be centered vertically on the door, and then I needed about 6 inch strips at either end.

With this plan, I lined up one side of the shade along the side of my door, making sure that it would be the side of the door that would be swinging open, not the side that would be pivoting. I also made sure the top of the shade was 6 inches down from the top of the door.

Then, I quickly used my staple gun to staple the edge of the shade and hold it in place along the long side. I stapled about every 2-3 inches all along that long side first.

To keep the canvas square, I next stapled along the top, but these I spaced out more because I knew I’d also be stapling the 6-inch strip over it anyway.

Stapled top corner of the canvas.

Next, I pulled the shade tight over the far side of the door and stapled the shade along that side. This way, the shade/canvas would wrap around the door, and these staples would never be seen because it was the pivoting side of the door against the doorframe.

With the shade stapled on, I could now cut the excess off past my staples on the door’s pivot side. Again, this side will never be seen, so I didn’t worry too much about cutting it perfectly straight. I just made sure it didn’t go farther than the back edge of the door.

Stapled canvas on the pivot side.

Next, I took my shade leftovers and lined up a strip to cover the top 6-inch gap. I overlapped my main piece only slightly so it wouldn’t be too thick, and I made sure the end lined up with the edge of the main piece. Then I stapled it on. Once those top staples held the strip secure, I wrapped the strip over the pivot side like I’d done with the main piece, then stapled it into the side and cut off the excess.

For the top of the strip, I wrapped this over the door also. The only difference here was that I had to cut a little away to leave space for the door’s pivot hardware. But it was easy to staple the shade secure around this, and again it didn’t really matter what it looked like because you’re never going to see the top of the door.

Canvas strip wrapped at top.

I did pretty much this exact same thing for the bottom 6-inch gap. I cut around the pivot hardware there too. Again, you’re not going to see the bottom.

Canvas strip wrapped at bottom.

Basically, wrap your door in canvas and staple it on, just don’t wrap the side that you’re going to see when opening and closing the door.

Step 5: Paint your art. This is the fun part, of course. Now that you’ve got this giant canvas, paint whatever you want on it! I’d found inspiration from a painting on Pinterest, and I wanted to use paint colors I’d used elsewhere in the house to tie it all together in our blue and green hallway.

I will fully confess that I spent 3 hours on my first attempt before deciding I didn’t like it and starting over. 🤪 But once I changed out what brush I was using, I began to get the look I was after.

Painting in progress.

Once my painting was dry, I carefully took the door upstairs and replaced it. This meant fitting the top pivot pin in place and also the bottom little pin. This allowed the door to pivot once again, and that’s all it took to hold the door in place so that it would swing open and closed.

Step 6: Make 1×2 decorative pieces. With my door in place, I took a lot of 1×2 scraps and figured out how much I would need to cover the edge along the front of the door where the side of the canvas and the staples showed. This was about 79 inches.

I also needed some to go over the seams at the top and bottom, BUT I made sure I didn’t go all the way to the pivot side of the door because that would get in the way when the door opened against the doorframe. I figured this out by simply opening the door and holding a finger where the doorframe touched the door. Then, I measured across the door to that point – about 18 inches.

I also wanted 2 more strips to go across the door like the top and bottom 18-inch pieces. (More on why later.)

I designed all this to mimic the “picture frame” I’d made for my art on another wall of our hallway. (You can see that tutorial here.) To get the look I wanted, I set my miter saw at 30 degrees and cut a bunch of pieces to make shapes like in the picture below.

Frame inspiration.

With my pieces cut, I sanded all the edges to soften the sharp sides and corners.

Next, I painted the wood pieces a nice “Royal Pine” green color to match the inspirational frame and also my floor. (See that whopper of a floor project here.) I had 2 little girl helpers with the first coat, and then I applied a second.

Painting the little pieces.

Step 7: Attach the decorative wood. When the paint was dry, I took all my pieces up to the hallway closet where the door was waiting. I wanted to attach these in place to be sure it would all fit within the doorframe. And I wanted to use a level and be sure the pieces were attached in straight, level lines if the door hung a little crooked – which, fortunately, it didn’t.

Starting at the bottom, I first attached the piece that went across the bottom seam. To give it extra hold, I used a little wood glue on the back. Carefully, I used a level, held the wood in place, and punched in a few nails with Brad.

Because my knees weren’t ready to stand up yet (lol), I next took a little piece to fit vertically under this crosspiece, filling in the space at the bottom of the door. This piece also started the vertical run along the door’s opening side. I leveled this little piece vertically and nailed it on, making sure it covered the staples and the outer edge of the canvas.

Attaching the first pieces.

With those starters on, I moved to the top and repeated this for the crosspiece over the top seam. Next went the vertical piece at the very top.

From there, I moved up and down between the top and the bottom, adding pieces at each end that matched in size. These met in the middle, and I fortunately had measured correctly so that my pieces met just fine to make a nice straight line all the way up the front edge of the door.

Adding vertical pieces.

Lastly, I measured to find where the last 2 decorative crosspieces needed to go to look even. I glued these again, then used a level to get them exactly right before nailing them on.

Step 8: Finishing fixes. With all these pieces nailed on, I needed to use a little wood filler to hide my nail holes. This was easy but of course looked messy once I was done.

Wood filler applied.

All it took to fix this was quick touchups with my same green paint. (And I painted that one wood end that I’d somehow missed. 🤦‍♀️)

I also ended up painting the side of the door that opened because it looked better and really helped to hide the canvas between the door and the decorative wood edging.

Painted door side.

ALSO, your door might swing open a bit, since the only hardware is on the pivoting side. To fix this, I got a little $3 magnetic cabinet catch and a scrap piece of 1×2. After nailing the 1×2 to the inside of the doorframe, I screwed the catch on the top, then screwed the metal plate onto the side of the door at the same height.

Magnetic catch installed.

This allowed the magnetic catch to hold the door in place when closed, and it’s completely out of the way and barely noticeable because of the baseboard around the door anyway. Just BE SURE to test the placement, and make sure you pick a size that leaves space for your door to open and close correctly.

Side note: If you must, you can put a magnetic catch at the top of the doorframe. I did this for my bifold-converted doors downstairs, and that works too. I just had a bigger gap at the top of this door, so I didn’t want to have to put a bigger piece of wood up there to fill the gap.

Step 9: Add picture frames. This idea had really started my plan in the first place.

While the touchup paint dried, I grabbed 3 spare wooden picture frames and painted them the same green.

When everything was dry, I found 3 small nails and picture hooks. Gently, I hammered them into my top 3 crosspieces, making sure to center the nail placement across the door – so at about 11 and 1/4 inches.

Picture hooks on crosspieces.

Finally, I hung the picture frames on the nails.

All finished, it looks pretty cool, like layers of art but also like pictures just hanging over wallpaper. These frames will be great for hanging my girls’ favorite artwork on display, and it’s somewhere special that can be just for their art but “fancy.”

AFTER: Art door!

I really like how this turned out, and it’s pretty cool that I don’t even need a handle on the door because of the wood. You could add a handle if you wanted, but I thought it would look too busy. And, this way, the whole door hides a bit as a door and looks like an artsy wall nook.


DIY Must-Have Lists

Click to see more!
Click to see more!
Click to see more!
Posted on Leave a comment

Candle Holders from Pop Bottles

Here’s my last DIY project for the year on the last day of 2023!

Once the charm of Christmas is over, I remember how much I dislike the early darkness of winter. (I can practically hear you people making jokes about my name, but trust me – I’ve heard it all. 😆) In my younger/single days, I often left up white Christmas lights all winter to make my living spaces more cozy despite the cold, dark nights. Now, I live with a husband and 2 small children who can’t remember to turn off a room’s “big lights” for anything. So, cozier light is harder to come by these days.

BUT, my girls do enjoy candlelight, and flameless, LED votive candles are a great, safe way to add touches of coziness scattered about where my family is least likely to leave on the house lights. Plus, I get the extra fun of figuring out cool holders for the candles…

Enter my second use for the pop bottles from my last project. I used the top halves of pop bottles to make Christmas bells, and now I found a use for the bottom halves – candle holders!

BEFORE: Empty pop bottles.

Supplies:

(As an advertising affiliate and Amazon Associate, I earn a small commission from qualifying purchases. But it doesn’t cost you anything extra and helps me keep up my site!)

Step 1: Cut bottles in half. If you haven’t done my last project with the top parts of the bottles, then take new pop bottles, wash them, and cut them to whatever heights you like. I’d already cut mine a little lower than halfway down, so those were the sizes that I had to work with. But you could make them as tall as you like, or even cut them at an angle so that the “backs” of your candle holders will be tall with shorter “fronts” to show more light. Really, you can cut them any size or design you like!

To cut the bottles, I found it worked best to stab a knife in to make hole, then use scissors to cut around the bottle. Again, I made mine in as straight a line as I could…especially since I didn’t think of the angled idea until way after. LOL.

Cut bottoms of cleaned bottles.

Step 2: Rim with hot glue. As you’ll see in the following options, there are a few ways I made candle holders. But for each option, I started by rimming the tops of the cut bottles with hot glue. This adds some texture, keeps the cut tops from being jagged or sharp, and makes a “melted glass” looking edge.

Hot glued rims.

And now you pick how to finish!

Option 1: Paint the rims. For a few of the bottles that had flat bottoms, I simply used a paint marker and colored over the cooled/hardened hot glue. I used a metallic gold paint pen, and I like how shiny and pretty this made the rims, leaving the rest of the candle holder clear to see the brightest light.

Glue painted gold.

I filled the base of the bottle/candle holder with a bit of coarse sea salt, partly to look pretty and partly to help the base be heavier. Setting a flameless votive candle in the center, these were done! You could fill your bottoms with different things for these candle holders, since this option leaves the insides most visible. I might change things up and replace the salt with pebbles at some point. Or beads. There are lots of options!

Option 2: Glue the sides and roll in salt. For other bottles with flat bottoms (these were SmartWater bottles), I spread hot glue on small sections at a time and then rolled that side over a plate covered with coarse sea salt. This used a lot of hot glue sticks, but honestly these surprised me in the end and were my favorite.

Rolled in sea salt.

Once the salt was stuck all over (some gaps are fine), I took these candle holders down to my workshop and used a clear gloss spray to coat them. This helped hold the salt in place and also added a crystal-like shine to the salt.

With these dry, I took them back upstairs and again poured some sea salt into the base of each candle holder. (You can’t really see what’s inside these options, so the salt was fine just for adding weight.) Setting a flameless votive candle in the center, these were done too!

Option 3: Make a cork base. The bigger, 2-liter bottles had bottoms that were very obviously pop bottles, so I wanted to hide these bottoms a little better. One way I did this was by using wine corks left over from another project. First, I took a knife and cut them in half, lengthwise. Next, I used hot glue and spread it on each cut cork’s flat side, then pressed the cork against the bottom of the bottle. I did this all the way around the 2-liter base, using 17 halves of corks.

Adding cork base.

Because I only had enough corks left to do a smaller bottle, I did one of those the same way. (I guess we need to drink more wine 😆) But I like having a little variety between the sizes with the same style option, so these 2 together look nice. Once all the corks were on, I again poured in sea salt to add weight to the base. This especially helped on the 2-liter-sized candle holder, since the opening was bigger and you can really see what’s inside. I put more salt in this one than I had in the smaller candle holders, and it looked nice against the cork.

I ended up using my gold paint pen on the top, glued parts of these candle holders as well, just because I liked how that looked better than leaving them plain.

Painting the top of my cork candle holders.

Option 4: Faux moss wrap. On another 2-liter bottom, I went around the top again with a thin bit of glue, then quickly dipped the top in salt. This rimmed the top with texture and a bit of sparkle. I didn’t need to spray these tops with gloss since there wasn’t much salt on there.

Next, I spread hot glue over small sections and pressed on faux moss to cover the bottle’s bottom. I decided to go all over with the moss, leaving only the top exposed where the salt/hot glue showed. This ended up looking woodsy and wintery, and it really looks better in person than in my pictures. I used green moss, but you could do this in different colored mosses too!

Adding faux moss.

Again, I added some salt to the base for weight, then placed in a candle.

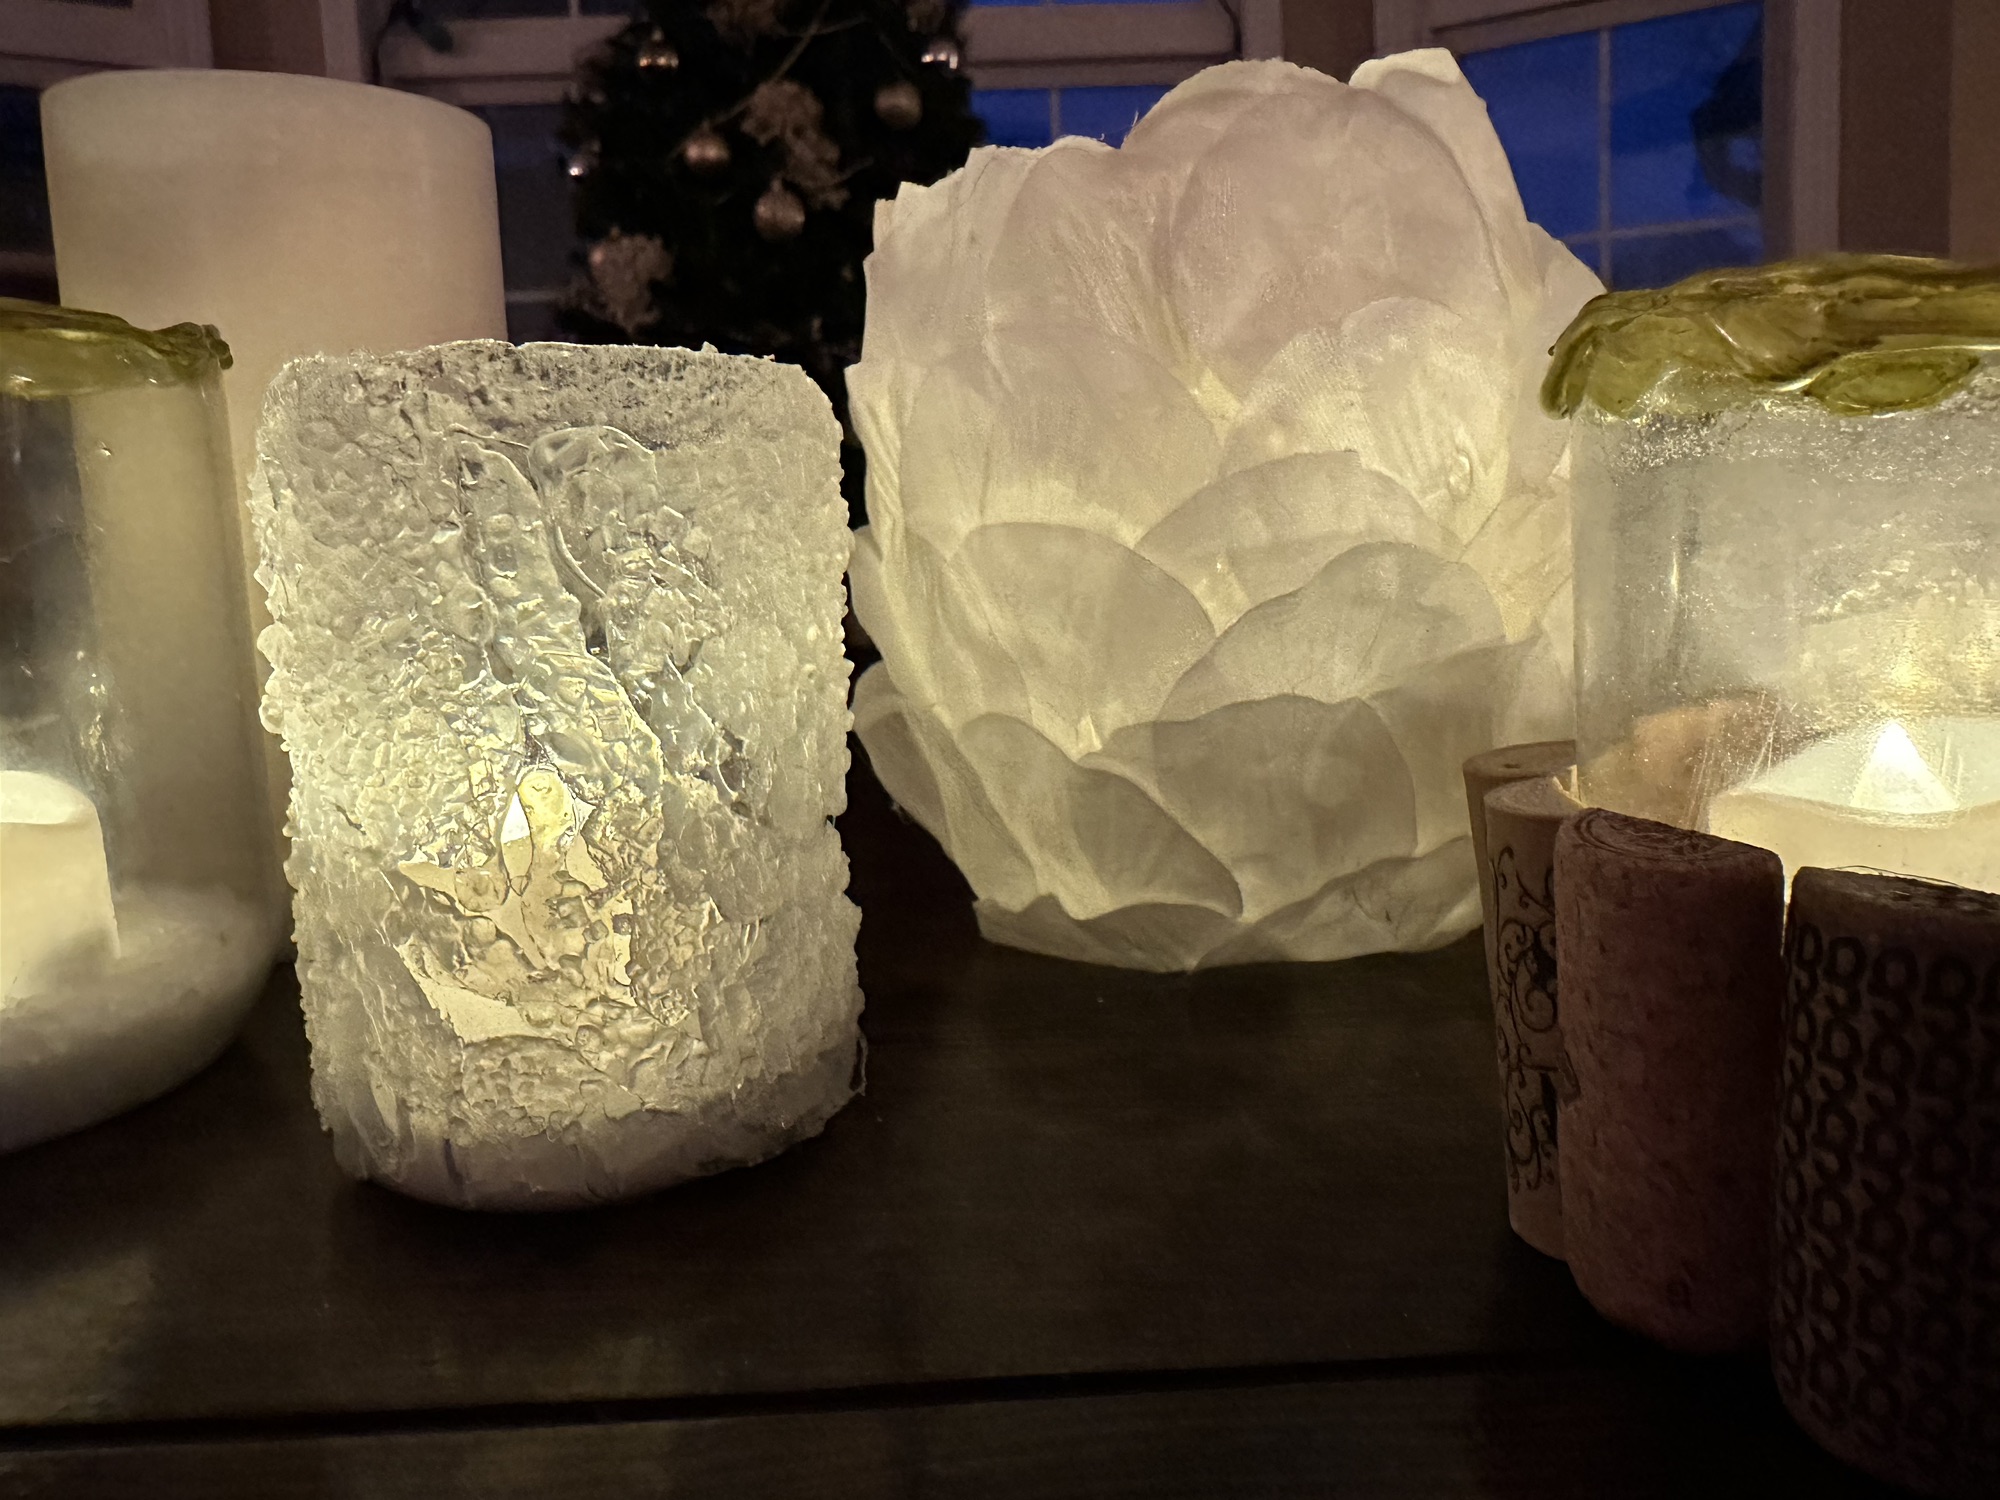
Option 5: Cover in petals. I’ve had these white flower petals for forever and finally had a use for them! Starting at the top of a 2-liter bottom, I put a dab of hot glue on the bottom of a petal and stuck it on so that the majority of the petal stuck up above the edge of the bottle. I continued to do this with petals all the way around the top, overlapping them a bit and gluing them down onto each other if they stuck out too much.

Adding petals.

Once the top layer was on, I went around with a lower row of petals. Then I did another lower layer. Finally, I heavily glued on petals around the bottom.

Petals done!

This petal-covered candle holder already looked pretty, and once I got a votive candle inside… 😍 This one ended up being my second favorite. …I may need to scrounge up more petals and do more!

That was it! I like the variety I ended up with. They looked cool without candlelight inside, and I’m SO glad this plan worked out and they look even cooler with candlelight shining through! 😆

AFTER: A variety of candle holders!
(Left to right) Options 3, 2, and 4.
(Left to right) Options 1, 2, 5, and 3.
Candle holders in action…

I’m sure there are many other things you could stick on the outside of these candle holders too! Beads, sequins, wood sticks – what else can you think of?

One IMPORTANT note: The hot glue might deform the plastic bottles a little bit if too hot. Since I was covering the bottles anyway, this wasn’t much of a problem. But it’s a good reminder that you MUST use flameless votive candles, because real fire will absolutely melt these and be a serious hazard.

I found flickering, LED votive candles on Amazon, and you can buy packs of them for pretty cheap…so I’m certainly making even more candle holders in the future. 😜


DIY Must-Have Lists

Click to see more!
Click to see more!
Click to see more!
Posted on Leave a comment

Decorative “Mosaic” Bowls

At the risk of spoiling Christmas gifts, here’s how I took plain bowls and decorated them. This was a pretty easy and fun way to make gifts for people, so here’s a Christmas gift idea if you’re looking!

BEFORE: Plain serving bowl.

I first heard that you could decorate these bowls using markers, but I experimented and didn’t really like the stroke marks that markers created. Instead, I used acrylic paint pens, and these worked much better to get brighter, sharper color and smoother, more “liquidy” strokes. What works best might depend on what kind of bowl you use – wood, ceramic, etc. – but these were made from bamboo fiber materials, and acrylic paint pens worked best for me to get the results I wanted. 🤷‍♀️I really like these bowls because they’re eco friendly, the lid stays put and doubles as a cutting board, and they come with two serving utensils, so you’re giving someone a nice set rather than just a plain bowl, too.

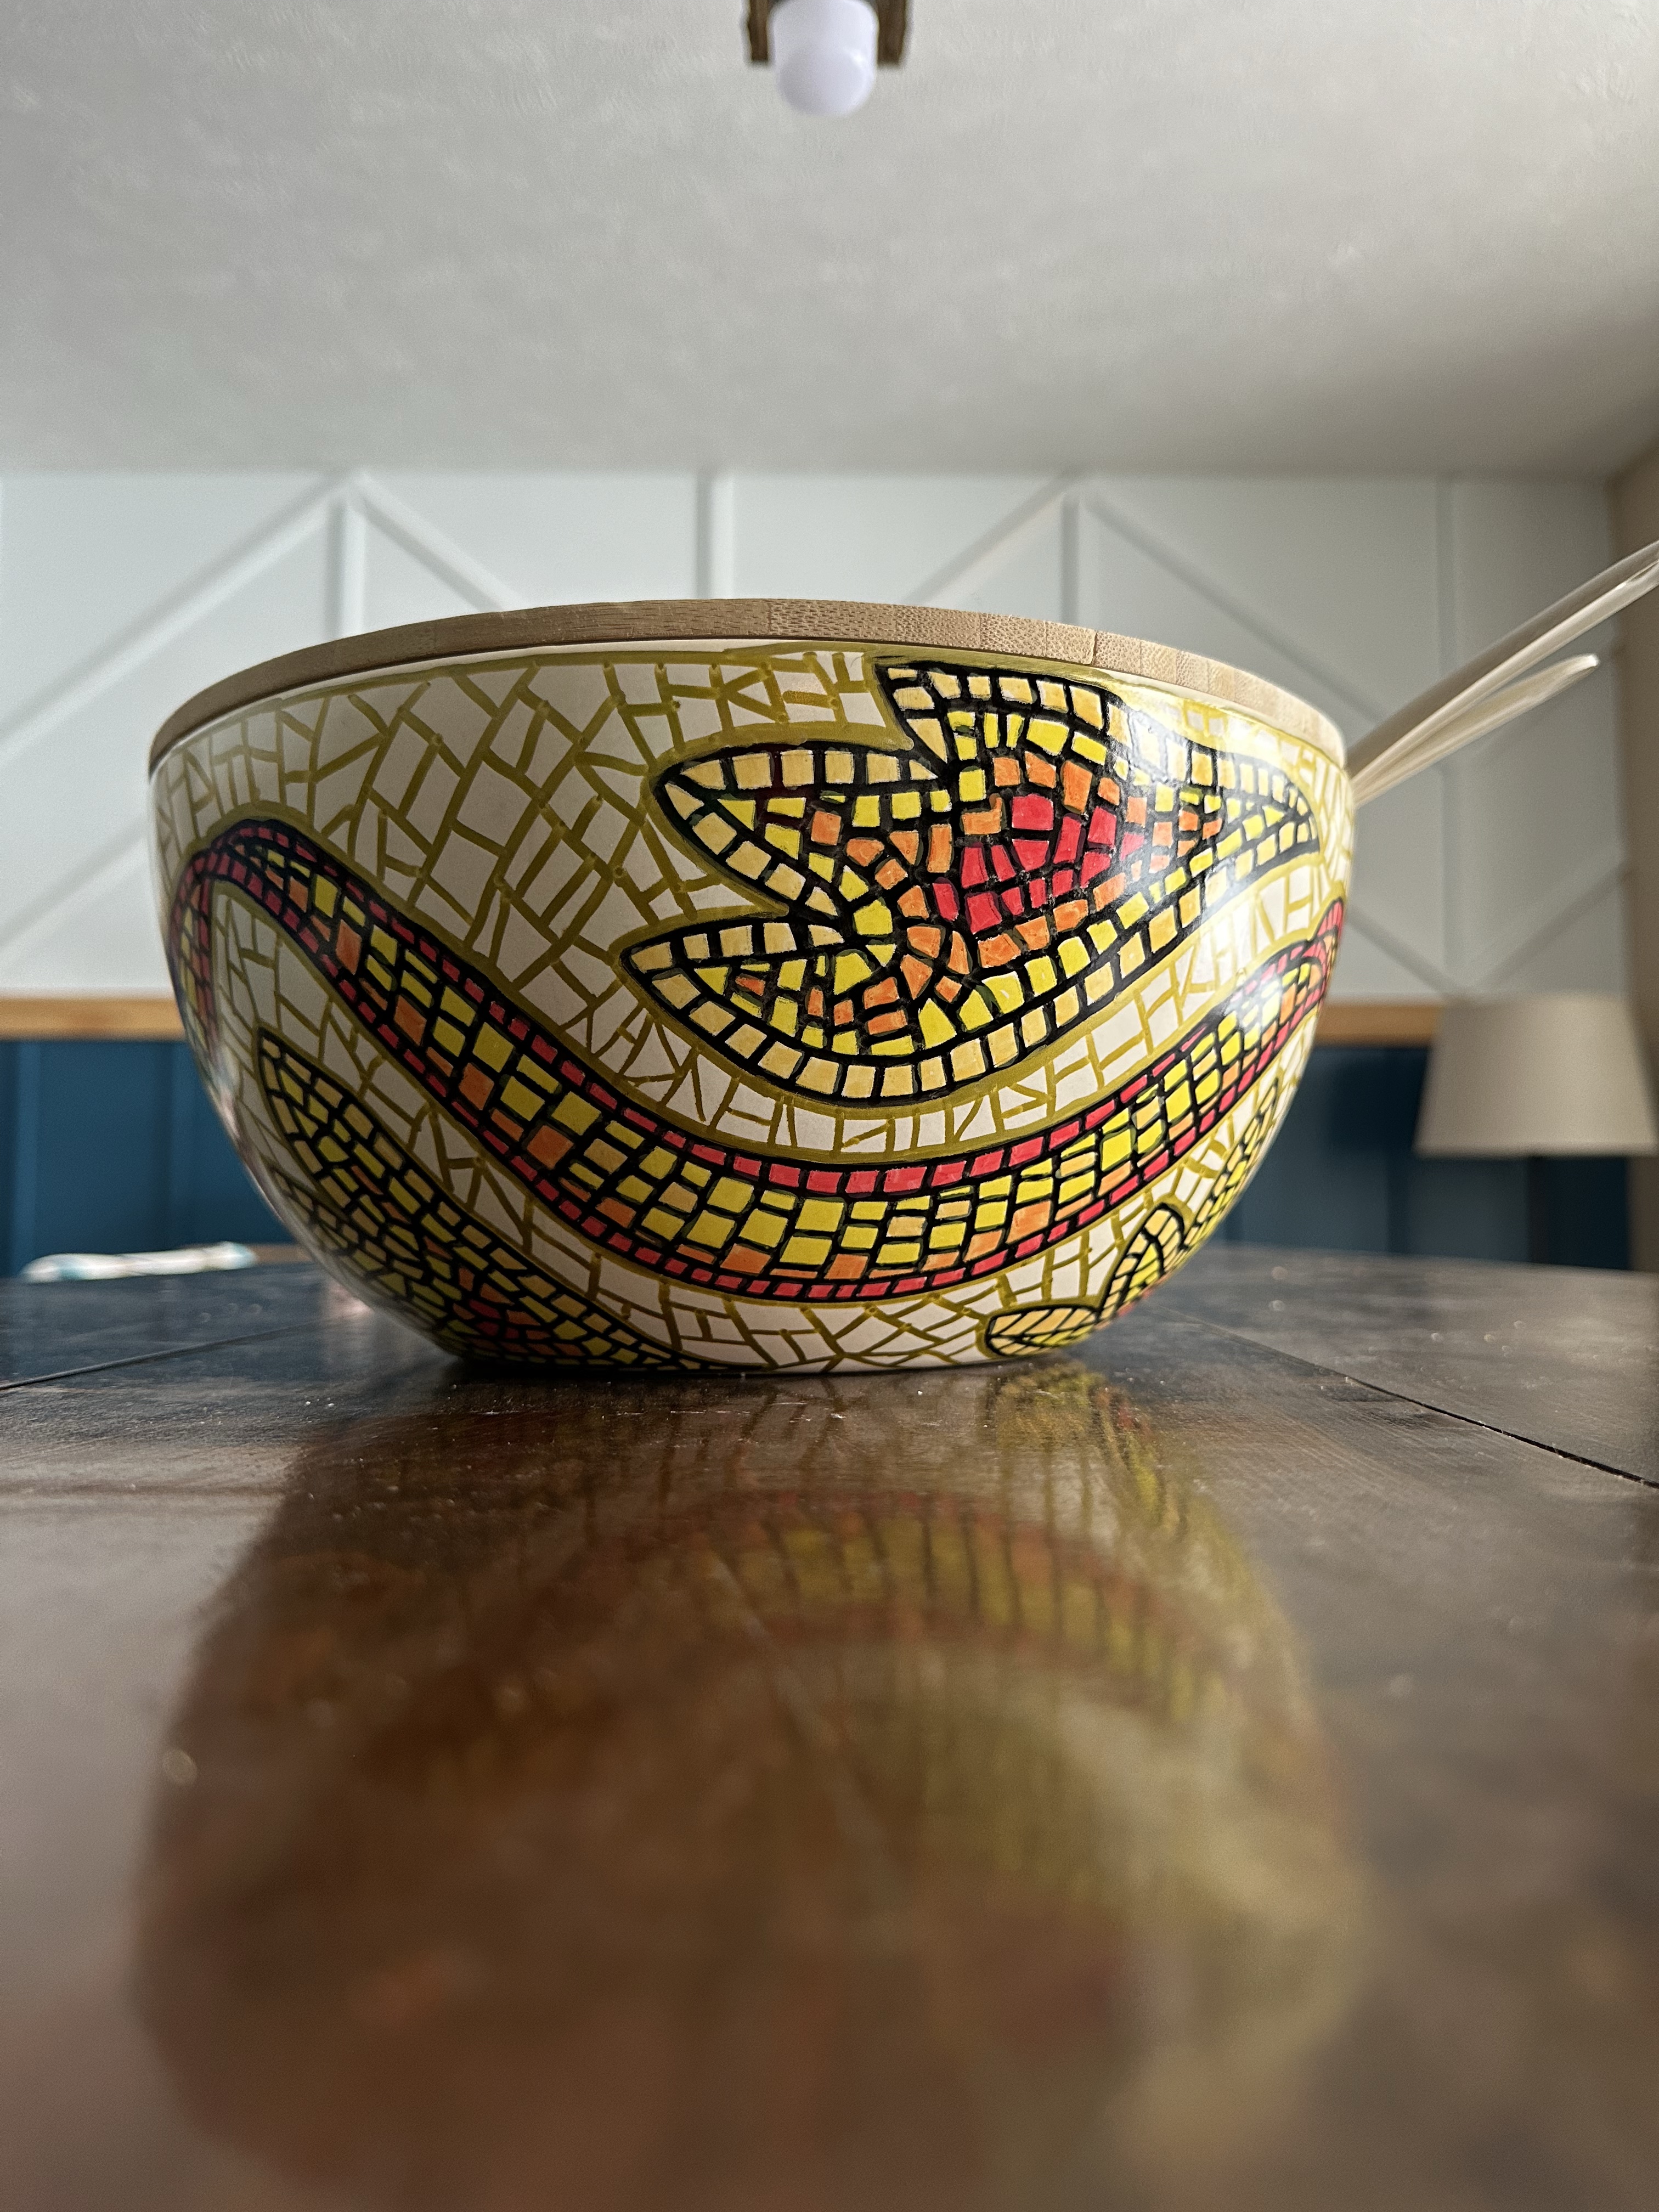
I got it in my head that I wanted to do mosaic patterns around the bowls, and this was probably more time consuming than if I’d drawn/painted normal pictures or shapes. But I think the end result looks pretty cool, and it looks a little fancier than just drawing straight flowers on a bowl (something I’d done first to 2 other bowls).

So here’s how I made “mosaic” art on these decorate bowls!

Supplies:

(As an advertising affiliate and Amazon Associate, I earn a small commission from qualifying purchases. But it doesn’t cost you anything extra and helps me keep up my site!)

Step 1: Sketch the plan. In order to be sure my design would be evenly spaced between top and bottom as well as matching up as I worked around the bowl, I took a pencil and outlined my basic plan. This was way easier once I flipped the bowl upside-down, and that’s how I worked with the bowls from then on. Just remember the bowl is upside-down if you’re drawing pictures and want them to look right once the bowl is flipped back over. 😜

Sketching my plan.

Step 2: Outline. Once my pattern was sketched in pencil, I took a black acrylic paint pen and carefully traced my pencil outline. Then, once sure of my boundaries, I began making my little lines all over to create the “mosaic” look of my design. This is what took time, but it was easy and fun to cross and zigzag and divide my lines to make cool mosaic patterns.

Adding black outlines.

Step 3: (Optional) Fill in mosaic around your main pattern. I gave my black a little while to dry to make sure I didn’t accidentally wipe it as I painted my next step on the bowl. It was also at this time that I carefully scratched a black line and found that it did scrape off a bit, but I’d already planned for this (more later). Just be sure, as you’re adding color, to not drag your hand or scratch over your design – it might smear or scrape off.

Anyway, while the black dried, I stared at the bowl a while and decided I wanted to completely cover it in a mosaic look. But I didn’t want to add more black lines for fear it would just look like I left those blank. So, I took a gold acrylic paint pen (it came in my same acrylic paint pen set) and went to work making lines and patterns all around my main design. I also outlined along the black sections to make them stand out.

Adding gold mosaic lines.

I was careful not to cross onto the black outlines, but wherever I goofed I could easily paint back over the gold with black to fix my slob spots.

Step 4: Add color. Satisfied now with my overall mosaic base, it was time to add color. I decided to use red, orange, yellow, and a light peach – again, all from that same paint pen set, so there are lots of color options! Completely at random, I started filling in the mosaic little squares and rectangles with one color at a time, working my way all around the bowl. I started from darkest to lightest, but I don’t think it really matters how you choose to apply the color.

Adding color.

I noticed that, if I accidentally went over the black outline with the lighter colors, this would lighten the black a little bit. But, it wasn’t super-noticeable and seemed to darken again as it dried. If any slobs were too bad, I painted back over them with black. (My 5-year-old told me I did a pretty good job of staying in the lines, which is nice to hear from such an accomplished artist.)

Color done! Needed some black touch-ups.

Step 5: Spray on sealer/gloss. In order to give the paint as much time as I could to set and dry, I left the bowl overnight on a high shelf where nothing (ahem, the cat) would touch it.

The next morning, I carefully lifted the bowl and carried it to my better-ventilated craft room to spray on some high-gloss, clear sealer. I used a spare paint can on top of my turntable, then rested the upside-down bowl on top. This way, I could spray from the top of the bowl to the bottom evenly while turning the bowl slowly all the way around.

I did a very light first coat to make sure it didn’t run my paint or leave drip trails.

Ready to apply the sealer.

After the first coat dried (about an hour), I touched it to be sure and also found it was now much more difficult to scrape off any of the paint design. To be sure, though, I gave the bowl another good coat of my gloss spray, again making sure to cover the whole upside-down bowl.

That was it! This wasn’t a particularly difficult craft project, but you can make any design of your choosing to cover these bowls. And with the protective gloss on, they’re sure to stay pretty for a while. I wouldn’t submerge the bowls in water or soap or anything – certainly not a dishwasher – but these bowls would work great as serving bowls for nut mixes (especially with the serving utensils), rolls, popcorn balls, or anything that can be easily wiped out of the bowls after use.

AFTER: Decorative “mosaic” bowl.

Now to make 4 more before Christmas! Wish me luck! (And follow me on Instagram to see how they turn out…which I’ll post after Christmas, so I don’t spoil the rest of my gifts. 😆)


DIY Must-Have Lists

Click to see more!
Click to see more!
Click to see more!
Posted on Leave a comment

Custom Turntable for Craft Supplies

To say our girls love art is a huge understatement. To say they make a mess is an even bigger understatement. I’d initially planned to make their art space in our basement, but I don’t want to kick them out of our kitchen/living room (where all the action is). It’s their house too, after all.

Despite many promises to pick up their scrap paper and put caps on their markers, our kitchen island daily looked like the picture below. It was both a constant mess AND the girls couldn’t find anything. So how was I to fix this?? (And to be honest, I took this picture on a good day. 😆)

Continue reading Custom Turntable for Craft Supplies
Posted on Leave a comment

Floating Frame Fall Art

Confession: I still had my Spring decorations up until about an hour ago. 😆 But now that summer is cooling and there’s pumpkin spice in the air, I decided it was time to move away from bright flowers and put up some seasonally appropriate décor. Our front door in particular has been naked and in need of some color, so I pulled together a few craft supplies and got to work.

Continue reading Floating Frame Fall Art